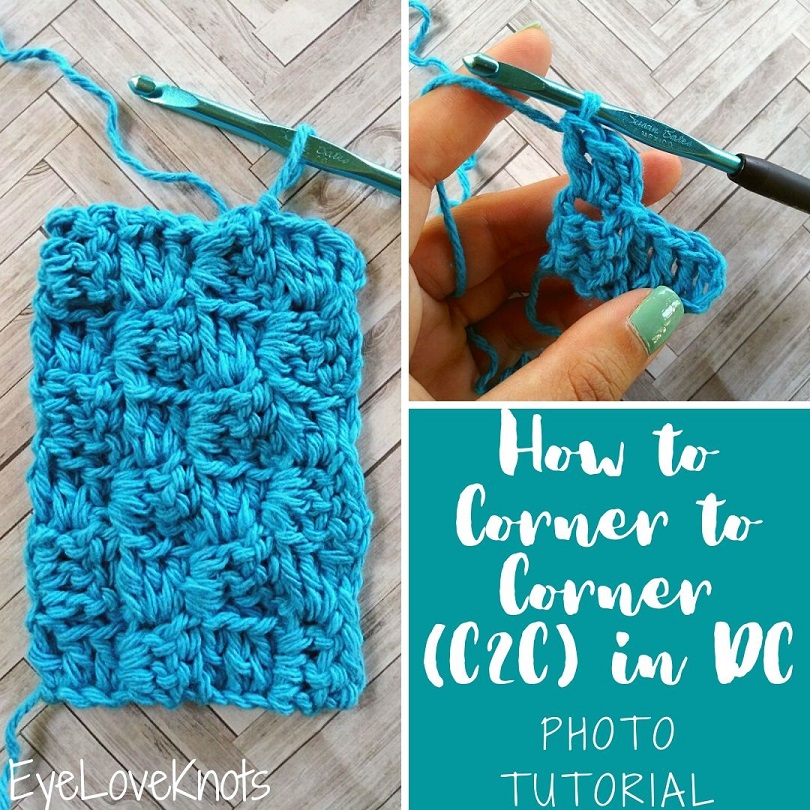
How to Corner to Corner (C2C) in Double Crochet (DC) with photo tutorial – a very easy, beginner crochet stitch pattern.
This post contains affiliate links for Amazon. If you make a purchase by clicking on them, I make a small commission at no extra cost to you. Thanks for your support!
When the Corner to Corner (C2C) trend first started, I was hesitant to join in – only because it was everywhere.
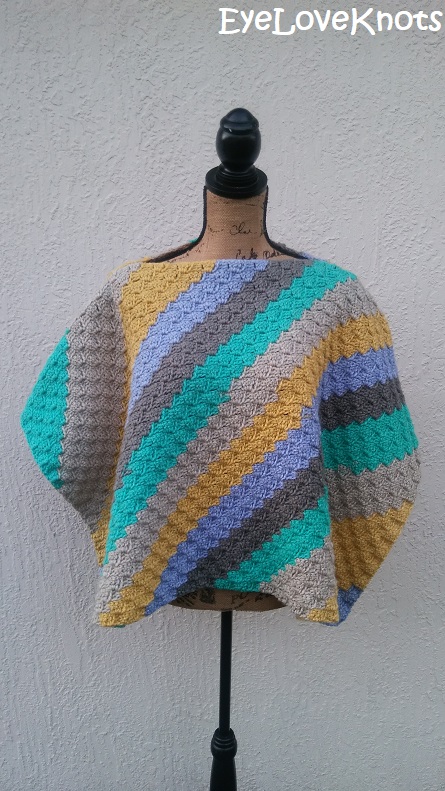
My very first C2C project was my C2C Poncho (Free Crochet Pattern), which was actually designed for a magazine issue of the C2C theme. For the poncho, I wanted to use C2C stitch pattern in a more out of the box way, and I just LOVE how it turned out! And ever since, I have been hooked.
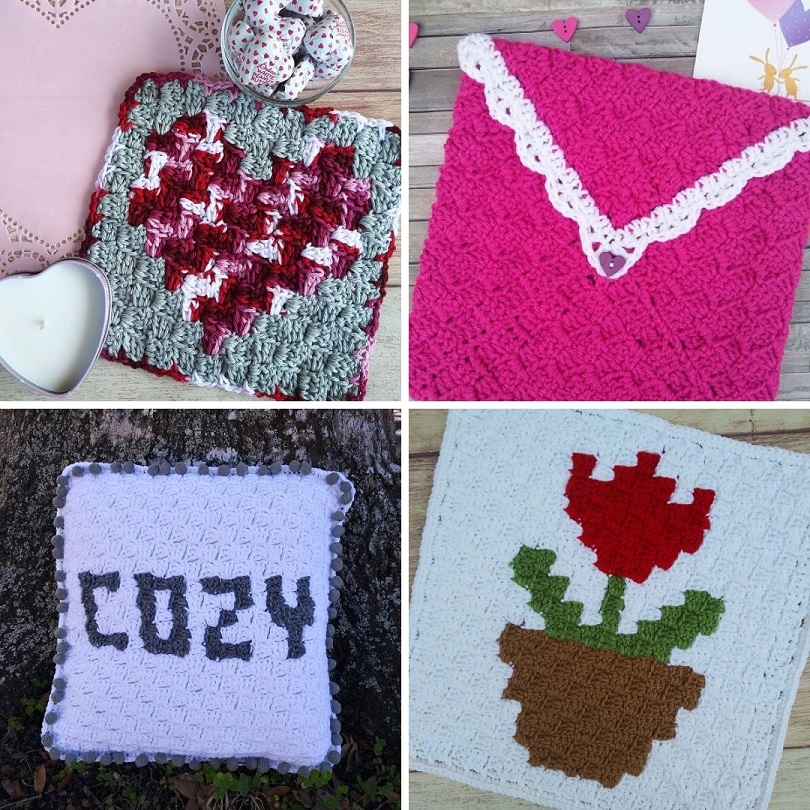
C2C is such a fun stitch pattern, and perfect for creating patterns and images, especially if tapestry isn’t your thing. These are just a few of my designs working in double crochet boxes: C2C Valentine’s Washcloth, C2C Valentine’s Envelope, C2C Cozy Throw Pillow, and C2C Potted Tulip Square.
I’ve named this series Colin Drew. Find more Colin Drew accessory and home decor crochet patterns here on EyeLoveKnots, and Colin Drew accessory and wearables crochet patterns over on Cre8tion Crochet.
Prefer working C2C in half double crochet boxes? You’ll love my Colin Harper series!
For this tutorial, I am using Lily Sugar n Cream in Mod Blue, and an H8/5mm hook, and I will be working a rectangle that is 4 boxes wide by 6 boxes in length.
I am not creating anything new here, but I did take the time to take the photos, edit them, and put this tutorial together, so please respect my work. Do not pin or share any of the tutorial images – just the main photo. Provide the link for others to find my page (help out me and my blog with the traffic). Do not copy and paste my work anywhere. Thank you!
What is Corner to Corner?
Corner to Corner (abbreviated as C2C) is a pattern built on boxes that are worked diagonally, and stacked on top of each other. You begin with the far bottom corner, and one box, then the next row is worked diagonally on top of that with two boxes, then the next row is worked diagonally on top of that with three boxes, and so on until the desired size is reached, then you work less boxes in the same manner to decrease back down to one box, ending at the opposite corner of where you started.
A box is comprised of four double crochet’s (when working in double crochet).
There are two ways you can C2C with boxes – 1.) in Double Crochet; 2.) in Half Double Crochet. In this tutorial, we will be covering the double crochet version – all you need to know to work this stitch pattern is How to Chain (Photo Tutorial), and How to Double Crochet (Photo Tutorial). If you want to learn to C2C in Half Double Crochet, check out my photo tutorial HERE.
C2C in HDC Versus C2C in DC
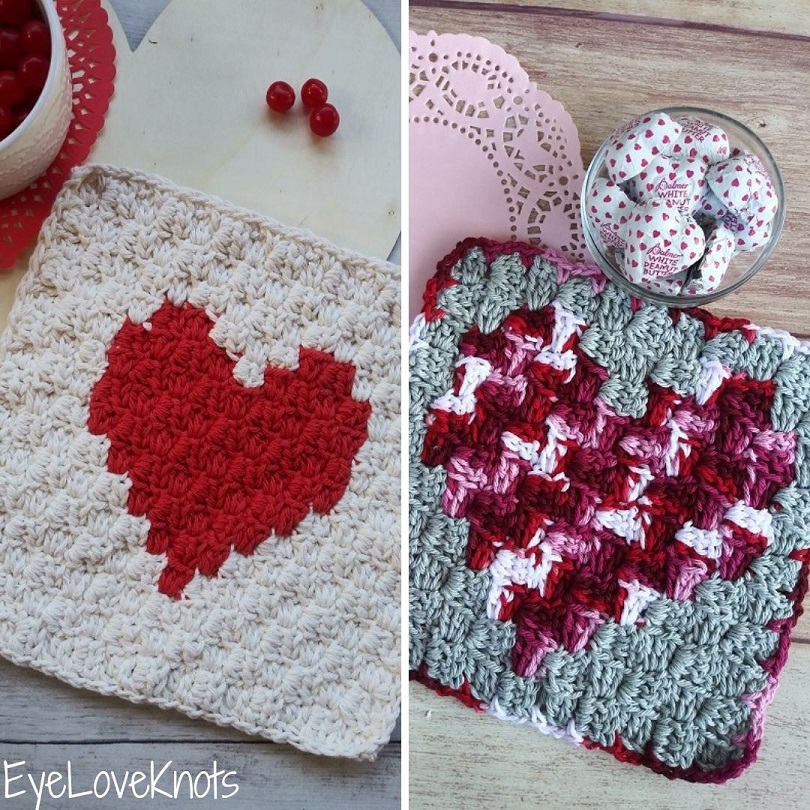
This is my C2C Enamored Heart Washcloth, and this free crochet pattern has 4 patterns in one – two worked in half double crochet, and two worked in double crochet. The hearts on both of these washcloths you see are the same exact number of boxes. You can see how many more boxes were needed on the left to equal the same size as the right.
Why does this matter? As a washcloth, C2C can sometimes become saggy because of the spaces in the boxes, and by spaces, I really just mean like a slit from the beginning chain that all the stitches are worked onto. I use my washcloths either for decorative purposes, or just to dry things up – not to wash anything with because of this, but an easy fix for a more functional washcloth is to work the C2C in half double crochet.
How to Start in C2C in DC:

If you’ve haven’t yet, make a slip knot (photo tutorial), then work a foundation chain (photo tutorial) of 6.
If this was an actual pattern, you would see it written like this: “Chain 6” OR “Ch 6”.
It mostly likely will not tell you to make the slip knot, but you always start with one.
Next, we will double crochet across the chain. Together, this will read in one of these ways:
- Chain 6, DC into the 4th chain from the hook, and each chain across.
- Ch 6, DC into the 4th ch from the hk, and ea ch across.
- OR Make 1 box.
I want to just touch on that last way to read really quickly – some patterns assume you already know how to corner to corner, and will not break it down. Instead, they will just say how many boxes to work and/or the color.
Also, note that the first skipped 3 chains will count as our first double crochet for this box.
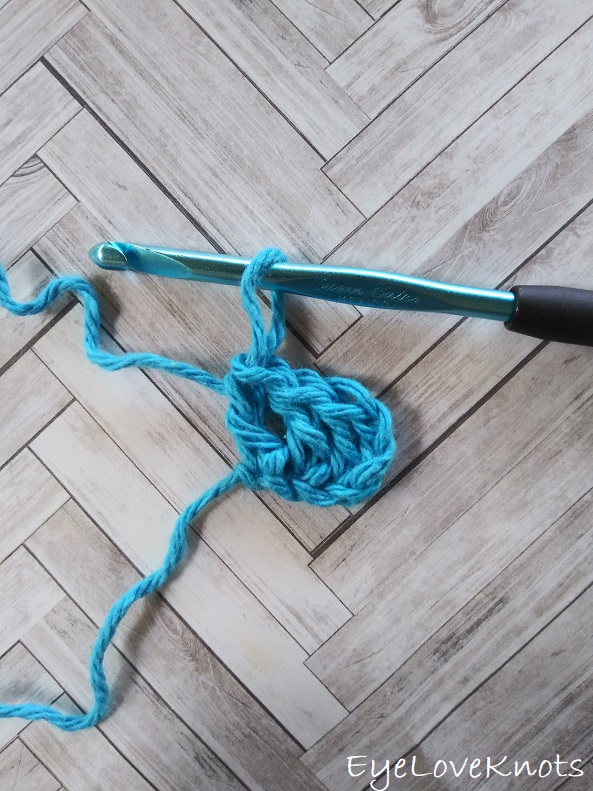
Continue to DC into the next 2 chains, and we have one completed box.
How to C2C Row 2 and Above for Increasing:
Row 2 could be written as follows:
- Chain 6, and turn. DC into the 4th chain, and into each of the next 2, slip stitch into the top of the next chain 2. Chain 2, work 2 DC into the space under the same chain joined to, DC into the top of the last stitch. (2 Boxes)
- OR Make 2 Boxes.
In each row that you want to increase, you will begin with a chain 6…
…then DC into the 4th chain from the hook, and across to complete the first box of Row 2.
Now you have a weird looking shape right now – it looks weird, but it’s correct.
Turn the bottom box towards you…

… until it’s mirrored…

… skipping the first three DC from the 1st box…
… insert hook into the top of the beginning chain of the last DC…
… yarn over…

… pull through both the DC and loop on the hook to complete a slip stitch.
We have the first box of Row 2 completed.
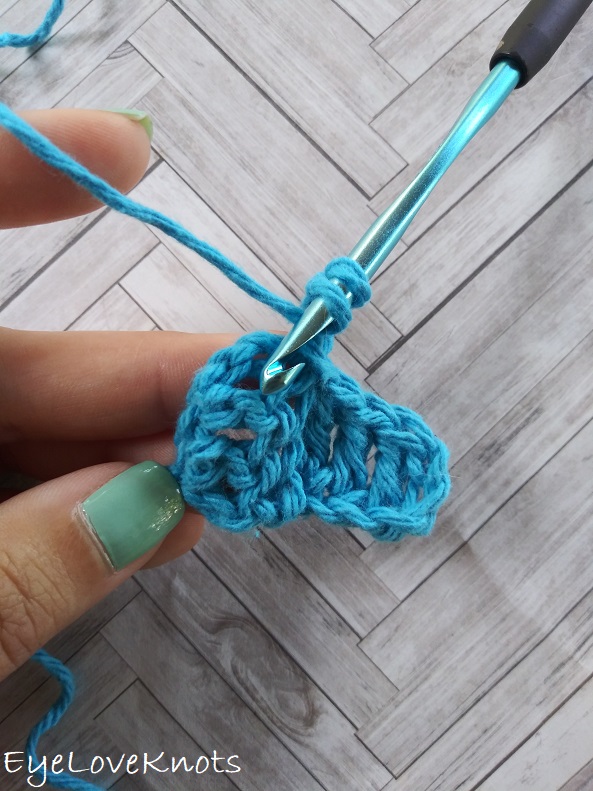
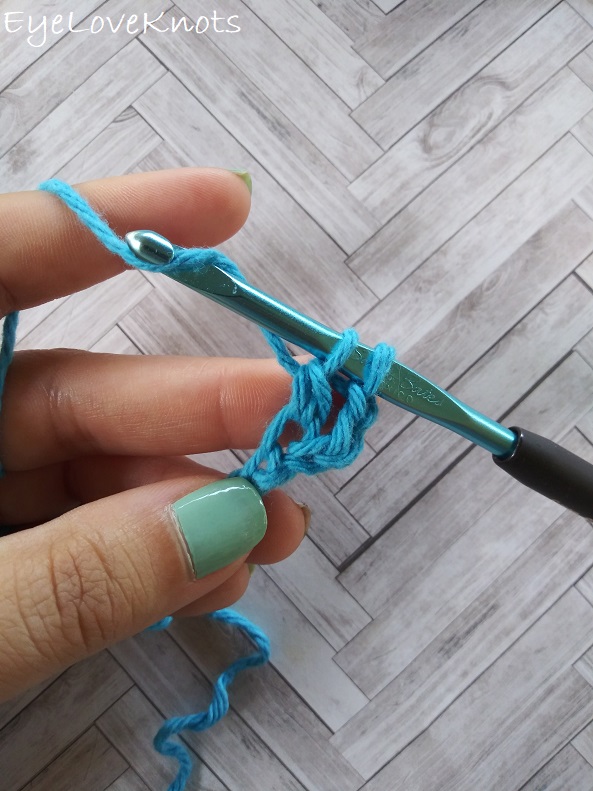
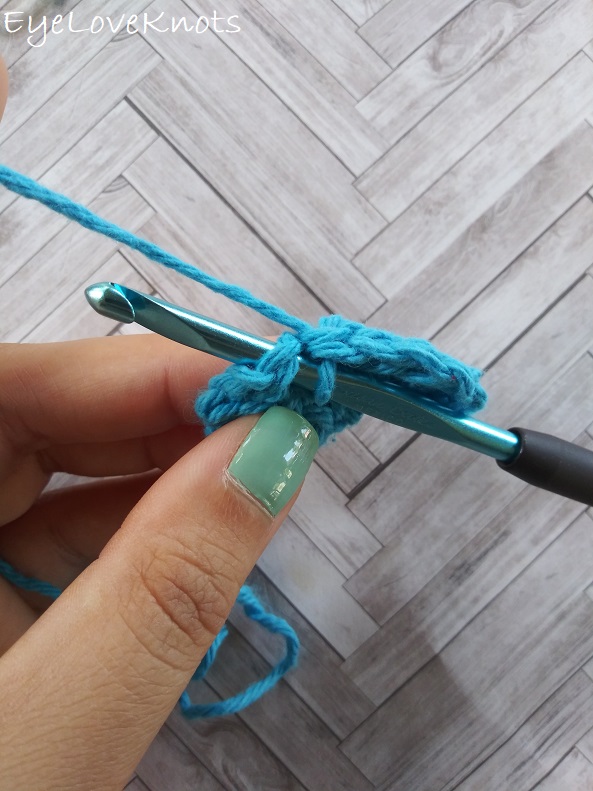
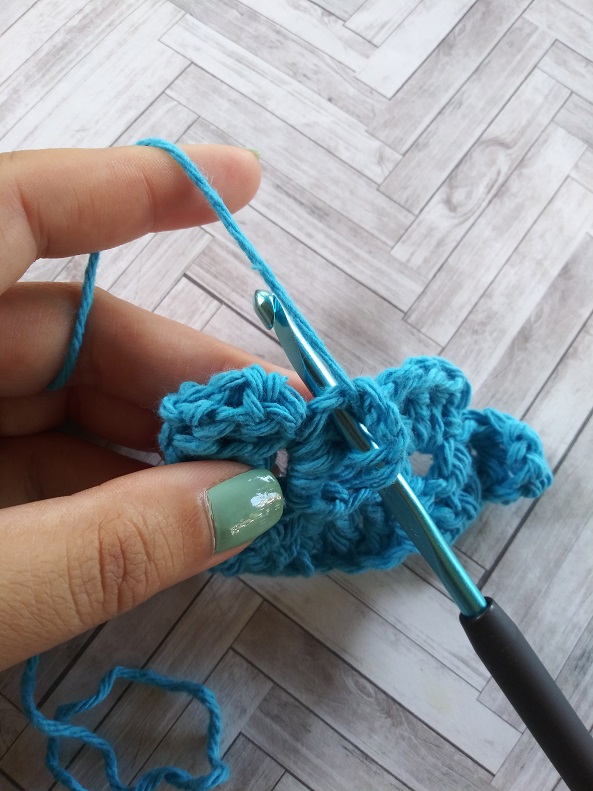
To make the next box, begin with a chain 2 (which is equal to a double crochet), yarn over, and take note the “space” that we will be working into.
In my patterns, I call this “the space under the same chain joined to”.
… insert hook into this space, yarn over, and complete the double crochet.

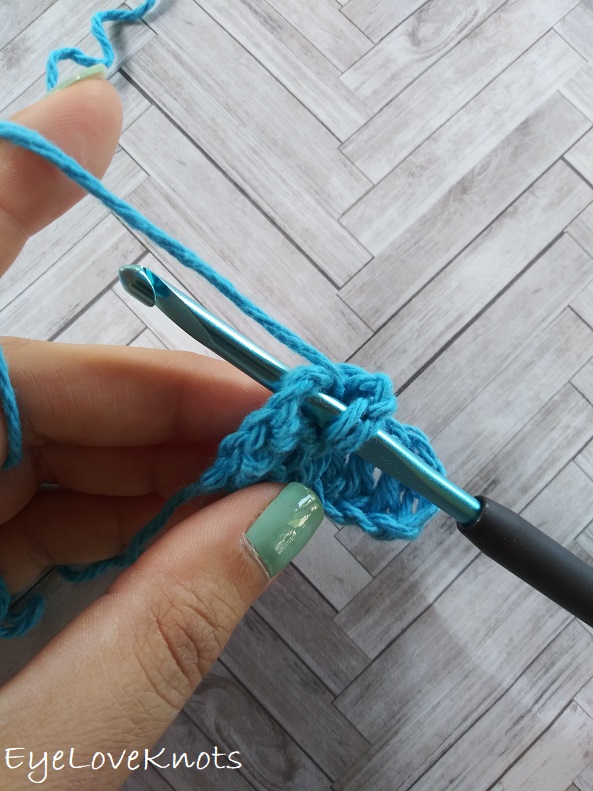
Work one more DC into this space.

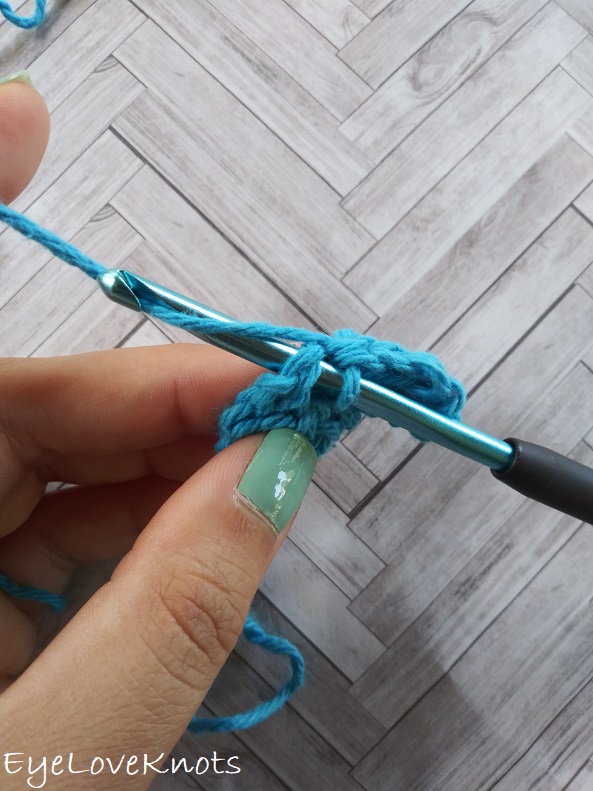
For the last double crochet, I recommend working it into the foundation chain on the end (this chain belongs to the 3rd DC of the 1st box from Row 1). By working into this chain, it gives your work a clean edge.
There are two alternatives to this that you may see in other tutorials/patterns:
- Work the last double crochet into the same space as the other stitches, but it leaves a weird gap along the outside edge of the fabric.
- Work the last double crochet into the chain just above where I am recommending, which actually belongs to the chain that we are working around. I don’t like the look as much, plus it takes more effort to work the stitch into this chain because it’s tighter.
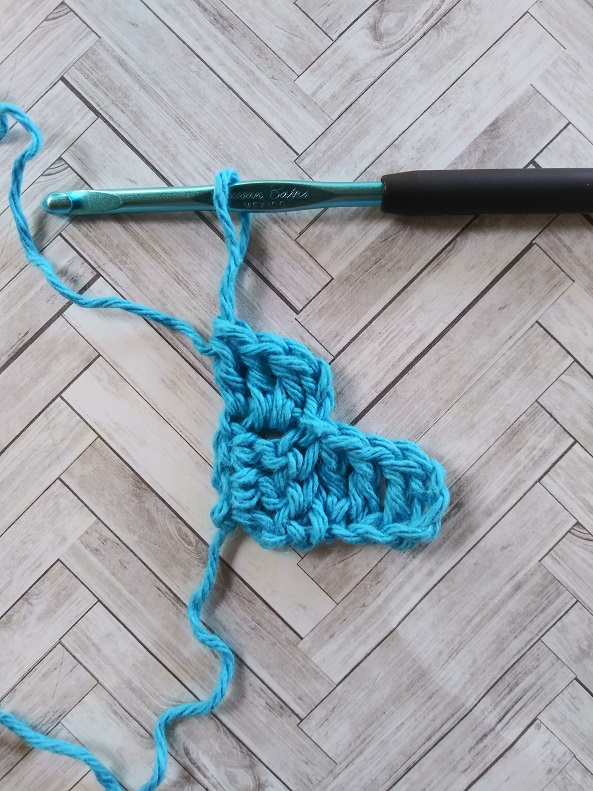
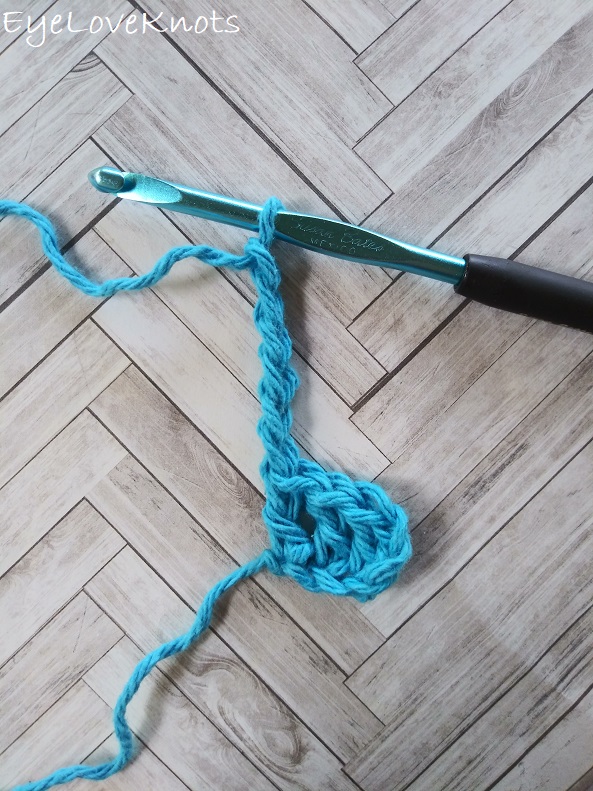
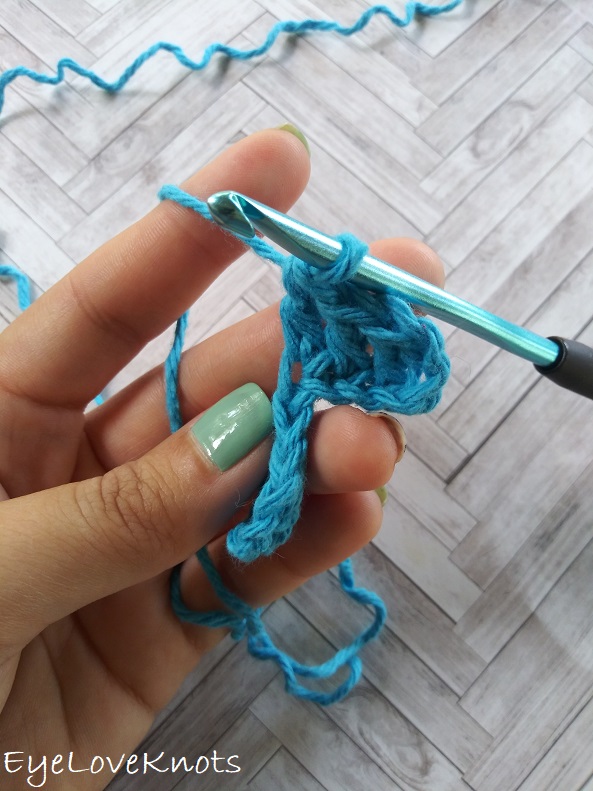
Now we have two boxes completed!
In this photo, I worked the last double crochet into the chain of the beginning chain (the last alternative I mentioned) so you can see how it looks. It certainly works, but I like working into the chain below it for an even nicer edging all the way around.
We continue to work in this same manner until we reach our desired size. In this tutorial, I will work until I have four boxes, and I would write it as follows in pattern:
Row 3: Chain 6, and turn. DC into the 4th chain, and into each of the next 2, slip stitch into the top of the next chain 2;
Chain 2, work 3 DC into the space under the same chain joined to, skip the next 3 DC, slip stitch into the top of the next chain;
Chain 2, work 2 DC into the space under the same chain joined to, DC into the top of the last stitch. (3 Boxes)
Row 4: (I) Chain 6, and turn. DC into the 4th chain, and into each of the next 2, slip stitch into the top of the next chain 2;
(II) [Chain 2, work 3 DC into the space under the same chain joined to, skip the next 3 DC, slip stitch into the top of the next chain] 2x;
(III) Chain 2, work 2 DC into the space under the same chain joined to, DC into the top of the last stitch. (4 Boxes)
If you wanted to work more than 4 rows of increases, you would just work more repeats in the section I have labeled as (II) in Row 4.

I have a tip for you! Sometimes as you work, it’s easy to accidentally catch the yarn of the box above you with your crochet hook.
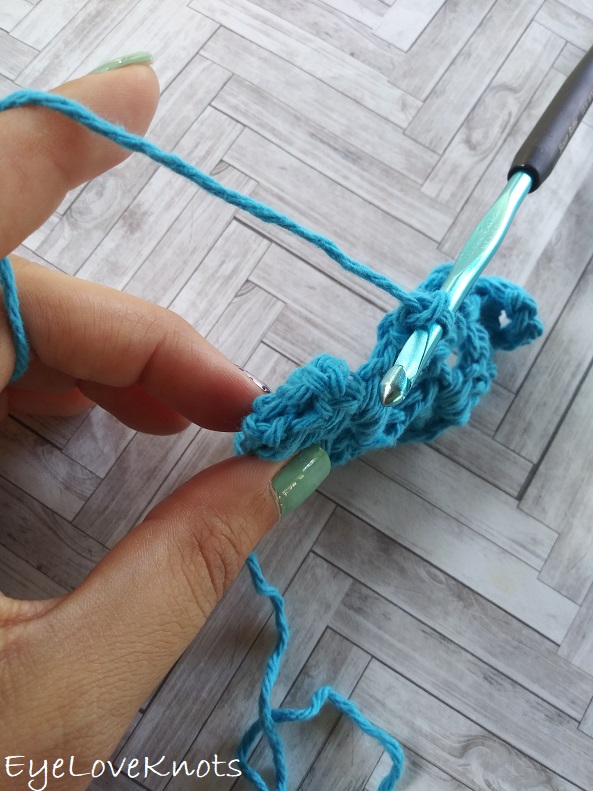
To avoid this, I just fold the fabric down…
… and hold it in place as I work.
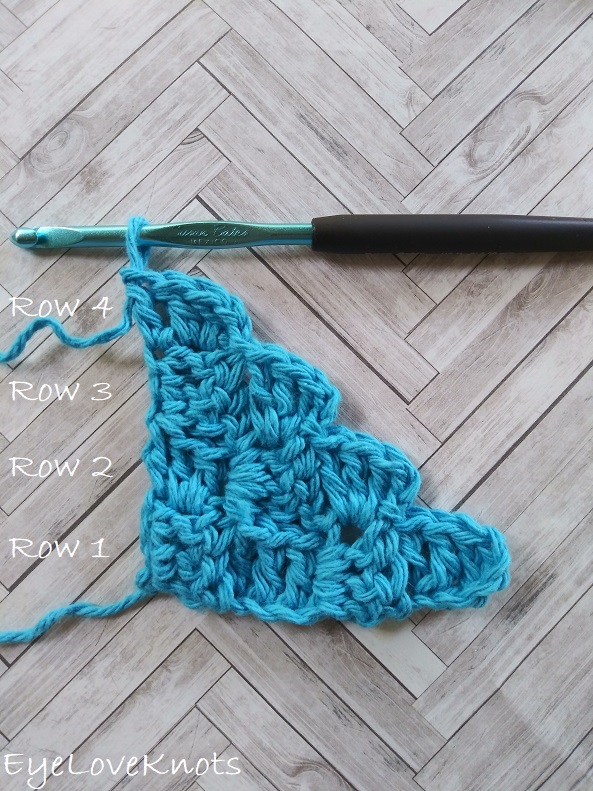
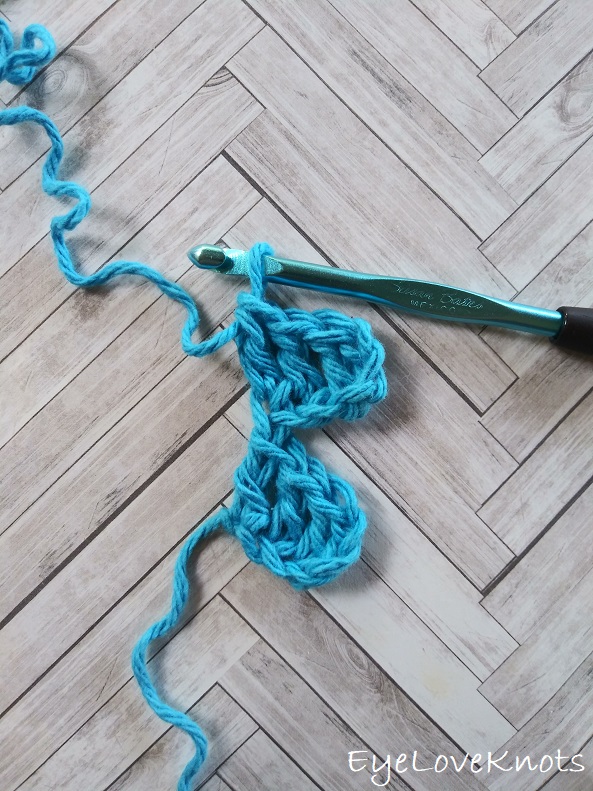
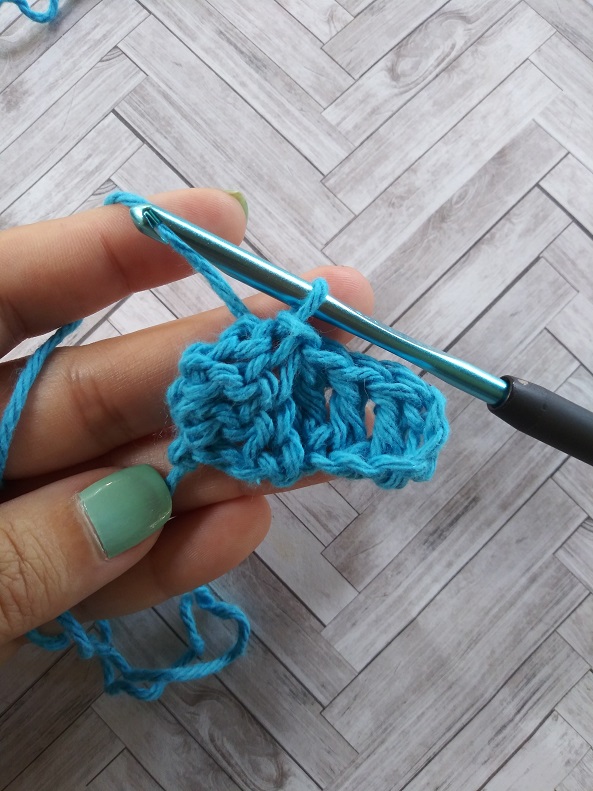
And here is 4 rows completed. Remember they are read diagonally. Row 4 has 4 boxes.
How to Keep the Same Number of Boxes without Increasing or Decreasing:
Once we reach our desired width – in this case 4 boxes wide, we stop increasing in the width.
Remember before that I said I would be working a rectangle that is 4 boxes wide by 6 boxes in length. To achieve this, we will not increase the width, but we will increase the length, and I will show you how!
If you were making a square, you would skip this part, and begin decreasing.

We are not increasing the width anymore, so chain 1…
… and turn.
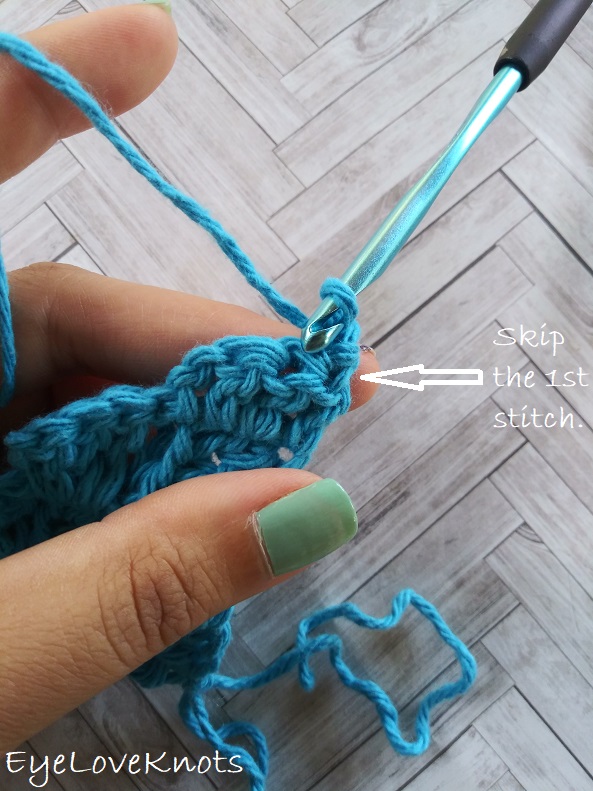
Skip the first stitch, slip stitch into the 2nd…
… 3rd and 4th stitches.
Now we’re in place to begin the first box of Row 5. Chain 2…
Work 3 DC into the space under the same chain joined to, skip the next 3 DC, slip stitch into the top of the next chain,
(chain 2, work 3 DC into the space under the same chain joined to, skip the next 3 DC, slip stitch into the top of the next chain) 2x,
Chain 2, work 2 DC into the space under the same chain joined to, skip the next 3 DC, DC into the top of the last stitch. (4 Boxes)

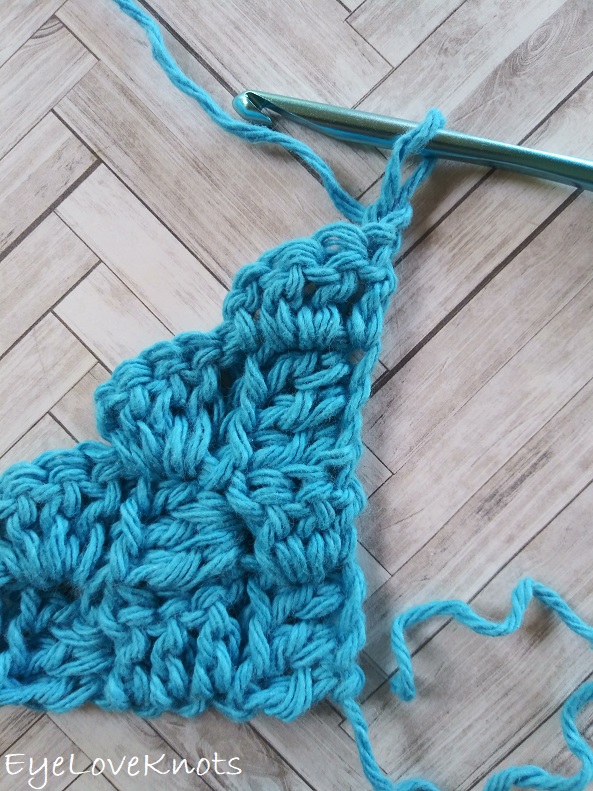
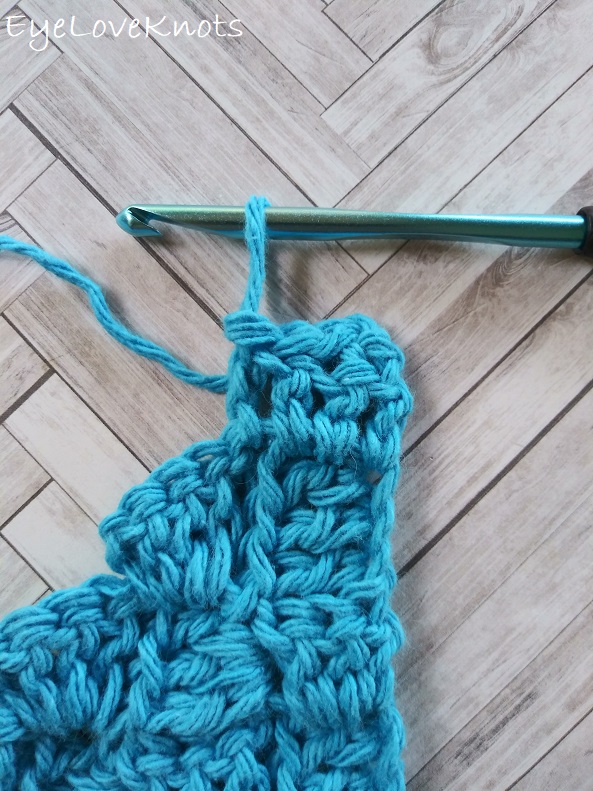
Remember we want 6 boxes in the length, and we now have 5, so to continue to increase the length, we will begin with a chain 6…
As we follow in pattern, make sure you are only working 4 boxes in total for this row (we aren’t increasing the width anymore).
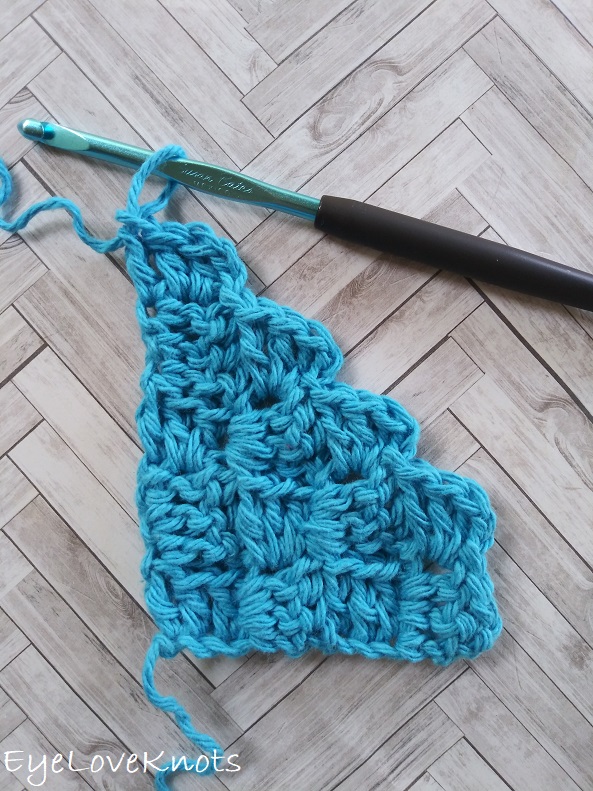
Now take notice that we have reached 6 boxes in length. Next, we will decrease down to close up that gap.
If you wanted to make it longer, you would continue repeating the last two rows, one beginning with a slip stitch over, and one beginning with a chain 6.
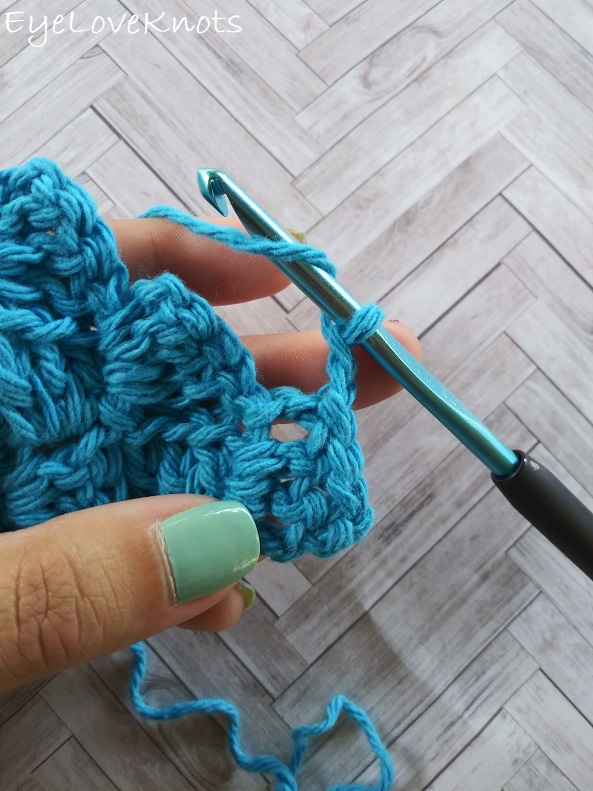
How to Decrease in C2C:
Now, we want to decrease by one box in each row back down to 1 box, so we will start every row with a slip stitch over, and end each row in line with the 6th box.

Row 7: Turn. Slip stitch into the 2nd stitch, and each of the next 2. Chain 2, work 3 DC into the space under the same chain joined to, skip the next 3 DC, slip stitch into the top of the next chain,
(IV) (chain 2, work 3 DC into the space under the same chain joined to, skip the next 3 DC, slip stitch into the top of the next chain),
Chain 2, work 2 DC into the space under the same chain joined to, skip the next 3 DC, slip stitch into the top of the last stitch. (3 Boxes)
If you had more boxes in the width, you would continue working in the same manner repeating (IV) one less time each row to decrease the number of boxes by one each row.
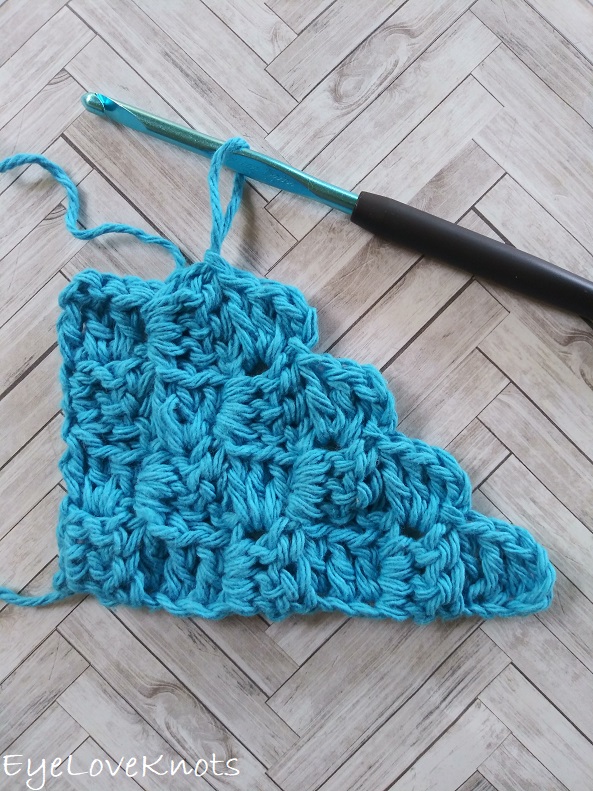
Row 8: Turn. Slip stitch into the 2nd stitch, and each of the next 2. Chain 2, work 3 DC into the space under the same chain joined to, skip the next 3 DC, slip stitch into the top of the next chain, chain 2, work 2 DC into the space under the same chain joined to, skip the next 3 DC, slip stitch into the top of the last stitch. (2 Boxes)

Row 9: Turn. Slip stitch into the 2nd stitch, and each of the next 2. Chain 2, work 3 DC into the space under the same chain joined to. Skip the next 3 DC, slip stitch into the top of the last stitch. (1 Box)
Fasten off, weave in your ends, and you have a finished rectangle!
If you would rather C2C in HDC, check out THIS photo tutorial, and stay tuned for a tutorial showing how to add a border to your C2C projects.
Join one of our awesome Facebook groups to share your creations, and see what others are up to!
– EyeLoveKnots Crochet & DIY Community
– DIY Home On Rockwood Lane
– Alexandra Lane Lifestyle
Linked Up To…
Craft Schooling Sunday – Creative Jewish Mom
Happiness is Homemade Link Party #326 – Create with Cynthia
Unlimited Monthly Link Party 13 – Grammy’s Grid
Handmade Monday #179 – Sum of their Stories
Ginx Woolly Linx Party June – Ginx Craft
Craftastic Monday Link Party – Sew Can Do
The Really Crafty Link Party #221 – Keeping it Real
Little Cottage Link Party #54 – Love my Little Cottage
Fabulous Party #323 – Lou Lou Girls
Linky Ladies Party #186 – The Purple Poncho
All About Home #43 – Common Ground
{Wow Me} Wednesday #458 – Ginger Snap Crafts
Your Whims Wednesday #463 – My Girlish Whims
To Grandma’s House We Go Link Party 196 – Chas’ Crazy Creations
Waste Not Wednesday 209 – Pretty DIY Home
Tuesday Turn About #52 – My Wee Abode
Hookin’ on Hump Day #216 – Moogly Blog
Thursday Favorite Things #443 – An Artful Mom
Creatively Crafty Link Party #227 – Life Beyond the Kitchen
Creative Compulsions Linky Party #63 – My Bijou Life
Pin Party #372 – The Pin Junkie
June 2020 Best of the Month Link Party – Calypso in the Country
Home Matters Linky Party #286 – Modern on Monticello
Create, Bake, Grow & Gather Party #423 – Shabby Art Boutique
Link Your Stuff – Annemarie’s Haakblog
Snickerdoodle Create Bake Make Link Party 339 – EyeLoveKnots
Thanks so much for linking up with me at my #UnlimitedMonthlyLinkParty 13, open June 1 to 26. All party entries shared if social media buttons installed.
Awesome tutorial! Pinning!
Thanks for sharing with Creative Cimpulsions!
Michelle
https://mybijoulifeonline.com
Thank you for pinning!