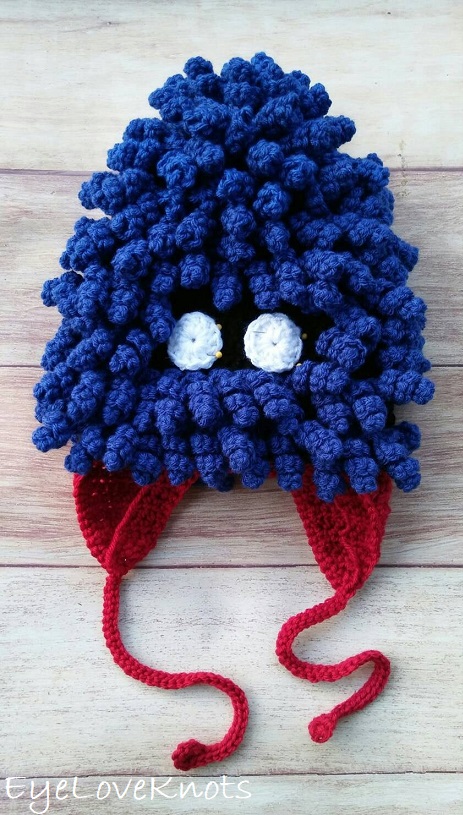
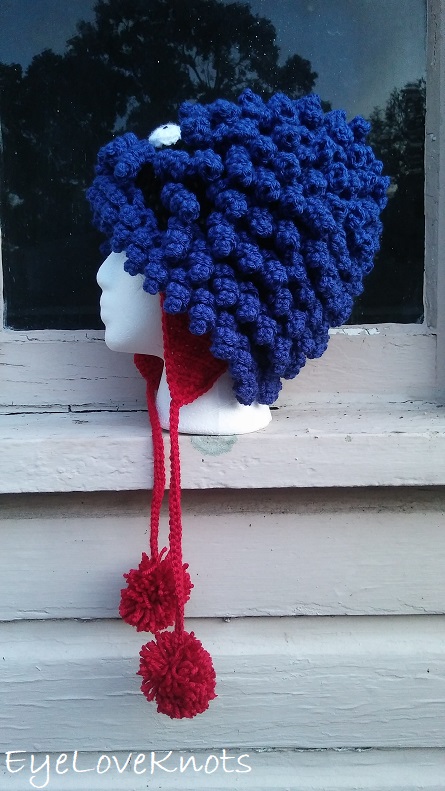
This is a free crochet pattern showing how to crochet a fun beanie that doubles as a wig, or with the added eyes, makes for a cozy, Monsterous beanie.
This post contains affiliate links for WeCrochet, Amazon and Etsy. If you make a purchase by clicking on them, I make a small commission at no extra cost to you. Thanks for your support!
Find the free crochet pattern instructions below, or purchase a printer-friendly, ad-free PDF on Ravelry by clicking here.
In a hurry? Pin this for later when you have more time.
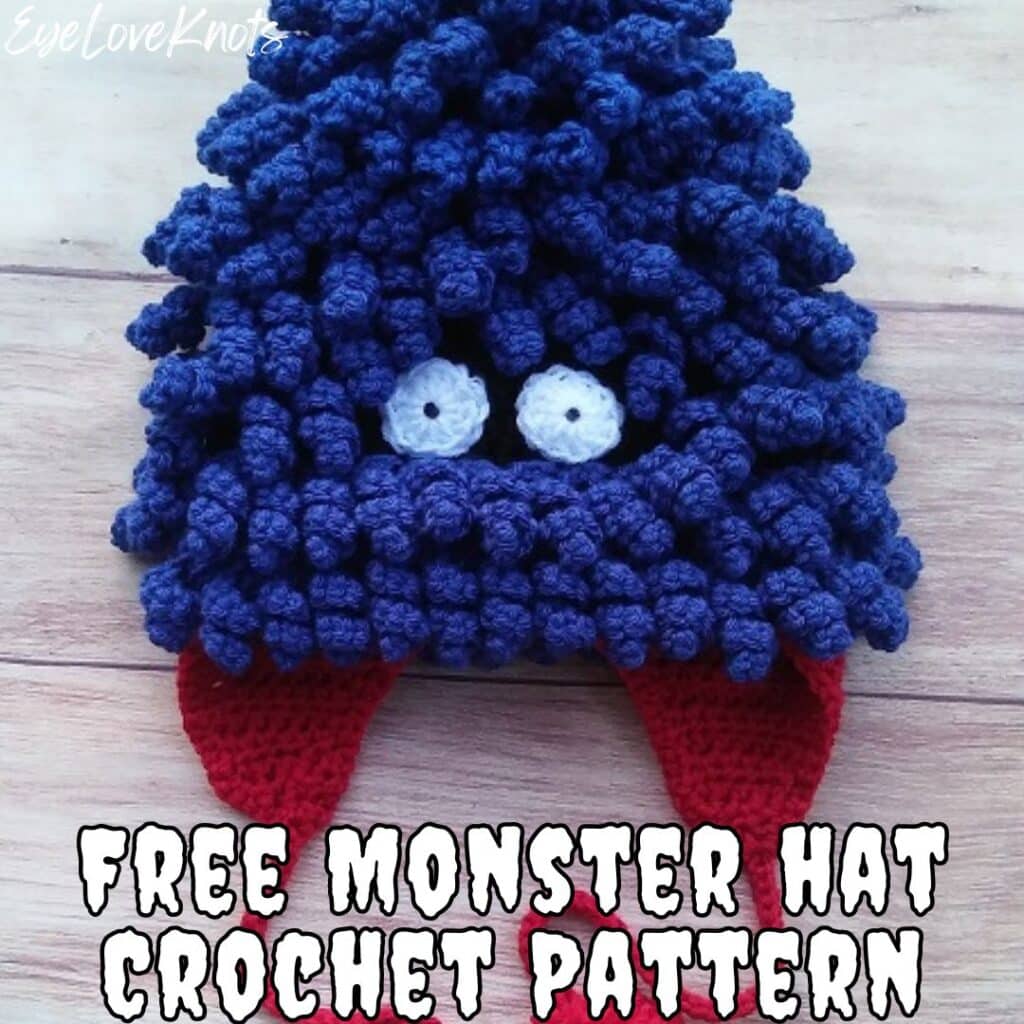
Many years ago, I was asked to make a blue, curly haired monster beanie with red legs and feet that he would be gifting to a friend. I will admit, at first, I was a little thrown back, but I always like a good challenge, and this seemed like something I could do using a basic beanie crochet pattern and the curls from my Pi & Pippi the Octopi for the hair. It took some guess, and check to get the curls to lay correctly, but after I figured it out, I started having more, and more fun putting it together.
To make this hat, it starts with a basic double crochet beanie, then the curls are worked evenly along the beanie for two rounds (skipping a row in between here up through 5 rounds of curls), then evenly work two rounds of curls leaving the center most 6 curls unworked for eyes, then work one more round of curls as before, and then begin working curls evenly without skipping a row in between to the end. Fill top as necessary.
Easy Double Crochet Patterns:
Dylan Claire is one of my easy, beginner friendly series that features simple double crochet stitches, though I don’t recommend starting with a project that is worked in the round as a beginner – try it after you are comfortable working back and forth in rows using the double crochet stitch pattern.
Super Chunky Dylan Claire Beanie
Find accessory crochet patterns over on my Cre8tion Crochet blog, and home decor and accessory crochet patterns here on EyeLoveKnots.
Ad-Free, Printer Friendly PDF:

EyeLoveKnots newsletter subscribers get access to Exclusive Subscriber Content, like the free PDF of this pattern via the Free File Library – you’ll find the tab on the top menu. The library is password protected so sign up for my newsletter and you’ll receive a Welcome email containing this month’s password, or if you are already a blog subscriber, reference your latest newsletter for this month’s password. From the library, you’ll be able to access the PDFs via Google Drive – you do not need to have a Google Drive account to view and download the PDF.
For a Limited Time…

Through 11/10/25 at 11:59pm EST, you can grab a free copy of the PDF for the Monster Beanie on Ravelry using code MONSTER25. I earn my income from the number of pageviews my blog sees, so please do not share the code, but instead share the link to this post so others can find it. Thank you!
After 11/10/25 or for non-subscribers, if you would like a PDF version of this post, you may get one through either my Etsy Shop, Ravelry Shop or LoveCrafts Shop for a small fee. This fee is to compensate for the views lost when you no longer need to return to the blog to for the information, as you will have your own copy. In a hurry? Pin this for later when you have more time!


Materials:
- About 600 Yards of Worsted Weight Yarn – I used Hobby Lobby’s I Love This Yarn in Black (half a skein), White, Royal Blue (one skein), and Red
- I9/5.5mm Crochet Hook
- Tapestry Needle
- Sewing Pins to help with Eyes
- Soft Tape Measure – Gauge is Essential
Material Notes:
Recently, I’ve learned from my friend Krissy of Krissy’s Over the Mountain Crochet that as a beanie for cancer patients, the best yarn for a sensitive head is going to be a bamboo blend, like Berroco Modern Cotton or Lion Brand Coboo. Some can tolerate 100% acrylic or wool, but not all can. With this said, if you’ll be donating your beanie, I recommend looking up the requirements from the organization. Some say not to use wool yarns. Some say not to use Red Heart Super Saver (though I think this is a great yarn that really softens nicely after washing, and wears and washes so well). Some request the beanies to be washed prior to donating. Each has it’s own set of guidelines so you’ll want to check with the organization first.
As a cold weather beanie, animal fibers are better for keeping warm against the wind, and while alpaca works great, my go-to is always a 100% superwash merino wool, like WeCrochet Swish Yarn, or a wool and acrylic blend, like Lion Brand Wool Ease and Berroco Vintage. All of these that I’ve mentioned hold up well to wear and tear and machine washing and drying.
We have lots of great crochet hooks in our Yarn Crafts and Coffee Yarn Shop. The most popular, and preferred by Candace and Emily, are the Clover Amour Crochet Hooks with the soft handles and smooth metal hook. Alexandra prefers metal crochet hooks with large, ergonomic clay handles and just loves the fun designs from SiennasBowtique and BronzeShepherdStudio! If your preference is wood, the LYKKE brand are lovely, smooth and sturdy.
Time Spent:
This beanie took quite a long time – just over 6 hours.
I found that the curls take about 2 minutes each.
Sized For:
Teen/Adult Small – has a crown of 6 1/4″ in diameter, a circumference of nearly 19 3/4″ to fit a head size of 20 – 22″, and is 8 1/2″ in length measured from the top of the beanie to the bottom final edge of the beanie (part of the instructions), not including the curls that hang down a little or earflaps on the sides.
If you are concerned with the size (or want to make a different size), take your tape measure out and measure around your head just above your eyebrows. The distance around is the circumference. You will need to use this equation to figure out what size diameter you will need: Your Circumference – 2” / 3.14 (pi) = crown diameter. 2” is the amount of stretch for acrylic, wool, and similar.
Gauge:
Measured in Pattern.
Abbreviations (US Terms):
- SC – Single Crochet (Photo Tutorial)
- HDC – Half Double Crochet (Photo Tutorial | Video Tutorial)
- DC – Double Crochet (Photo Tutorial)
- HDC2tog – Half Double Crochet Two Stitches Together to Decrease
- FPSC – Front Post Single Crochet
Pattern Notes:
I work my crown and body differently than most to help keep my seam straight, and that is that the first stitch from the first set of increases is done in the first stitch of the round, which will appear just to left of the beginning chain, then the round will be worked as normal, and the final stitch of the round will be the second stitch of the first set of increases, and it will be worked into the same stitch as the first, and appear just to the right of the beginning chain. The photo above shows where the first and last stitch are worked, and I have a photo tutorial of this technique in my How to Keep a Straight Seam post. You can work in your preferred increase method as long as we end up with the same stitches at the end of the round.
In the crown, the beginning chain 2 does not count as a stitch, but in the body, the chain 2 does count.
Slip stitch join to the first stitch of each round, not the beginning chain.
Crochet Monster Hat Pattern:
Basic Beanie Pattern:
In Black, chain 4. Join to form a ring. Chain 2. 9 HDC into the ring. Join. (9 HDC)
R2: Chain 2. Work 1 DC into the first stitch, 2 DC in each of the next 8 DCs, and 1 DC into the last stitch. Join. (18 DC)
R3: Chain 2. Work 1 DC into the first two stitches, (2 DC into the next stitch, 1 DC into the next stitch) 8x, 1 DC into the last stitch. Join. (27 DC)
R4: Chain 2. Work 1 DC into the first three stitches, (2 DC into the next stitch, 1 DC into each of the next 2 stitches) 8x, 1 DC into the last stitch. Join. (36 DC)
Checkpoint #1: Stop here, and measure the diameter to check gauge. You’ll want your diameter to measure 4 1/4″.
R5: Chain 2. Work 1 DC into the first four stitches, (2 DC into the next stitch, 1 DC into each of the next 3 stitches) 8x, 1 DC into the last stitch. Join. (45 DC)
R6: Chain 2. Work 1 DC into the first five stitches, (2 DC into the next stitch, 1 DC into each of the next 4 stitches) 8x, 1 DC into the last stitch. Join. (54 DC)
Checkpoint #2: Stop here, and measure the diameter to ensure the finished beanie will fit correctly. You’ll want your diameter to measure 6 1/4″.
R7: Chain 2. Work 1 DC into the second DC, and each DC around. Join. (54 DC)
R8: Chain 2. Work 1 DC into the first DC, and each DC around. Join. (54 DC)
R9: Chain 2. Work 1 DC into the second DC, and each DC around. Join. (54 DC)
R10 – 16: Repeat Rounds 8 and 9, ending with a Round 8.
R17: Chain 1. 1 SC into the first stitch, & each stitch around. Join with Red and Fasten Off Black. (54 SC)
First Earflap:
In Red, chain 1. HDC 12.
R2: Chain 1, turn. HDC2tog, HDC into the next 8, HDC2tog. (10 HDC)
R3: Chain 1, turn. HDC into each HDC across. (10 HDC)
R4: Chain 1, turn. HDC2tog, HDC into the next 6, HDC2tog. (8 HDC)
R5: Chain 1, turn. HDC into each HDC across. (8 HDC)
R6: Chain 1, turn. HDC2tog, HDC into the next 4, HDC2tog. (6 HDC)
R7: Chain 1, turn. HDC into each HDC across. (6 HDC)
R8: Chain 1, turn. HDC2tog, HDC into the next 2, HDC2tog. (4 HDC)
R9: Chain 1, turn. (HDC2tog) 2x. (2 HDC)
R10: Chain 1, turn. HDC2tog. (1 HDC)
Fasten off.
Second Earflap:
Skip 27 stitches along the beanie, then begin First Earflap, but don’t fasten off.
Ties with Round Ends:
Chain 44. Slip stitch into the 4th chain from the hook, chain 1, 5 SC into the ring, then slip stitch down the chain working into the back bumps.
When you reach the earflap, evenly SC (you will have roughly 3 SC per 2 HDC rows) over to the center of the other earflap, and begin the tie again. Evenly SC back to the beginning, then join, and fasten off.
Straight Ties for Adding Pom Poms:
Chain 41. Working into the back bumps, slip stitch into the 2nd chain, and down.
When you reach the earflap, evenly SC (you will have roughly 3 SC per 2 HDC rows) over to the center of the other earflap, and begin the tie again, then join, and fasten off.

Pom Poms:
Wrap yarn around three fingers 75 times. Carefully remove from fingers. Find the vertical center, and tie a strand of yarn that is approximately 12” tightly around – I like to do a square knot 3x. Without cutting this additional strand, evenly trim pom pom. Use the added strand to sew them onto the end points of the ties.
I recommend weaving in ends at this point so they are easier to get to.
Curls:
Lay the beanie down flat, and turn the beanie so that the opening is on the top – you will be working the curls onto the beanie from this orientation (even though my photos show the other way).
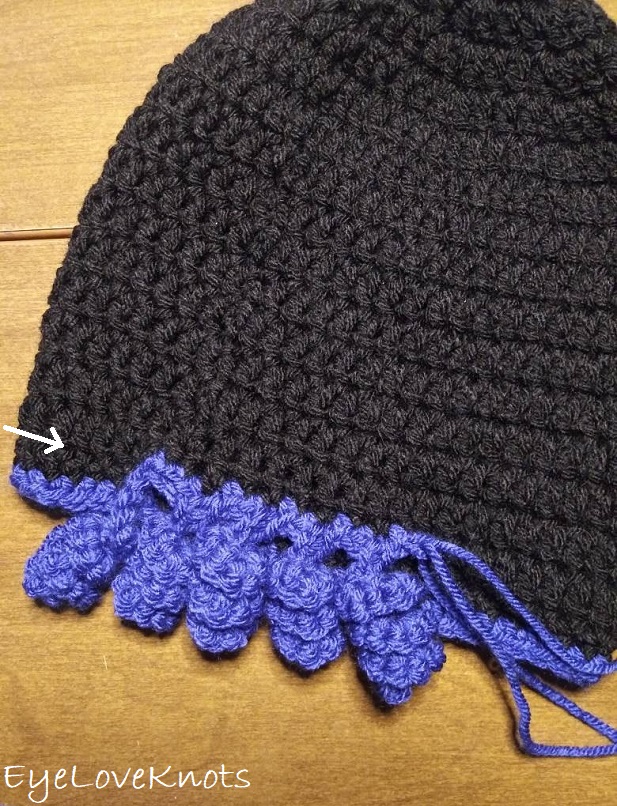
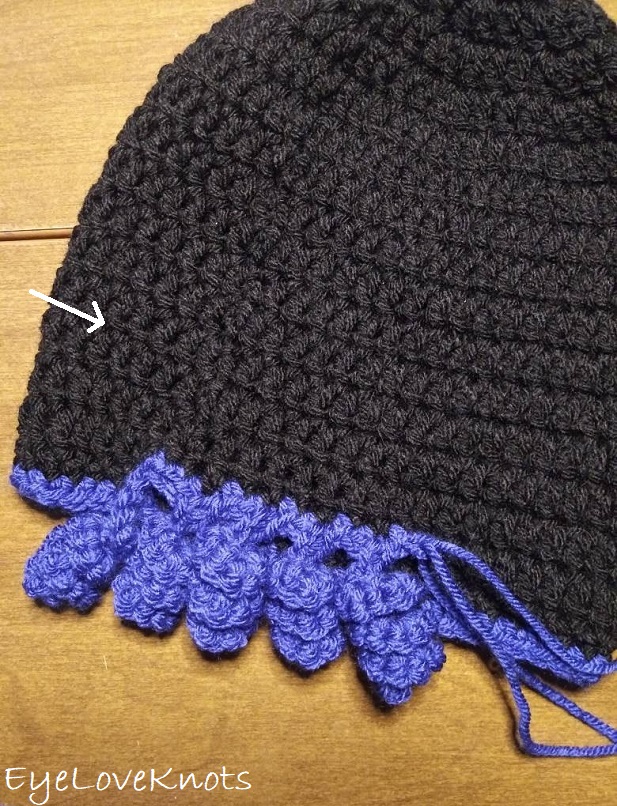
Looking at the rows of your hat, you see the long double crochet stitch posts, and right in between the rows, you a solid little line of holes (where my arrow is pointing). This little row is where you are going to be working your single crochets, and it will be around the posts.
Curls will start at the end of the beanie, and for the beginning, you will skip a row in between, but when you get closer to the top of the beanie where it starts to decrease in size, you will need to work into every row, or you will have very large holes, and it won’t look good.
Begin Curls:
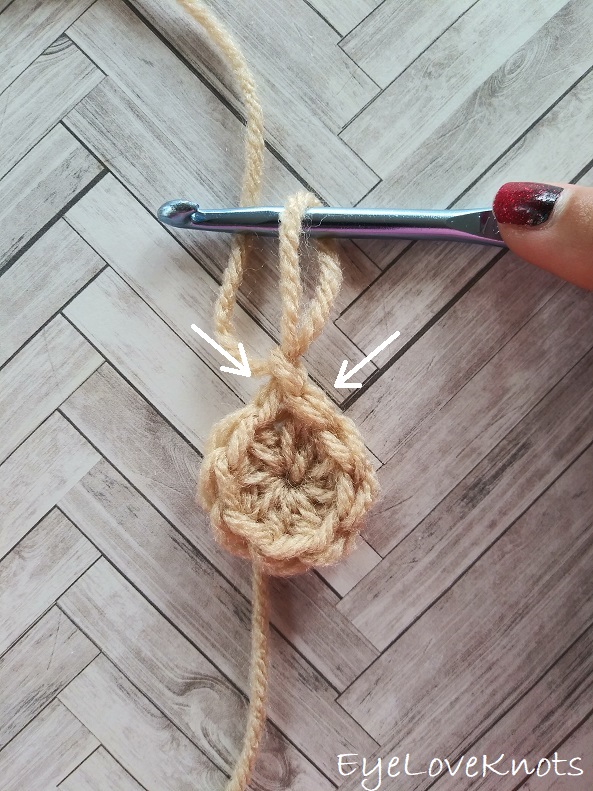
In Blue, and with the beanie in the upside down position, skip the two rounds of single crochet, and join yarn with slip stitch around the post stitch of the next double crochet base row (not around the actual double crochet, but the base of it – see arrow on photo), above where you slip stitch joined in the previous round (this is important for your curls to line up with mine for the eyes).
Chain 9, work 2 SC into the 2nd chain, and each chain across, then FPSC around the base of the next 2 base row posts, (chain 11, work 2 SC into the 2nd chain, and each chain across, then FPSC around the base of the next 2 base row posts) 17x.
R2: Front post slip stitch up 4x (this is around double crochet post, and base row post 2x to get to next spot – shown in photo above). (Chain 11, work 2 SC into the 2nd chain, and each chain across, then FPSC around the base of the next 2 base row posts) 18x.
Main Idea: Work curls up to the front of the beanie, and fasten off, then and skip the center most 6 curls, then reattach yarn, and continue working around- you can check yourself by mapping out the stitches around your beanie before actually working them).
For Row 4, the inside most curls may be slightly staggered to each other, and that’s okay!
R3 – 4 (Eye Rows): Front post slip stitch up 4x. (Chain 11, work 2 SC into the 2nd chain, and each chain across, then FPSC around the base of the next 2 base row posts) 5x, chain 11, work 2 SC into the 2nd chain, and each chain across, then FPSC around the base of the next base row post, then fasten off. Skip next 20 base stitches (equal to 6 curls plus 2), and rejoin yarn with slip stitch around the next base row stitch. FPSC around the next base of the next base row, then (Chain 11, work 2 SC into the 2nd chain, and each chain across, then FPSC around the base of the next 2 base row posts) 6x.
R5: Front post slip stitch up 4x. (Chain 11, work 2 SC into the 2nd chain, and each chain across, then FPSC around the base of the next 2 base row posts) 18x.
Now, we begin working into each base row to avoid large gaps as the beanie decreases in size.
R6 – 10: Front post slip stitch up 2x. (Chain 11, work 2 SC into the 2nd chain, and each chain across, then FPSC around the base of the next 2 base row posts) around.
R11: Work three more curls to fill the small space at the top, and fasten off.
Pull all ends to be just underneath the curls, and weave in along here to hide.
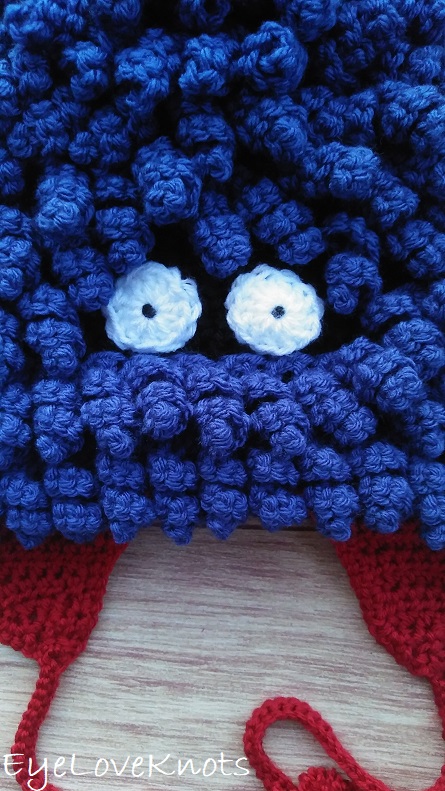
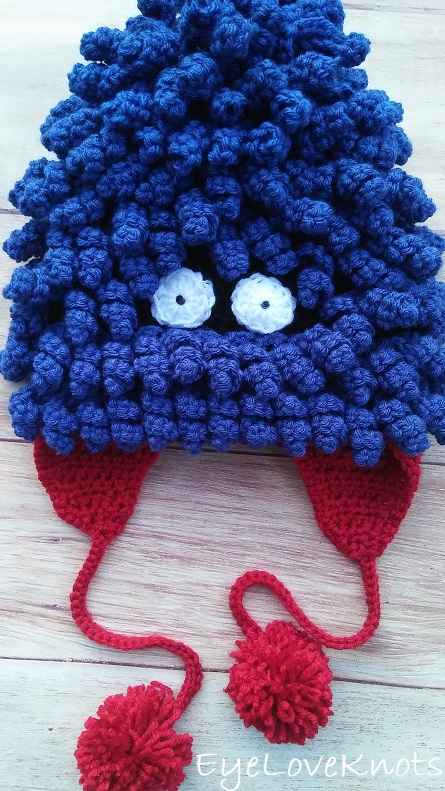
Eyes – Make 2:
With white, chain 5. Slip stitch join to form a ring. Chain 2. 12 DC into the ring. Join to the 1st DC. Fasten off with longer tail for sewing.
Loosely weave in the initial tail end – I say loosely so you can work your center eyeball dot in later.
Use sewing pins to evenly pin eyes in place, using skipped 6 curls as a guide, and the empty black space – keep in mind the curls along the top of the empty space will come down some. I pinned mine in place, then held the beanie up to check placement.
Use long tail to sew in place.
Cut a small piece of black yarn, and work a french knot directly into the center of the eyes (or you could hot glue a tiny black pom pom here).
Please feel free to make and sell your own items made using this pattern, but keep in mind, this written pattern and my photos are protected by copyright. Please DO NOT claim this pattern as your own nor should you sell my pattern. DO NOT re-publish my photos as your own. DO NOT copy and paste my pattern anywhere, link to it instead so other’s can visit. Making videos providing instructions how to make my projects on any social media platform is also not permitted.

Join one of our awesome Facebook groups to share your creations, and see what others are up to!
– Yarn Crafts & Coffee Community
– DIY Home On Rockwood Lane
– Alexandra Lane Lifestyle
Linked Up To…
Handmade Monday #197 – Sum of their Stories
The Really Crafty Link Party #236 – Keeping it Real
Ginx Woolly Linx Party October – Ginx Craft
Craftastic Monday Link Party – Sew Can Do
Linky Ladies Party #195 – The Purple Poncho
Your Whims Wednesday #480 – My Girlish Whims
Hookin’ on Hump Day #224 – Moogly Blog
Thursday Favorite Things #461 – An Artful Mom
Pin Party #390 – The Pin Junkie
Friday Favorites – Busy Being Jennifer
Link Your Stuff – Annemarie’s Haakblog
A Morning Cup of Joe Linky Party – The Cottage Market
Snickerdoodle Create Bake Make Link Party 357 – EyeLoveKnots
That is such a fun monster beanie! Perfect for Halloween and it looks really cute in blue and red!
Hope that you are having a lovely weekend 🙂
Thank YOU, Mica! I think it would be really cute for Halloween, especially for an adult who might not really want to dress up.
wow, amazing and great for kids or kids at heart! thanks for sharing on craft schooling sunday!
Kids at heart, hehe. Definitely!
What a fun hat! I love all the crochet spirals!
Thanks, T’onna! I think crocheted spirals are fun – have to think of other ways to use them.
Completely adorable! This beanie will be featured in this week’s Creative Compulsions.
Michelle
https://mybijoulifeonline.com
Super cute handmade hat!
Great idea for a hat. Really effective.
This beanie is super cute. You are quite talented to come up with the ideas that you do.