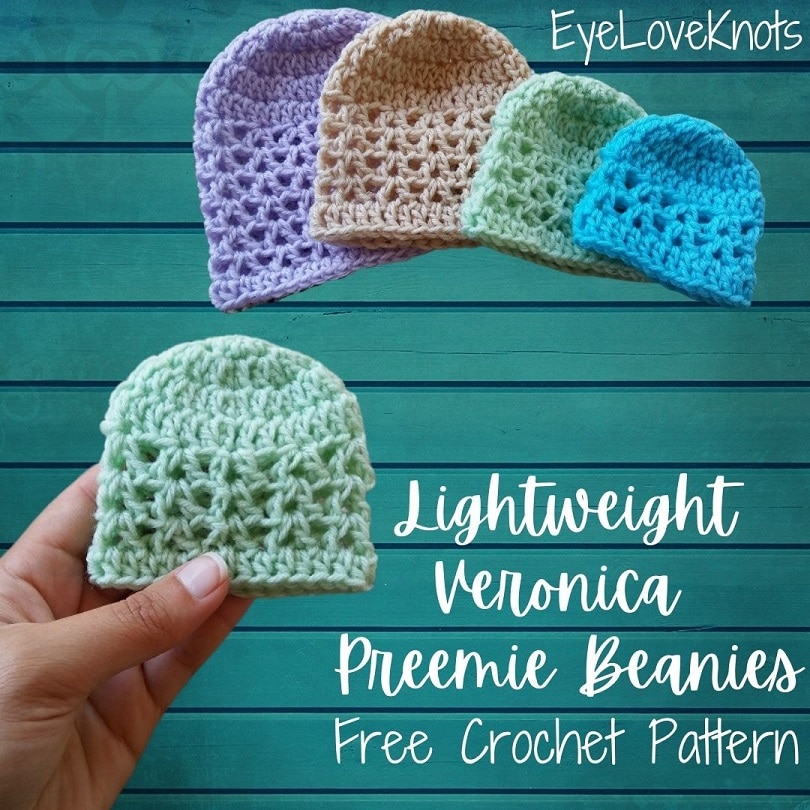
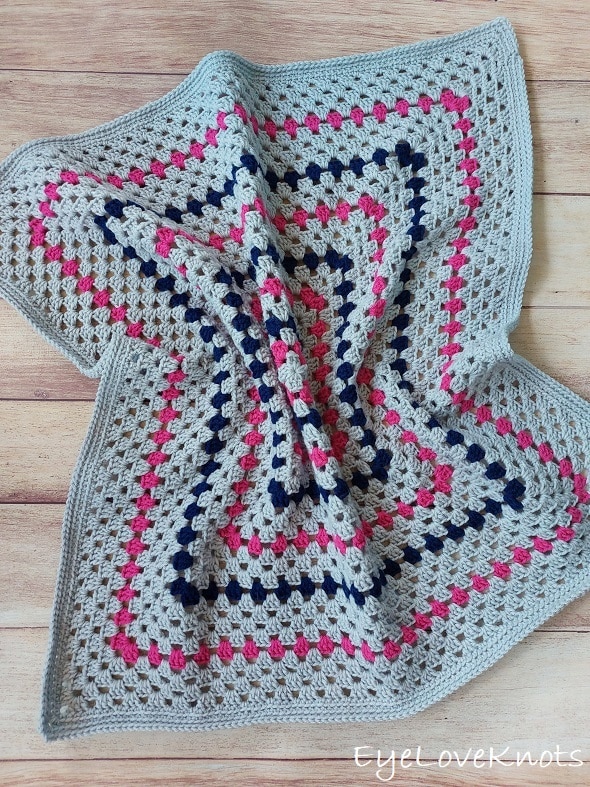
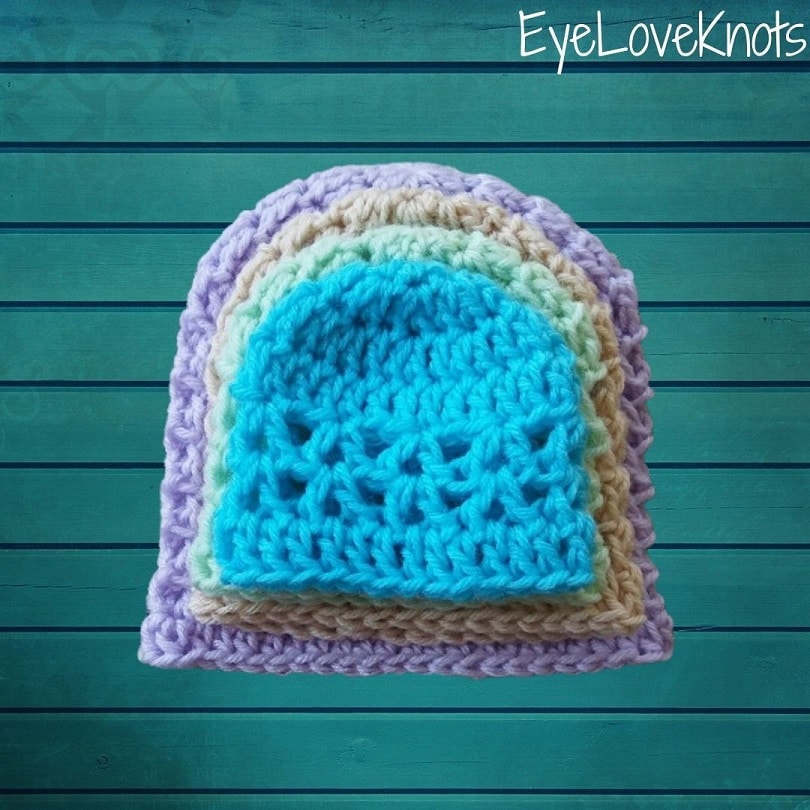
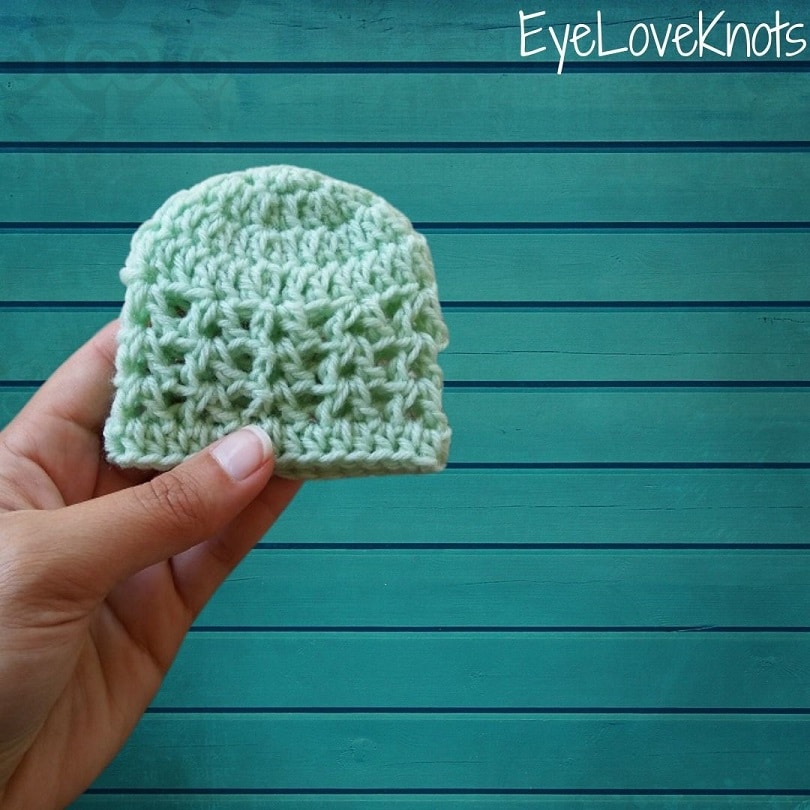
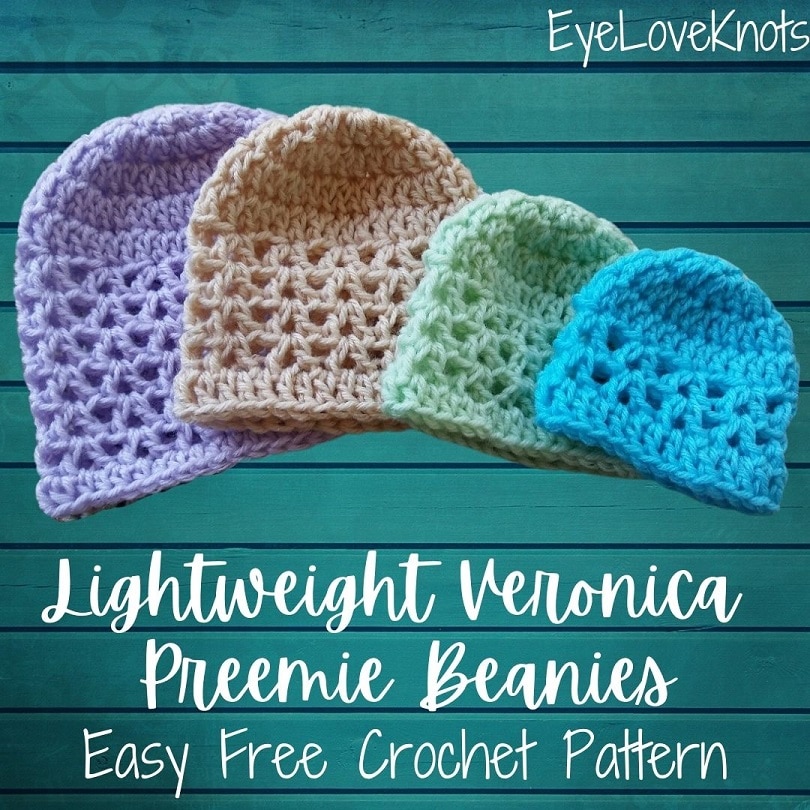
This is a free crochet pattern for how to crochet an adorable lightweight preemie beanie perfect for Spring. It’s worked in a small amount of yarn making it perfect for those scraps in your stash, and in an hour and a half, you can half one in each size!
This post contains affiliate links for WeCrochet, Etsy and Amazon. If you make a purchase by clicking on them, I make a small commission at no extra cost to you. Thanks for your support!
Find the free crochet pattern instructions below, or purchase a printer-friendly, ad-free PDF on Ravelry by clicking here.
In a hurry? Pin this for later when you have more time.
Preemie beanies are one of my favorite things to make, and be able to donate. I love the idea of a little baby in one of my hats, and I know families really appreciate the sweet touch.
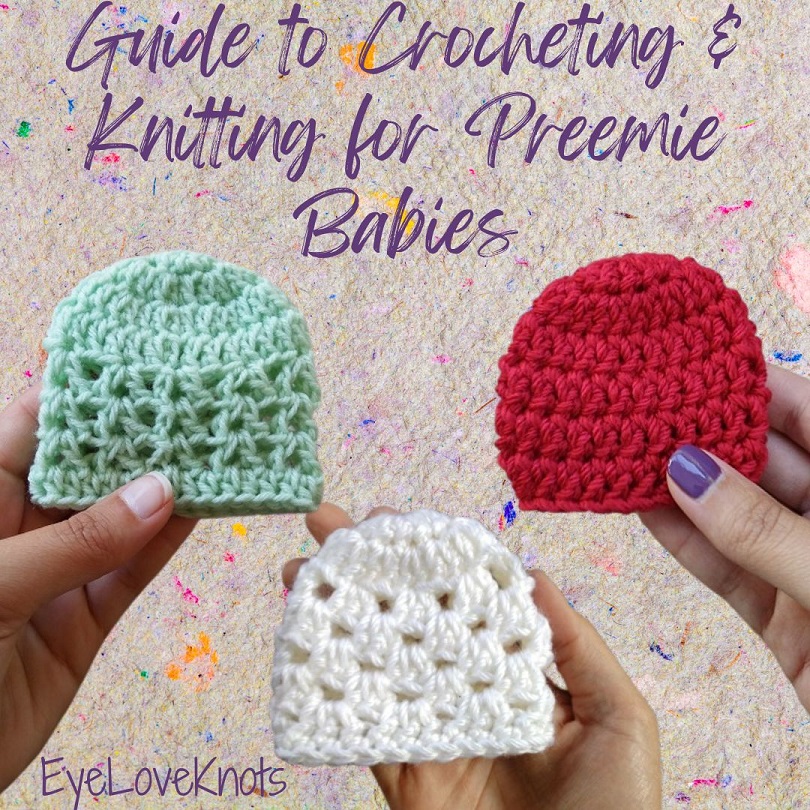
I’ve put together a complete Guide to Crocheting & Knitting for Preemie Babies. The number one thing that I am going to recommend above anything else is first check with the organization that you plan to donate to. Each organization has their own needs, which can vary from time to time, and each one also has their own set of guidelines, like what kind of yarn and/or colors to use or not to use as well as things like if they accept donations from a pet friendly home, but in this guide, I talk about what I find to be the most common across preemie organizations for crocheting and knit items.
Easy Preemie Baby Crochet Patterns:
The Grace Tinley Preemie Beanie is worked in the classic granny stitch pattern which is simple double crochet stitches, available in the same 3 sizes, and also has a video tutorial available.
The Dylan Claire Preemie Beanies are worked in simple double crochet stitches, and there is a video tutorial available for it as well.
The Gia Afghan has instructions for a Lovey size (12″) and Preemie size (20″). Some organizations also like the Newborn size (30″) for preemies.
The Haylee Afghan has instructions for a Lovey size (12″) and Preemie size (20″). Some organizations also like the Newborn size (30″) for preemies.
The Volume One Afghan has instructions for a Lovey size (12″) and Preemie size (20″). Some organizations also like the Newborn size (30″) for preemies.
Free V-Stitch Crochet Patterns:
Veronica is an easy crochet line that features v-stitches formed from working double crochet stitches with a chain in between. While easy, I don’t recommend starting with a project that is worked in the round as a beginner – try it after you are comfortable working back and forth in rows using double crochet stitches.
Find more Veronica accessory and home decor crochet patterns here on EyeLoveKnots, and Veronica accessory and wearables crochet patterns on Cre8tion Crochet.
Ad-Free, Printer Friendly PDF:

EyeLoveKnots newsletter subscribers get access to Exclusive Subscriber Content, like the free PDF of this pattern via the Free File Library – you’ll find the tab on the top menu. The library is password protected so sign up for my newsletter and you’ll receive a Welcome email containing this month’s password, or if you are already a blog subscriber, reference your latest newsletter for this month’s password. From the library, you’ll be able to access the PDFs via Google Drive – you do not need to have a Google Drive account to view and download the PDF.
For a Limited Time…

Through 11/26/25 at 11:59pm EST, you can grab a free copy of the PDF for the Lightweight Veronica Preemie Beanie on Ravelry using code VERONICA25. I earn my income from the number of pageviews my blog sees, so please do not share the code, but instead share the link to this post so others can find it. Thank you!
After 11/26/25 or for non-subscribers, if you would like a PDF version of this post, you may get one through either my Etsy Shop, or Ravelry Shop for a small fee. This fee is to compensate for the views lost when you no longer need to return to the blog to for the information, as you will have your own copy. Plus! It helps fund supplies for new projects to share with you! In a hurry? Pin this for later when you have more time.
Save this to your Favorites: AllFreeCrochet, FaveCrafts, Cheap Thrifty Living, DIYideaCenter and Crochet Pattern Bonanza
Materials:
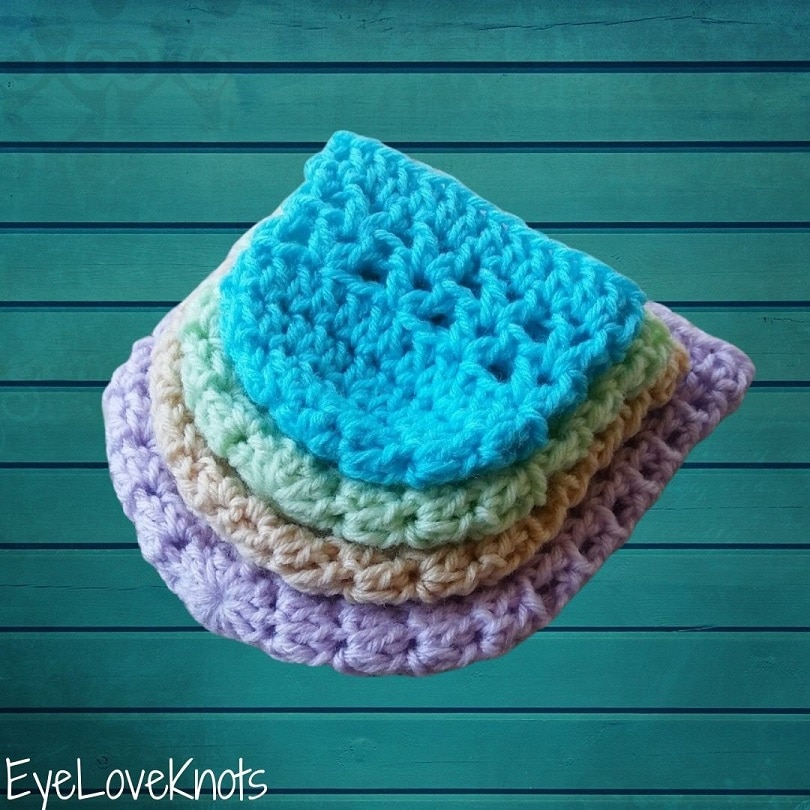
- Small Amounts of Lightweight (#3) Yarn – I used Baby Bee’s Sweet Delight from my local Hobby Lobby in the Sugarplum (Lavender), Sand Castle (Tan), Mint Charm (Pale Green), and Splash (Bright Blue) colorways
- H8/5mm Crochet Hook
- Tapestry Needle
- Soft Tape Measure – Gauge is Essential
Material Notes:
I love using WeCrochet Swish DK, Berroco Vintage DK and Lion Brand Wool Ease DK for beanies. If you want to work with cotton, I recommend looking for a blend (like cotton and acrylic) as it needs another fiber combined with it to retain its shape and to be able to bounce back – 100% cotton will only grow out of shape – my favorites are Berroco Modern Cotton DK and Lion Brand Coboo. If you’re donating your beanies, make sure to check the organization’s guidelines first as they each have their own preferences. Mainly, you want a soft yarn that can withstand multiple washing and drying.
Keep in mind, we may think yellow for babies, especially as a neutral, but hospitals tend to stray away from yellow because it can make them appear jaundiced.
Time Spent:
I had the 1 – 1 1/2 lb and 2 – 3 lb sizes done in just under 15 minutes each, the 3 – 5 lb done in just under 20 minutes and the 6 – 8 lb hat done in just under 30 minutes. That’s less than an hour and a half for all four!
Measurements:
The 1 – 1 1/2 lb size has a crown of 2 1/2″ in diameter, a circumference of nearly 7 7/8″ to fit a head size of 8″ – 9 1/4″, and is 3″ in length.
The 2 – 3 lb size has a crown of 3″ in diameter, a circumference of nearly 9 1/2″ to fit a head size of 9 3/4″ – 11″, and is also 3 1/2″ in length.
The 3 – 5 lb size has a crown of 3 1/2″ in diameter, a circumference of nearly 11″ to fit a head size of 11 1/4″ – 12 3/4″, and is 4 3/8″ in length.
The 6 – 8 lb size has a crown of 4″ in diameter, a circumference of nearly 12 1/2″ to fit a head size of 13″ – 14″, and is 5 3/8″ in length.
If you are concerned with the size (or want to make a different size), take your tape measure out and measure around the head just above your eyebrows. The distance around is the circumference. You will need to use this equation to figure out what size diameter you will need: Your Circumference – 1” / 3.14 (pi) = crown diameter. Typically, we do account for -2” of ease with double crochet beanies (for the amount of stretch in acrylic, wool & similar), but many organizations request preemie sizes to be -1” of ease.
Gauge (Essential):
Measured in Pattern.
Gauge it very important for beanies. If you do not meet gauge, and continue making your beanie, the finished size will either be too small or too big so make sure to stop and check it. If you’re measuring smaller than the given measurements, go up a crochet hook size, and if you’re measuring larger, go down a crochet hook size. Rework the sample, take gauge again, and see where you are.
Abbreviations (US Terms):
- HDC – Half Double Crochet (Photo Tutorial | Video Tutorial)
- DC – Double Crochet (Photo Tutorial)
- How to V-Stitch: (DC, chain 1, DC)
Pattern Notes:
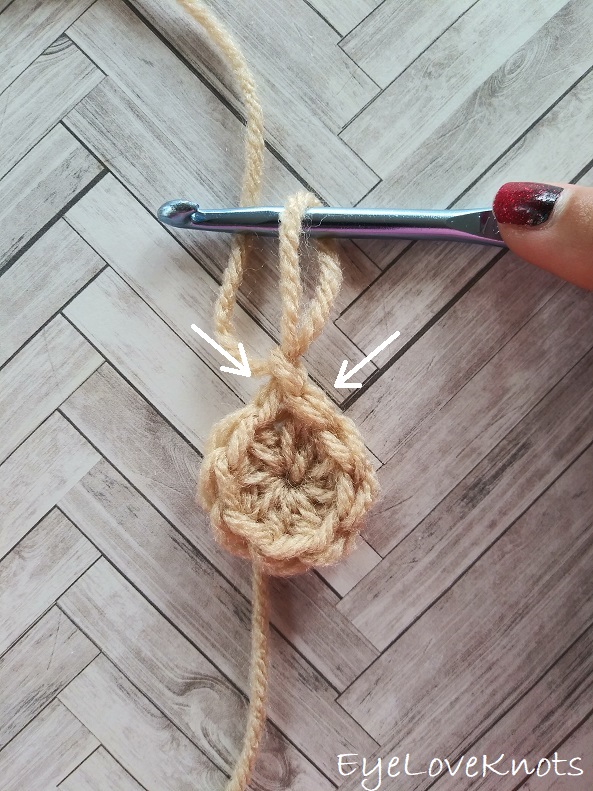
I work my crown and body differently than most to help keep my seam straight, and that is that the first stitch from the first set of increases is done in the first stitch of the round, which will appear just to left of the beginning chain, then the round will be worked as normal, and the final stitch of the round will be the second stitch of the first set of increases, and it will be worked into the same stitch as the first, and appear just to the right of the beginning chain. The photo above shows where the first and last stitch are worked, and I have a photo tutorial of this technique in my How to Keep a Straight Seam post. You can work in your preferred increase method as long as we end up with the same stitches at the end of the round.
Beginning chain 2 does not count as a stitch in the crown, but does in the body of the hat, which will be marked with “counts as a … here and throughout).
Join to the first stitch of each round, unless otherwise stated.
1 – 1 1/2 lbs:
Chain 4. Join to form a ring. Chain 1. Work 9 HDC into the ring. Join. (9 HDC)
R2: Chain 2. DC into the first HDC, 2 DC into each of the next 8 HDCs around, DC into the first HDC. Join. (18 DC)
R3: Chain 2. DC into the first 2 DCs, (2 DC into the next DC, DC into the next DC) 8x, DC into the first DC. Join. (27 DC)
Checkpoint: Stop here, and measure the diameter to ensure the finished beanie will fit correctly. You’ll want your diameter to measure 2 1/2″.
R4: Chain 2 (counts as a double crochet here, and throughout). DC into the 2nd DC, and the next 25. Join. (27 DC)
R5: Chain 3 (counts as a double crochet plus chain 1 here, and throughout). DC into the 1st DC, [skip the next 2 DC, (DC, chain 1, DC) into the next DC] 8x. Join to the 2nd chain. (9 V-Stitches)
R6: Slip stitch into the next chain space. Chain 3. DC into the same chain space, [(DC, chain 1, DC) into the next chain space of the previous v-stitch] 8x. Join to the 2nd chain. (9 V-Stitches)
R7: Chain 2. DC into each chain space, and DC around. Join. (27 DC)
Fasten Off and Weave in Ends.
2 – 3 lbs:
Chain 5. Join to form a ring. Chain 2. Work 10 DC into the ring. Join. (10 DC)
R2: Chain 2. DC into the first DC, 2 DC into each of the next 9 DCs around, DC into the first DC. Join. (20 DC)
R3: Chain 2. DC into the first 2 DCs, (2 DC into the next DC, DC into the next DC) 9x, DC into the first DC. Join. (30 DC)
Checkpoint: Stop here, and measure the diameter to ensure the finished beanie will fit correctly. You’ll want your diameter to measure 3″.
R4: Chain 2 (counts as a double crochet here, and throughout). DC into the 2nd DC, and the next 28. Join. (30 DC)
R5: Chain 3 (counts as a double crochet plus chain 1 here, and throughout). DC into the 1st DC, [skip the next 2 DC, (DC, chain 1, DC) into the next DC] 9x. Join to the 2nd chain. (10 V-Stitches)
R6: Slip stitch into the next chain space. Chain 3. DC into the same chain space, [(DC, chain 1, DC) into the next chain space of the previous v-stitch] 9x. Join to the 2nd chain. (10 V-Stitches)
R7: Chain 1 (doesn’t count as a stitch). HDC into the 1st DC, and into each chain space, and DC around. (30 HDC)
Fasten Off and Weave in Ends.
3 – 5 lbs:
Chain 4. Join to form a ring. Chain 1. Work 9 HDC into the ring. Join. (9 HDC)
R2: Chain 2. DC into the first HDC, 2 DC into each of the next 8 HDCs around, DC into the first HDC. Join. (18 DC)
R3: Chain 2. DC into the first 2 DCs, (2 DC into the next DC, DC into the next DC) 8x, DC into the first DC. Join. (27 DC)
R4: Chain 2. DC into the first 3 DCs, (2 DC into the next DC, DC into each of the next 2 DC) 8x, DC into the first DC. Join. (36 DC)
Checkpoint: Stop here, and measure the diameter to ensure the finished beanie will fit correctly. You’ll want your diameter to measure 3 1/2″.
R5: Chain 2 (counts as a double crochet here, and throughout). DC into the 2nd DC, and the next 34. Join. (36 DC)
R6: Chain 3 (counts as a double crochet plus chain 1 here, and throughout). DC into the 1st DC, [skip the next 2 DC, (DC, chain 1, DC) into the next DC] 11x. Join to the 2nd chain. (12 V-Stitches)
R7 – 9: Slip stitch into the next chain space. Chain 3. DC into the same chain space, [(DC, chain 1, DC) into the next chain space of the previous v-stitch] 11x. Join to the 2nd chain. (12 V-Stitches)
R10: Chain 2. DC into each chain space, and DC around. Join. (36 DC)
Fasten Off and Weave in Ends.
6 – 8 lbs:
Chain 5. Join to form a ring. Chain 2. Work 11 DC into the ring. Join. (11 DC)
R2: Chain 2. DC into the first DC, 2 DC into each of the next 10 DCs around, DC into the first DC. Join. (22 DC)
R3: Chain 2. DC into the first 2 DCs, (2 DC into the next DC, DC into the next DC) 10x, DC into the first DC. Join. (33 DC)
R4: Chain 2. DC into the first 3 DCs, (2 DC into the next DC, DC into each of the next 2 DC) 10x, DC into the first DC. Join. (44 DC)
Checkpoint: Stop here, and measure the diameter to ensure the finished beanie will fit correctly. You’ll want your diameter to measure 4″.
R5: Chain 2 (counts as a double crochet here, and throughout). DC into the 2nd DC, and the next 43 (which includes one into the first stitch to count as an increase). Join. (45 DC)
R6: Chain 3 (counts as a double crochet plus chain 1 here, and throughout). DC into the 1st DC, [skip the next 2 DC, (DC, chain 1, DC) into the next DC] 14x. Join to the 2nd chain. (15 V-Stitches)
R7 – 11: Slip stitch into the next chain space. Chain 3. DC into the same chain space, [(DC, chain 1, DC) into the next chain space of the previous v-stitch] 14x. Join to the 2nd chain. (15 V-Stitches)
R8: Chain 1 (doesn’t count as a stitch). HDC into the 1st DC, and into each chain space, and DC around. (45 HDC)
Fasten Off and Weave in Ends.
Please feel free to make and sell your own items made using this pattern, but keep in mind, this written pattern and my photos are protected by copyright. Please DO NOT claim this pattern as your own nor should you sell my pattern. DO NOT re-publish my photos as your own. DO NOT copy and paste my pattern anywhere, link to it instead so other’s can visit. Making videos providing instructions how to make my projects on any social media platform is also not permitted.
Join one of our awesome Facebook groups to share your creations, and see what others are up to!
– Yarn Crafts & Coffee Community
– DIY Home On Rockwood Lane
– Alexandra Lane Lifestyle
Linked Up To…
March 2018 Sharing Time Link Party – Raising Memories
Link Your Stuff – Anniemarie’s Haakblog
Sundays at Home #199 – Celebrating Everyday Life
Sweet Inspiration Link Party #99 – The Boondocks Blog
Friday Frenzy Link Party – 3/23/18 – Kelly Lynn’s Sweets and Treats
Creative Mondays Link Up – Claire Justine
Merry Monday Link Up #197 – A Wonderful Thought
The Really Crafty Link Party #112 – Keeping it Real
You’re the Star Linky Party Week 78 – Let it Shine
Ginx Woolly Linx March Party – Ginx Craft
The Style File – Lady in Violet
Turning Heads Linkup – Elegantly Dressed and Stylish
416th Inspire Me Tuesday – A Stroll Thru Life
From Dream to Reality #304 – The DIY Dreamer
Show and Tell Link Party – Flamingo Toes
Wednesday Link Party 238 – Oombawka Design
Talk of the Town #116 – My Repurposed Life
The Linky Ladies Party #129 – The Purple Poncho
Sew It, Cook It, Crafty It Link Party #50 – Sew Historically
{Wow Me} Wednesday #344 – Ginger Snap Crafts
Hookin’ on Hump Day #163 – Petals to Picots
Your Whims Wednesday #348 – My Girlish Whims
The Blended Blog Style Link Up – Living on Cloud Nine
Ginx Woolly Linx Party May – Ginx Craft
Loop Scoop #14 – Moogly Blog
Craftastic Monday Link Party – Sew Can Do
{Wow Me} Wednesday #505 – Ginger Snap Crafts
Creative Crafts #42 – Creatively Beth
The Wednesday Link Party – Oombawka Design
Craft Schooling Sunday – Creative Jewish Mom
Happiness is Homemade #375 – Decor Craft Design
Handmade Monday #228 – Sum of their Stories
The Really Crafty Link Party #267 – Keeping it Real
Creatively Crafty Link Party #276 – Life Beyond the Kitchen
Artsy-Fartsy Party #345 – Artsy-Fartsy Mama
You’re the Star Blog Hop – Decor Craft Design
Unlimited Link Party 26 – Grammy’s Grid
The Hearth and Soul Link Party – April, the 21st Century Housewife
590th Inspire Me Tuesday – A Stroll Thru Life
Fabulous Party 372 – Lou Lou Girls
Party in Your PJs #359 – The Apple Street Cottage
Your Whims Wednesday #512 – My Girlish Whims
Thursday Favorite Things #490 – An Artful Mom
Encouraging Hearts & Home Blog Hop – Scratch Made Food
Friday Favorites – Busy Being Jennifer
Funtastic Friday Link Party #333 – Simply Beautiful by Angela
Link Your Stuff – Annemarie’s Haakblog
A Morning Cup of Joe – The Cottage Market
Snickerdoodle Create Bake Make Link Party 386 – EyeLoveKnots
So tiny and sweet–thanks for linking up to the Friday Frenzy!
i have some made where can I donate?
At the end of the pattern is a link to The Preemie Project. I designed these hats with them in mind. You could also contact your local baby hospital to see if they take donations.
Those are so sweet, thank you for sharing at The Really Crafty Link Party this week. Pinned!
So lovely, thank you so much for providing the pattern for free. Pinning.
so lovely! i think i would make some for charity 🙂
Cute little pattern for the little ones who need them.
These are so precious! The perfect charity item!!!
Perfect way to use up some of the bits of yarn I have left over from the baby blankets.
Thanks for this cute pattern!
Definitely a great scrap buster.
Thank you. I have been wanting to do some hats to donate. I can do these while I am at work.
Fantastic to hear! Definitely good little quick projects, and good stashbusters.
How cute! Thanks so much for linking up with me at the Unlimited Link Party 26.
Oh these are adorable!! Thank you for sharing the pattern with the Hearth and Soul Link Party community, Alexandra! I hope you have a lovely weekend.
Thanks, April! I love working on baby items, especially these that I am able to donate
R3 in 3-5lbs does not yield 27 DC, but 25 DC which then throws off the count for R4.
I just double checked the pattern. Round 3 is correct at 27 stitches – each round increases by 9 stitches. Do you have 18 stitches at the end of Round 2?