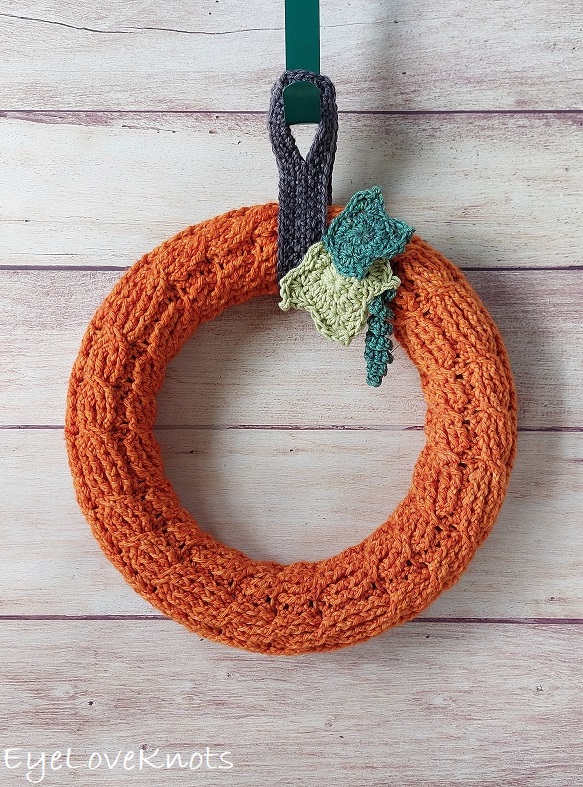
This is a free crochet pattern and video tutorial showing how to crochet the Cabot Pumpkin Wreath, a cozy, cable stitch wreath complete with pumpkin leaves and curly vine that is perfect for Fall decorating! With removable accents, it can take you through Winter too!
This post contains affiliate links. If you make a purchase by clicking on them, I make a small commission at no extra cost to you. I only recommend products I love and hope you’ll love them too! Click here to find out about the different affiliate programs I am apart of. This post also contains shop links to my yarn shop and craft store, Yarn Crafts & Coffee. You can shop online or in person in Melbourne, Florida.
Find the free crochet pattern instructions below, or purchase a printer-friendly, ad-free PDF on Ravelry by clicking here.
In a hurry? Pin for Later when you have more time.
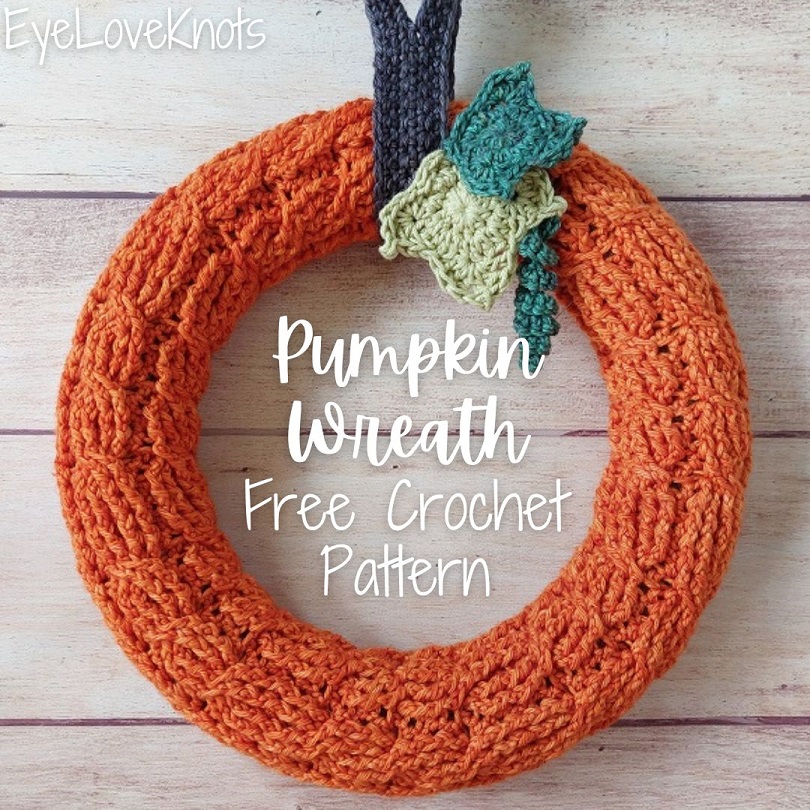
When I first debuted this wreath in August of last year (2022) on Instagram, I already had it in my mind that it would be a Pumpkin.
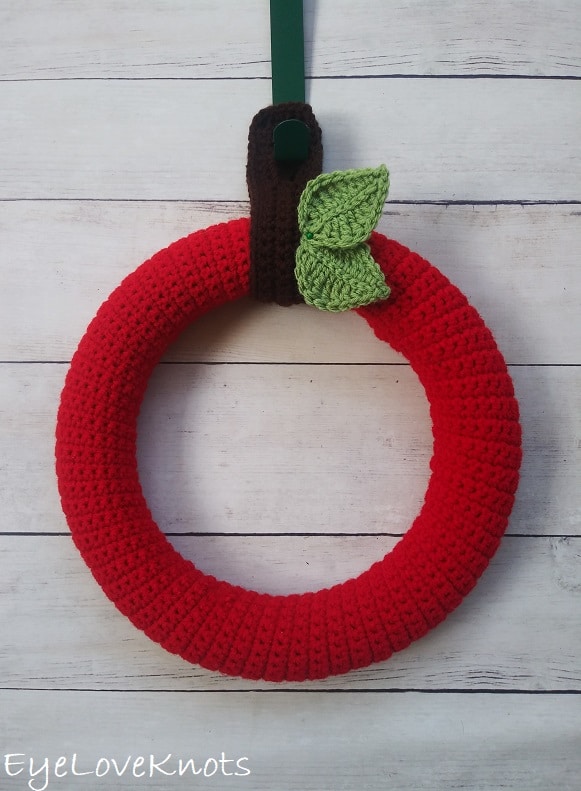
I loved the fun nature and simplicity of my Apple Wreath, and wanted to work on something similar that looked more like a Pumpkin.
I was ahead of the game for Fall decor, and I had the cover about halfway finished back then. I paused to order some brown yarn for the hanger, but…

… when I ordered the brown yarn, I also ordered some gray because the entire time I worked on the wreath form cover, I couldn’t help but envision the cable stitch pattern as a scarf! The wreath cover went into the WIP bin, I caked the Jackie-O colorway up, and the Cabot Scarf was born! (The penguin earrings are handmade too!)
After that, came market prep for the Fall Festival at America’s Antique Mall in Melbourne, Florida (here, here and here), and then just like that, it was Christmas!
This bright orange has been peeping through on the top of my WIP the entire time, begging to be finished. This year, I already decided that I am ready for the warm and coziness of Fall to come to my home early so I finally picked this wreath back up, got it seamed up, and the hanger made. After that, it took me about another month to get some Pumpkin Leaves worked up, and a Curly Vine, but that didn’t stop me from hanging it on my door in the meantime!
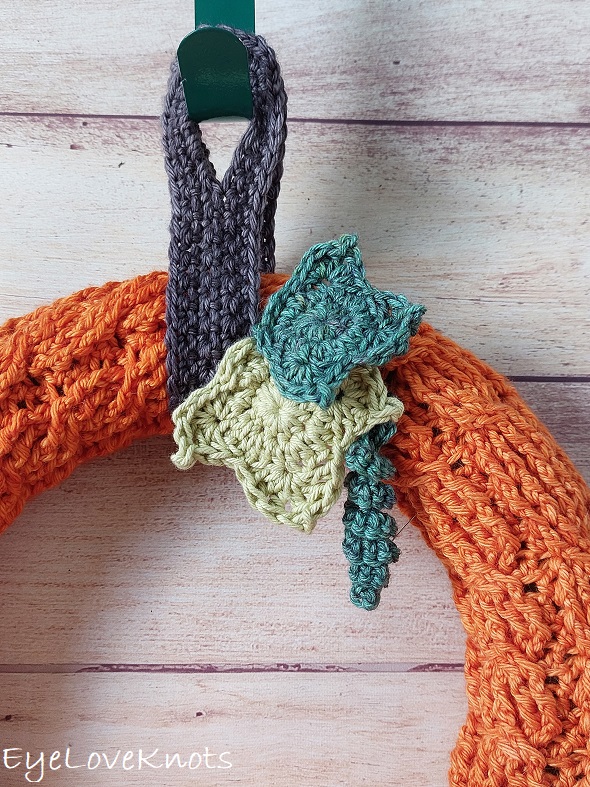
The Pumpkin Leaves were a piece of cake, but the Curly Vine took a little bit of experimenting, and I had a bit of trouble deciding on the placement. I envisioned 2 vines – 1 on either side of the leaves, but I couldn’t figure out how to make the second one hang in a way I was happy with, so I just stuck to 1, and I actually like the grouping of 3 even more than having an extra vine!
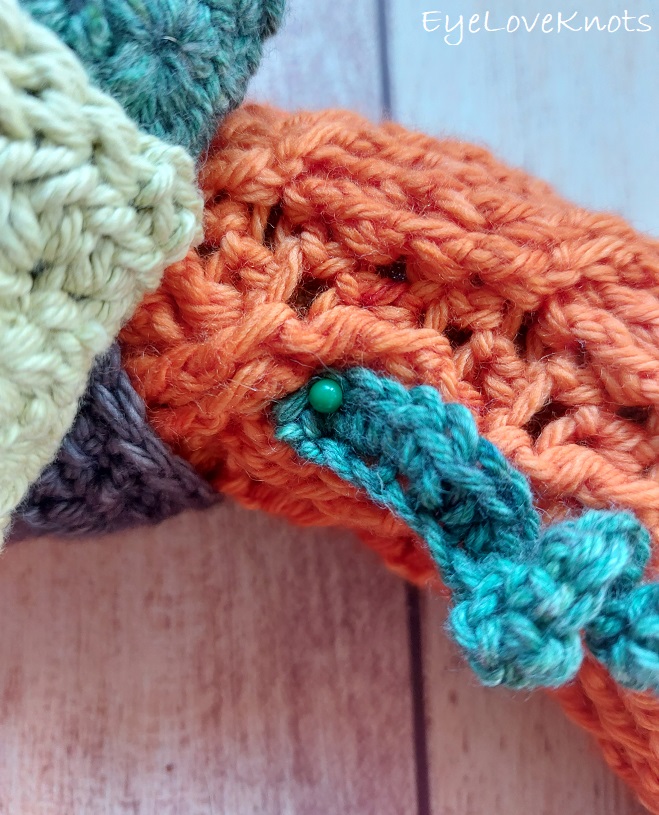
Rather than permanently adhering the embellishments (though you can), use sewing pins. They hold the items securely in place, and are easy to pull out if you want to change up the decor. Sunflowers would be nice for Summer and to transition into Fall. After Fall is over, you can remove the embellishments for a cozy Winter sweater wreath, and in the Spring, you can add some Frilly Flowers with more sewing pins, like I did with my Hilda Wreath for St. Patrick’s Day.
Behind the Scenes…
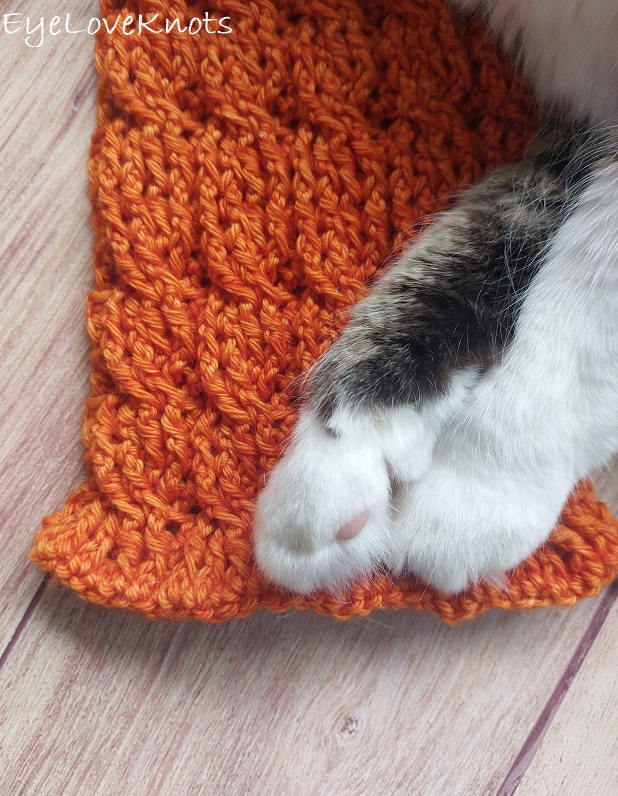
As I was trying to snap a photo of the stitch pattern, Shiloh jumped right on in there to help, and I just love it!
I worked this project earlier this year, and snapped this photo then. Sadly, my sweet boy is no longer with me, but it warms my heart to have these precious photos <3
This wreath is featured in my Pumpkin Patch Crafting Event 2026 hosted on my Yarn Crafts & Coffee blog with my friends Emily of Crochet Aweigh and Candace of T&C Crafters.
Ad-Free, Printer Friendly PDF:
From 6:00pm EST 10/04/26 through 10/09/26 at 11:59pm EST, you can grab a free copy of the PDF for the Cabot Pumpkin Wreath on Ravelry using code CABOT26. I earn my income from the number of pageviews my blog sees, so please do not share the code, but instead share the link to this post so others can find it. Thank you!
After 10/09/26 or for non-subscribers, if you would like a PDF version of this post, you may get one through either my Etsy Shop or Ravelry Shop for a small fee. This fee is to compensate for the views lost when you no longer need to return to the blog to for the information, as you will have your own copy. In a hurry? Pin this for later when you have more time!



Save this to Your Favorites On: AllFreeCrochet, FaveCrafts, Crochet Pattern Bonanza, Cheap Thrifty Living, DIYideaCenter, AllFreeHolidayCrafts
Materials:
- Wreath Base: 320 Yards of Worsted Weight Yarn
- Leaves: 5 Yards of Yarn Each
- Curly Vine: 5 Yards of Lightweight Yarn
- Small Leaf & Curly Vine: G6/4.25mm Crochet Hook
- Rest: H8/5mm Crochet Hook
- Tapestry Needle
- Tape Measure (Gauge is essential)
- Scissors
- Optional, Stitch Markers
- Optional, Jewelry Pliers
- 12″ Foam Wreath Base
- Glue OR Sewing Pins
Yarn Talk:
I used Emma’s Yarn Washable Worsted in the Volume & Barkin Up the Wrong Tree colorways for the Wreath Base & Hanger, Emma’s Yarn Comfy Cotton DK in Canopy as well as WeCrochet Dishie (worsted weight) in Honeydew for the Leaves and the same Emma’s Yarn Comfy Cotton DK in the Canopy colorway for the Curly Vine.
Emma’s Yarn Washable Worsted is a really lovely, 100% superwash merino wool that is hand dyed at my local yarn shop, Four Purls, in Winter Haven, Florida. It’s soft, squishy and beautiful, and I knew the Volume colorway would make for the perfect Fall wreath! Similar yarns are going to be Lion Brand Wool Ease and WeCrochet Swish, but you can use your favorite worsted weight yarn out of your stash!
For most of the wreaths that I make, I use Red Heart Super Saver as it holds up really well to wear and tear and while it does fade over time, I feel that it holds the color the best over other yarns I’ve tried as well as the shaping of embellishments. Premier Yarn Basix Worsted and Lion Brand Pound of Love are also favorites for the same reasons. If the wreath will be inside only, you could go with cotton blends and embellishments, but for outdoor wreaths, cottons fade quickly and begin to fall apart.
Premier Yarns Basix is a sturdy worsted weight acrylic yarn that is perfect for practically any yarn project you could dream of! It’s similar to Red Heart Super Saver and Bernat Super Value, but a little softer. It’s also machine washable and dryable making projects easy to care for. As of July 4th, 2026, it is available in an amazing number of colors – 93 solid colors – as well as 10 tweed colorways and 14 ombre colorways and in Lightweight, Chunky Weight and Super Bulky Weight.
Lion Brand Pound of Love Yarn is a soft, acrylic yarn that comes in a one pound ball. One pound means you won’t need many skeins to get projects done and even after big projects, like baby blankets, you’ll usually have some yarn leftover for smaller projects. It’s machine washable and dryable making projects easy to care for. As of June 5th, it is available in a 35 colors.
Emma’s Yarn Comfy Cotton DK is a really lovely, 50/50 blend of cotton and superwash merino wool that is also hand dyed at my local yarn shop, Four Purls, in Winter Haven, Florida. It’s soft, squishy and beautiful. Similar yarns are Berroco Vintage DK and WeCrochet Swish DK, but again, you can use any lightweight yarn for similar results, or switch up the weight of the yarn to get different sizes.
WeCrochet Dishie was also perfect for one of my pumpkin leaves, but mostly because it was in the colorway that I was looking for. As an alternative, I love working with Queensland Coastal Cotton. Both of these yarns are on the lighter side for a worsted weight yarn and they’re both also colorfast, which means the colors are set so you don’t have to worry about them fading or bleeding from regular use (the sun will still make them fade). I really love how this color goes together with the Canopy green, and the size difference I was able to achieve with a slight change in yarn weight and hook size following the same exact pattern. Feel free to experiment with the accents! There are so many fun possibilities.
Tools & Notions:
We have lots of great crochet hooks in our Yarn Crafts and Coffee Yarn Shop. The most popular, and preferred by Candace and Emily, are the Clover Amour Crochet Hooks with the soft handles and smooth metal hook. Alexandra prefers metal crochet hooks with large, ergonomic clay handles and just loves the fun designs from SiennasBowtique and BronzeShepherdStudio! If your preference is wood, the LYKKE brand are lovely, smooth and sturdy.
A tape measure is an essential tool in a multitude of crafts, including crocheting, knitting and needlepoint to name a few, especially if you are cutting material to finish a project or trying to meet gauge.
Tapestry Needles with the blunt, round end are essential for sewing and finishing on a number of yarn crafts, including crocheting, knitting as well as needlepointing on fabric and plastic canvas. The blunt, rounded end allows the needle to pass easily through the fabric created by yarn and holes on canvas without snagging (or getting your fingers) in the process. More specifically for crocheting and knitting, a Bent Tip Tapestry Needle makes weaving, grafting and sewing so much easier on the hands. The long oval eye makes threading strands of yarn easier, though you may still want to use a needle threader.
Scissors are an essential tool. When I’m working on the go, I like to carry a pair of folding scissors as they fit perfectly in even the tiniest of bags. When I am working at home or have more space in my bag for a larger notions pouch, I like to use a pair of lightweight, all-purpose scissors as they are so versatile and great for a variety of things from cutting plastic canvas mesh to trimming yarn ends after weaving in to cutting out a care card to include with a handmade gift.
Stitch Markers are really helpful to use when it comes to marking the first stitch of the round so you can easily find it when it comes time to join, especially when working in a continuous round, as well as marking where to add increases in making top down garments or where change the stitch pattern within a pattern, which is more common in knitting, but they’re also really helpful when it comes to holding the layers of your fabric together, such as what you would use sewing pins for with fabric, so you can try garments and accessories on as you go or to keep all the rows and stitches lined up when you are ready to seam. You’ll find there are a variety of Stitch Markers available depending on what you’ll use them for, but plastic Locking Stitch Markers are among the most popular as they come in kits and are the cheaper option to grab off the shelf at the craft store, but my favorite are Lever Back Stitch Markers. Scrap yarn, paper clips and safety pins work too!
Jewelry Pliers are an excellent tool to use to help weave in the ends of tough yarns, such as cotton yarns and chunkier yarns, that can be quite tough on the fingers when weaving in with just fingers and a tapestry needle. Sore thumbs and frustration can be a thing of the past by simply using jewelry pliers to help pull the tapestry needle through the work. Make sure the eye of the needle is facing up so you can see directly down it and carefully pull, wiggling as needed. If it gets caught and you tug too hard, it will break the eye of your needle.
Foam wreath form bases come in green and white. It does not particularly matter which color you use for a crocheted wreath that is made of a solid fabric. Even as it stretches, the fabric is typically still solid enough that you don’t see your stitches through, but this is not always true so you will definitely want to test it before whipstitching closed. Personally, I always try to match light colored yarns with a white base, and darker colored yarns with a green base just so I don’t have to worry about it.
If you don’t have a foam wreath base, you could use a straw wreath or a pool noodle with the two ends attached together with a strong tape. These tend to be thicker so you may need to add stitches to the beginning chain to get a wider fabric. While I have not tested wire wreath forms, I think they would work about the same, but may be thinner around and require less stitches.
Usually, I hot glue all of my wreath embellishments down, but I wanted a removable option so I could reuse this wreath so I used sewing pins. If I were going to sell this wreath or gift it, I would definitely have glued the leaves in place.
45mm sewing pins that are 1 3/4″ long are handy to keep the pieces in place. The size of the sewing pins is flexible for this project, since the crocheted fabric is very easy to pin through, but generally 45mm is a good size to use with thick fabrics as it’s a sturdy pin and 1 3/4″ is a good length for thicker fabrics as well.
Hot glue works well for several years, but it can look a little messy, especially if it’s hot where you are, and the embellishments start to loosen over time. I prefer using Titebond Quick and Thick Multi-Surface to glue embellishments in place.
How Long Does it Take to Crochet a Wreath for Fall?
This wreath took about 4 hours to work up, with the wreath cover taking approximately 3 1/2 hours and the rest of the time for the accents.
Measurements:
- Panel: 5 3/4″ Wide by 30 5/8″ Tall
- Fits: 12″ Wreath
- Leaf with Comfy Cotton DK and G6/4.25mm Hook: 2 7/8″ by 2 3/8″
- Leaf with Dishie and H8/5mm Hook: 3 1/4″ by 3″
- Curly Vine with Comfy Cotton DK and G6/4.25mm Hook: 3 1/2″ Long by 3/4″ Wide
Before seaming the cover, your fabric should measure anywhere from 5 1/2″ wide to 6 1/8″ wide by about 30 7/8″ in length.
Gauge:
In Pattern of Wreath Base, 31 stitches by 12 Rows = 5 3/4″ Wide by 3 7/8″ Tall
The most important thing is to measure the width of your fabric after at least 8 rows – this will be the finished width, and you’ll want that to be 5 1/2″ to 5 3/4″ wide, though it does work all the way up to 6 1/8″ with a little looser of a fit. Anything less or more, I recommend going up or down a hook size or adding or taking away stitches in any multiple.
Abbreviations (US Terms):
- HDC – Half Double Crochet (Photo Tutorial | Video Tutorial)
- FPDC – Front Post Double Crochet
- BPDC – Back Post Double Crochet
- SC – Single Crochet (Photo Tutorial)
- DC – Double Crochet (Photo Tutorial)
- TR – Treble Crochet aka Triple Crochet [yarn over twice, insert hook into stitch, yarn over, pull through (4 loops on hook), (yarn over, pull through two loops) 3x]
Special Stitch:
We’ll be creating a cable stitch over 4 stitches, abbreviated as Cr4F.
How to Cr4F: Skip the next 3 stitches, FPDC around the next 2 posts, chain 1, then working in front of the stitches just created, FPDC around each of the skipped 2 posts starting with the one furthest right all while leaving the center HDC unworked.
Pattern Notes:
I will put the notes for each section just above the written instructions for each section.
Pumpkin Wreath Video Tutorial, Part 1:
Pumpkin Wreath Video Tutorial, Part 2:
Cabot Pumpkin Wreath Base Notes:
If you need to adjust to meet gauge for the wreath base, I recommend changing the crochet hook size before changing the stitch count because of how many stitches are in each repeat section. If you need just a little bit more width, you can add two chains to the foundation, and work 2 half double crochets in the beginning of the row, and 2 at the end of the row.
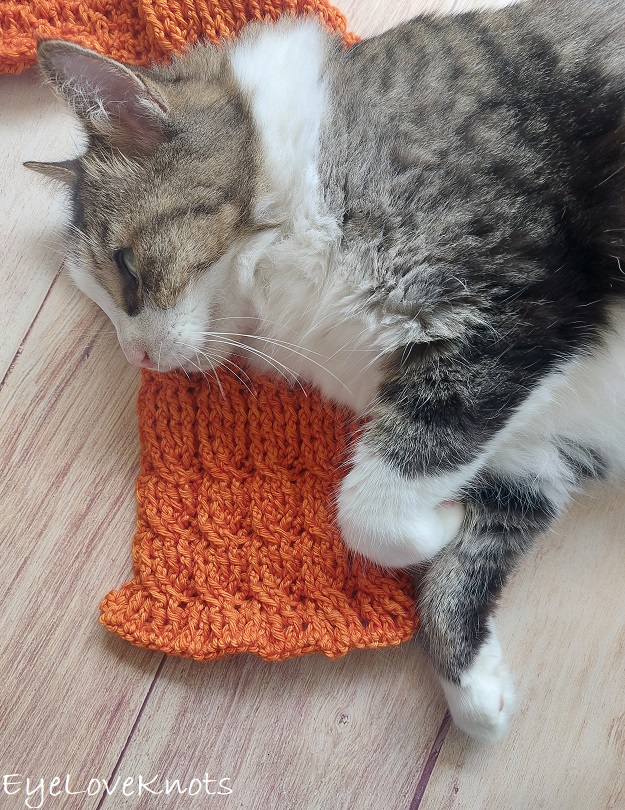
If you’re following along with the video tutorial, the wreath base originally begins with a chain 32 resulting in 31 half double crochets, and then the repeat for Rows & 3 are (post stitch around each of next 2, HDC next), but I’ve modified this in the written pattern to correct the flaring of the fabric in the beginning (best seen on the photo above). I do a similar modification to the end of the panel as well to correct the same thing on the other side beginning at Row 97. Following the video tutorial, the beginning and end flare out a little, and result in a slightly puffy join. It still comes together nicely, and the puffiness can be covered by the wreath hanger, or embellishments.
Cabot Pumpkin Wreath Base Written Pattern – with H8/5mm Hook:
Chain 27, then work a HDC into the 2nd chain from the hook, and each chain across. (26 HDC)
R2: Chain 1, and turn. HDC into the 1st HDC, (FPDC around each of the next 4 posts, HDC into the next stitch) 5x. (26 stitches)
R3: Chain 1, and turn. HDC into the 1st HDC, (BPDC around each of the next 4 posts, HDC into the next stitch) 5x. (26 stitches)
The next row uses a modified Cr4F as there isn’t a half double crochet within the cable stitch yet. We’re going to add it into the next row increasing the total number of stitches in the row, and this stitch count will remain until the last cable row worked. This row will have instructions for this modified cable, and the rest will follow as dictated in the Abbreviations section.
R4, Begin Cable: Chain 1, turn. HDC into the 1st HDC, skip the next 2 stitches, FPDC around the next 2 posts, chain 1, then working in front of the stitches just created, FPDC around each of the skipped 2 posts starting with the one furthest right, (HDC into the next stitch, skip the next 2 stitches, FPDC around the next 2 posts, chain 1, then working in front of the stitches just created, FPDC around each of the skipped 2 posts starting with the one furthest right) 4x, HDC into the last stitch. (26 stitches)
R5: Chain 1, and turn. HDC into the 1st HDC, BPDC around each of the next 2 posts, HDC into the next chain, BPDC around each of the next 2 posts, (HDC into the next stitch, BPDC around each of the next 2 posts, HDC into the next chain, BPDC around each of the next 2 posts) 4x, HDC into the last stitch. (31 stitches)
R6: Chain 1, and turn. HDC into the 1st HDC, FPDC around each of the next 2 posts, HDC into the next stitch, FPDC around each of the next 2 posts, (HDC into the next stitch, FPDC around each of the next 2 posts, HDC into the next stitch, FPDC around each of the next 2 posts) 4x, HDC into the last 2 stitch. (31 stitches)
R7: Chain 1, and turn. HDC into the 1st HDC, BPDC around each of the next 2 posts, HDC into the next stitch, BPDC around each of the next 2 posts, (HDC into the next stitch, BPDC around each of the next 2 posts, HDC into the next stitch, BPDC around each of the next 2 posts) 4x, HDC into the last stitch. (31 stitches)
R8, Cable with actual Cr4F: Chain 1, turn. HDC into the 1st HDC, Cr4F, (HDC into the next stitch, Cr4F) 4x, HDC into the last stitch. (31 stitches)
R9: Chain 1, and turn. HDC into the 1st HDC, BPDC around each of the next 2 posts, HDC into the next stitch, BPDC around each of the next 2 posts, (HDC into the next stitch, BPDC around each of the next 2 posts, HDC into the next stitch, BPDC around each of the next 2 posts) 4x, HDC into the last stitch. (31 stitches)
R10: Chain 1, and turn. HDC into the 1st HDC, FPDC around each of the next 2 posts, HDC into the next stitch, FPDC around each of the next 2 posts, (HDC into the next stitch, FPDC around each of the next 2 posts, HDC into the next stitch, FPDC around each of the next 2 posts) 4x, HDC into the last stitch. (31 stitches)
R11: Chain 1, and turn. HDC into the 1st HDC, BPDC around each of the next 2 posts, HDC into the next stitch, BPDC around each of the next 2 posts, (HDC into the next stitch, BPDC around each of the next 2 posts, HDC into the next stitch, BPDC around each of the next 2 posts) 4x, HDC into the last stitch. (31 stitches)
R12 – 17: Repeat Rows 9 – 12, then 11 – 12 again.
R18 – 21: Repeat Rows 9 – 12.
R22 – 25: Repeat Rows 9 – 12.
R26 – 95: Repeat Rows 13 – 26.
The next row uses a modified Cr4F as this is the last cable work we’ll work, and we need to now take out the half double crochet that is within the cable stitch, or decrease back to the total number of stitches we had when we started.
R96: Chain 1, turn. HDC into the 1st HDC, skip the next 2 stitches, FPDC around the next 2 posts, then working in front of the stitches just created, FPDC around each of the skipped 2 posts starting with the one furthest right, (HDC into the next stitch, skip the next 2 stitches, FPDC around the next 2 posts, then working in front of the stitches just created, FPDC around each of the skipped 2 posts starting with the one furthest right) 4x, HDC into the last stitch. (26 stitches)
R97: Chain 1, and turn. HDC into the 1st HDC, BPDC around each of the next 4 posts, (HDC into the next stitch, BPDC around each of the next 4 posts) 4x, HDC into the last stitch. (26 stitches)
R98: Chain 1, and turn. HDC into the 1st HDC, FPDC around each of the next 4 posts, (HDC into the next stitch, FPDC around each of the next 4 posts) 4x, HDC into the last stitch. (26 stitches)
R99: Chain 1, and turn. HDC into the 1st HDC, and into each HDC around. (26 HDC)
Fasten off with a long tail (approximately 60″) for sewing. Pull up on last stitch to break.
Weave in all the ends except the long one last cut. Thread tapestry needle with long tail end, wrap the wreath form cover around the wreath with the right side facing out, and whipstitch closed lining up the stitches stretching to fit as needed.
Assembly Photos, Shown on my Through the Window Wreath:
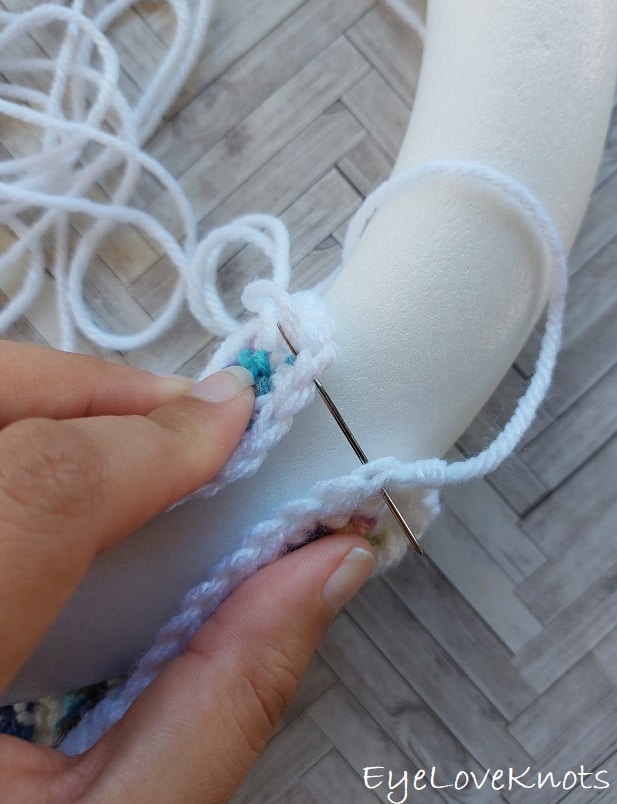
Wrap the piece around the form, line up the stitches, and sew the two layers together.
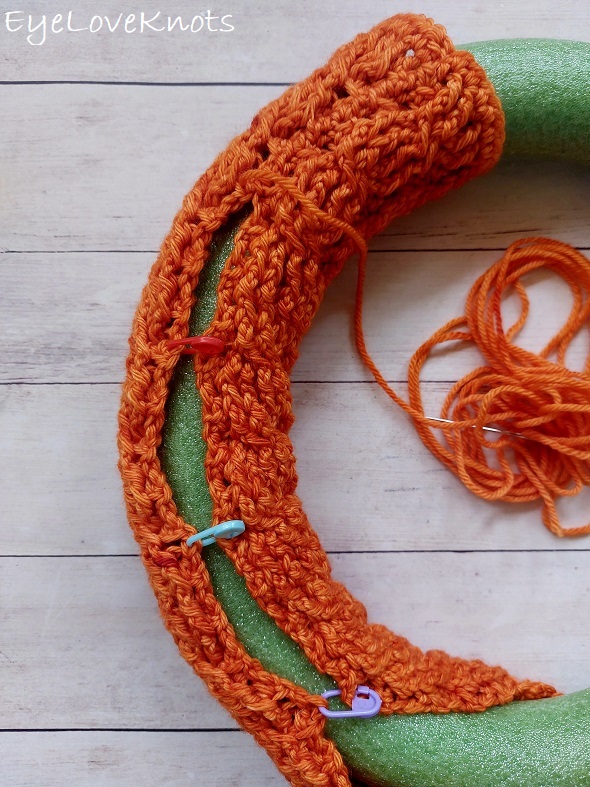
You may find it helpful to use stitch markers to pin the fabric together every 2″ or so. I like to use Locking Stitch Markers for this.
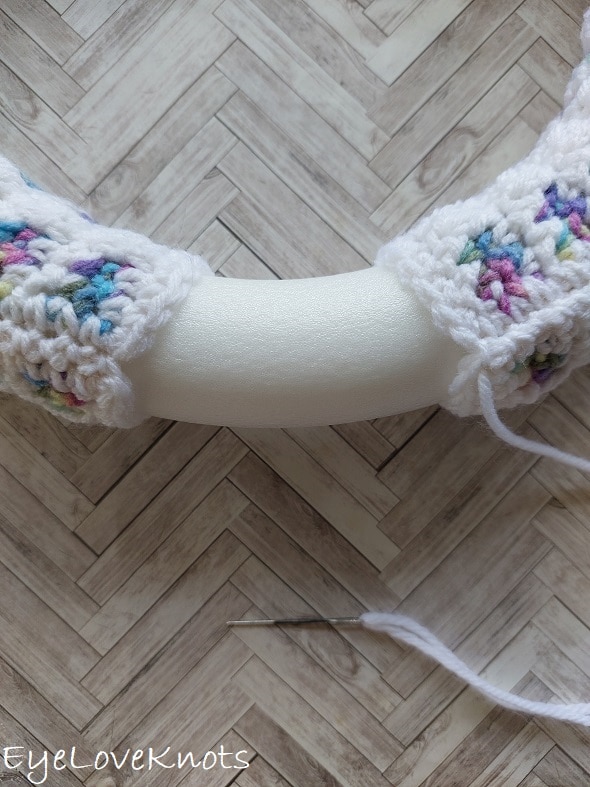
Once towards the end, it will look like it isn’t long enough to connect, but it will with a little stretching. Finish sewing the sides together, then sew the beginning foundation chain stitches to the stitches from the final row.
Weave in your tail, and your wreath form cover is complete!
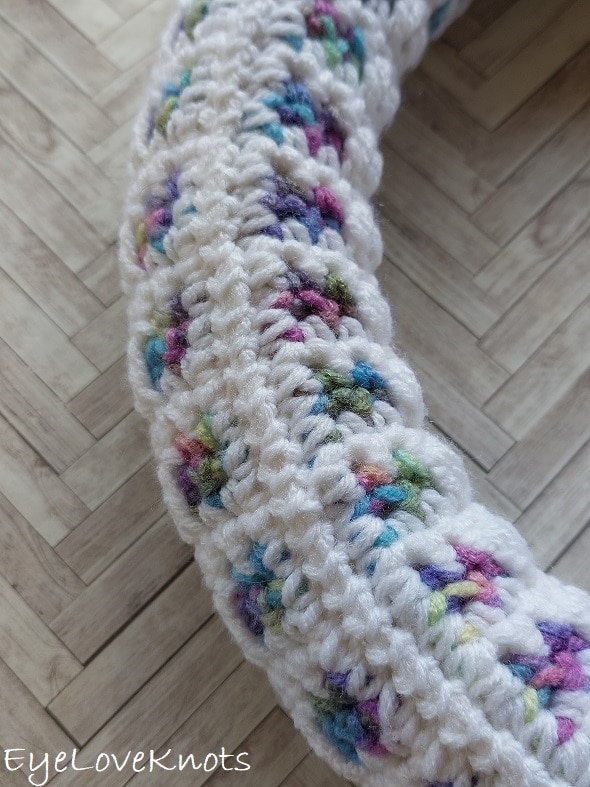
This is what the back of it looks like. You will see that the seam falls to the back. If it doesn’t, just twist your piece a little to make it so.
Optional Wreath Hanger Note:
Row 3 is modified to shape the hanger to look more like a stem. If you prefer a hanger without shaping, simply work 26 SC in the section in between chain spaces.
Wreath Hanger Written Pattern – with H8/5mm Hook:
Chain 43. SC into the 2nd chain, and each chain across. (42 SC)
R2: Chain 1, turn. SC into the 1st SC, and each SC across. (42 SC)
R3: Chain 1, turn. SC into the 1st 4 SCs, chain 4, skip the next 4 SC, SC into the next 8 SC, HDC into the next SC, DC into the next 8 SC, HDC into the next SC, SC into the next 8 SC, chain 4, skip the next 4 SC, SC into the last 4 SC. (34 stitches)
R4: Chain 1, turn. SC into the 1st 4 SCs, work 4 SC into the chain space, SC into the next 26 stitches, work 4 SC into the next chain space, SC into the last 4 SC. (42 SC)
R5: Chain 1, turn. SC into the 1st SC, and each SC across. (42 SC)
Border: Chain 1, turn. SC into the 1st SC and each SC across to the last stitch, work 3 SC into the last stitch to form a corner, evenly work 3 SC (that’s 1 SC per row edge) down the side, work 3 SC into the last stitch to form a corner, working into the opposite side of the foundation chain: SC into the next 40 stitches, work 3 SC into the last stitch to form a corner, evenly work 3 SC (that’s 1 SC per row edge) up the side, 1 SC into the same stitch as the first, then slip stitch join to the 1st SC. (98 stitches including the slip stitch)

Pumpkin Leaf Notes:
In Round 2, I will split the beginning increase to help keep my seam straight, and less noticeable, and also to prevent a gap between the last stitch and the first. You can increase as you’re comfortable.
In Round 3, in the middle of the petal we work a chain and slip stitch to the first – this is to create a point sort of like a picot.
I worked the smaller leaf in Emma’s Yarn Comfy Cotton DK (lightweight yarn) in the Canopy colorway with a G6/4.25mm crochet hook, and the larger one in WeCrochet Dishie (worsted weight yarn) in the Honeydew colorway with an H8/5mm crochet hook.
Pumpkin Leaf Written Pattern – Make 2 in Your Choice of Colors/Yarn:
Chain 5. Slip stitch join to the first chain to form a ring. Chain 1. Work 12 HDC into the center ring. (12 HDC)
R2: Chain 1. Work 1 HDC into the first stitch (this stitch falls just to the left of the beginning chain), 2 HDC into each of the next 11 stitches, HDC into the first stitch (this stitch falls just to the right of the beginning chain). Join. (24 HDC)
R3: Chain 1. Skip the first 3 stitches, (SC, HDC, 2 DC) into the next stitch, chain 2, slip stitch to the 1st chain, then into the same stitch as the previous 4 stitches (DC, HDC), skip the next 2 stitches, slip stitch into the next, skip the next 2 stitches, (DC, 2 TR) into the next stitch, chain 2, slip stitch to the 1st chain, then into the same stitch as the previous 3 stitches (2 TR, DC), skip the next 2 stitches, slip stitch into the next, skip the next 2 stitches, (HDC, DC) into the next stitch, chain 2, slip stitch to the 1st chain, then into the same stitch as the previous 2 stitches (2 DC, HDC, SC), skip the next 2 stitches, slip stitch into the next, SC into the next, HDC into the next, slip stitch into the next, HDC into the next, SC into the next. Slip stitch join to the beginning chain 1.
Fasten off, and weave in ends.
Curly Vine Notes:
There is not a stitch multiple for this project. You can make this larger or smaller by working more chains, or less chains.
For a tighter curl, work 3 stitches into each stitch.
Curly Vine Written Pattern – with G6/4.25mm hook:
Chain 31. Work 2 SC into the 2nd chain from the hook, and into each chain all the way across to the end. (60 SC)
If you’re going to be sewing the curly vine onto a project, then fasten off with a long tail end to work with, if not, fasten off with a tail end long enough to comfortably weave in.
Weave in initial tail end as normal.
For the second tail end (if you’re not using it for sewing), I like to work it a special way to help keep the shaping of the v-shape from the last stitch. Insert your needle from the wrong side (or back side) through the chain that is opposite your last stitch. Pull through, and use your fingers to manipulate the fabric so the fabric lays flat, and the strand lays naturally along the top forming a top leg. Insert your needle from the right side (or front) through the last stitch worked, picking up both loops from the v-shape, and pull through. This creates another leg on the bottom that will blend in with the rest of the stitches. Finish by weaving in as normal on the wrong side of the fabric.
Final Touches:
Decide where to place your leaves and curly vine. I used a sewing pin to help me map out where I wanted them to be, and ended up using this method to secure them, but I usually hot glue them down.
When it comes to wreaths, I know your first thought is to hang it on the front door, and I absolutely agree! Hang the first wreath on the front door, and then make another one because they can be hung on a gallery wall, over an entryway table, mantel or fireplace, from windows, cabinets and the back of dining chairs and so much more! You can place a wreath anywhere you want for a little more cheer.
I feel like there is no right or wrong answer when it comes to placing your wreath because it’s whatever you like best, but the standard and a safe bet is going to be to hang your wreath at eye level.
Please feel free to make and sell your own items made using this pattern, but keep in mind, this written pattern and my photos are protected by copyright. Please DO NOT claim this pattern as your own nor should you sell my pattern. DO NOT re-publish my photos as your own. DO NOT copy and paste my pattern anywhere, link to it instead so other’s can visit. Making videos providing instructions how to make my projects on any social media platform is also not permitted.
Join one of our awesome Facebook groups to share your creations, and see what others are up to!
– Yarn Crafts & Coffee Community
– DIY Home On Rockwood Lane
– Alexandra Lane Lifestyle
Linked Up To…
Leave a Reply