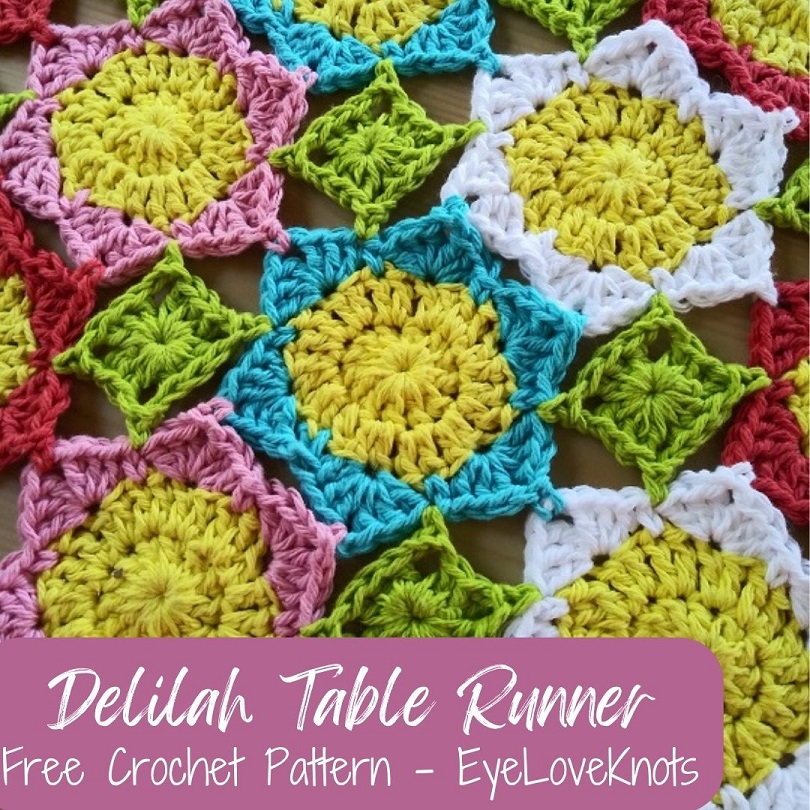
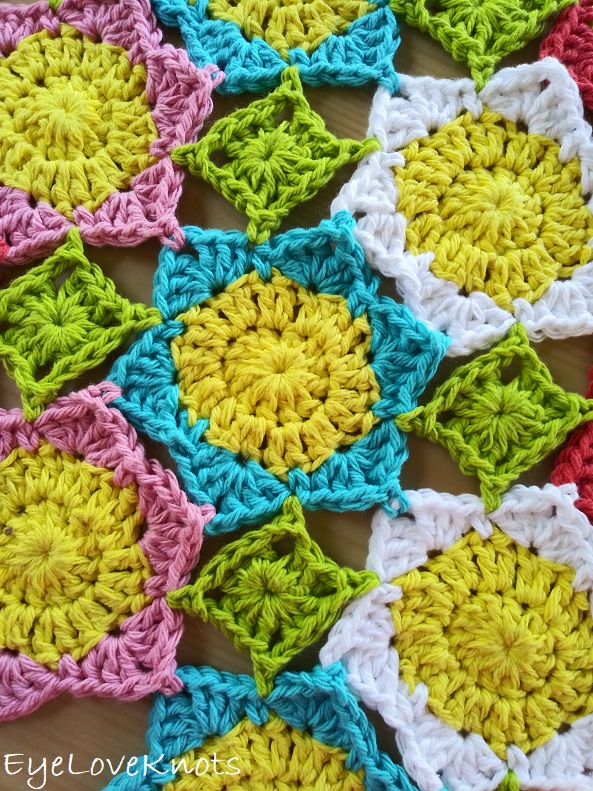
This is a free crochet pattern and video tutorial showing how to crochet a pretty and whimsical floral table runner that is worked by joining floral motifs together as you go, and then adding in leaves after. The half leaves along the sides, top and bottom and border are optional. At only 12 yards of yarn per flower and 4 yards per full leaf, this is a great project for scraps of yarn! It is the perfect piece to add to your dining table, kitchen island, entryway table, desk or over a chest!
This post contains affiliate links for Amazon, LoveCrafts, Etsy, Lion Brand and WeCrochet. If you make a purchase by clicking on them, I make a small commission at no extra cost to you. Thanks for your support!
Find the free crochet pattern instructions below, or purchase a printer-friendly, ad-free PDF on Ravelry by clicking here.
In a hurry? Pin this for later when you have more time.
Prior to creating my Dara Table Runner, I never used to use table runners. Sure, my mom used them throughout the house while I was growing up, but I never reached for one to put down on any table or surface.
I’ve always tried adding decorative touches around my home, but I didn’t really get into it until around 2020, and my Simple Turquoise, Orange & White Spring Entry Table was the first entryway table I set in my home.
All it took was once, and then I kept the same table runner out, and switched up the decor on top depending on the time of year. I was so surprised that this cream and gray table runner was actually the perfect piece for all of the seasons and holidays, including Christmas!
Ever since, I have loved crocheting table runners to use in both my home decor and in my OnRockwoodLaneShop that is located inside America’s Antique Mall in Melbourne, Florida. Check out some of my other free table runner crochet patterns.
Table sizes and shapes vary so much, it’s hard to have just one average size that works for everything, but I will say that my favorite size table runner is about 15″ wide by 45″ long, and I love it on my rectangle table that seats 6 as well as my entryway tables, desk and chest. You will find instructions for creating a table runner specifically to this size, and then if you want to go a bit further, I’ll include more details and sizing options for other table sizes that you’ll find in the FAQ section below.
You’re also going to find instructions and measurements for both Lily Sugar n Cream and WeCrochet Dishie, since they both work up a little different from each other. Gauge is not essential for this project and with the flowers joined as you go, it’s so easy to measure as you go, and stop at the size that you like the best, which means you can easily change up the yarn weight to use whatever you have in your stash!
My original runner was designed in one size without half leaves along the edges or a border, but I recently received a request for additional details to add these things to the table runner, and in working on this update, I’ve added a video tutorial, and details on the additional sizes – let me know what you think!
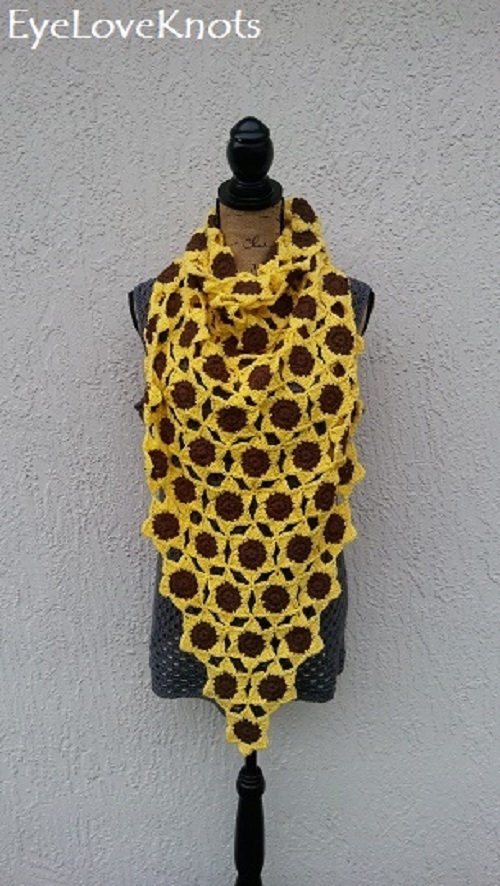
This floral motif has been one of absolute favorite little things! I have used to create so many fun free crochet patterns in the Delilah Series:
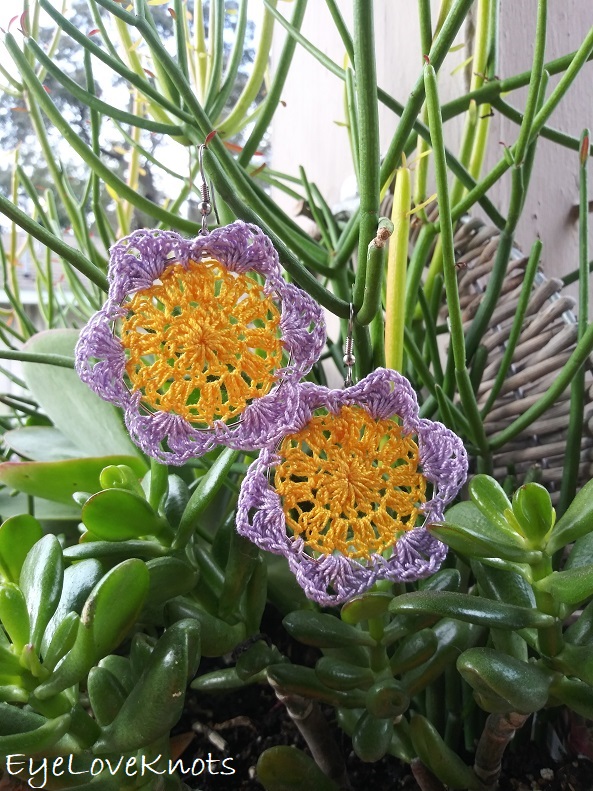
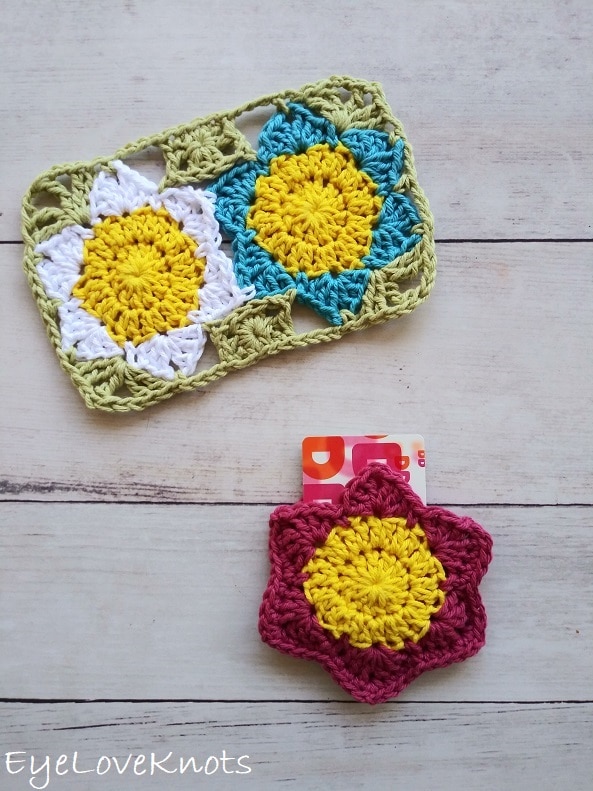
Delilah Mug Rug & Delilah Gift Card Holder
What is the best yarn to use to crochet a table runner? Can you crochet a table runner with acrylic yarn?
I did use Lily Sugar n Cream for the original table runner, but I really like using WeCrochet Dishie Yarn and Queensland Coastal Cotton because they are colorfast, which means the colors are set. Cotton is a great durable, sturdy, absorbent fiber, but really, you can use any yarn to create a table runner. The only thing I will stress is the purpose of your table runner.
Decoratively, any yarn will work just fine. Lion Brand Wool Ease is another lovely yarn for table runners that I have used for some in my personal collection, and the wool adds to the durability and absorbency.
If you will be using a table runner on a table that you will be eating and drinking on too, I recommend 100% cotton or 100% wool with no synthetic yarn (acrylic, polyamide, nylon…) within it. Why? Synthetic yarn is made from plastic and could melt if something fresh from the oven or stove were placed on top of – don’t worry though, a hot cup of coffee is not hot enough to melt synthetic fiber.
While synthetic yarns also don’t absorb the same way with cold beverages, it still holds the water and does not seep through to the surface so you wanted to use a yarn like Red Heart Super Saver, you absolutely could as long as not putting those hot pots and pans on top.
Gauge is not essential for this project so you can easily substitute another weight yarn that might be in your stash, such as a Lightweight #3 Yarn like Lion Brand 24/7 Cotton DK, or a Chunky Weight #5 Yarn like Lion Brand Hue and Me – you may need to test to make sure your items will sit well on the fabric if using a Chunky Weight Yarn depending on where you will be using your table runner.
Are crocheted table runners washable?
I like to use yarns for table runners that I know are easy to wash, like WeCrochet Dishie, Red Heart Super Saver and Lion Brand Wool Ease. These hold up well to use, and machine washing and drying, though hand washing and laying flat to dry is always best to preserve your crocheted items. With the yarns I mentioned, I know I can throw the table runner into the washing machine (on gentle and in cold water) and then into the dryer (on low heat) when it’s time to clean it.
Do people use table runners? Should you use a table runner?
While table runners aren’t used quite as often as they used to be, the fact that they come in a wide range of materials, colors, and styles, they are becoming more popular in modern decor. Table runners are both decorative and functional, which make them an excellent piece to add to your home decor to complement the other elements in the home or on the table, and protect your surfaces from scratches, spills and stains.
When most people think table runner, they think traditional dining table, but table runners don’t stop there! Place them on your kitchen island or buffet table, on the entryway table, console table or coffee table, over the top of a hope chest, or on your desk, dresser or vanity. These are just a few of my favorite ways to use them to amp up the decor, cover blemishes in the furniture and to protect the surfaces, and that isn’t only in my home, but also in my OnRockwoodLaneShop that is located inside America’s Antique Mall in Melbourne, Florida. If you are selling in a booth or at a fair, I definitely recommend having table runners on hand alongside tablecloths.
What is the best size for a table runner? What is the most common size for a table runner?
Table sizes and shapes vary so much, it’s hard to have just one average size that works for everything, but I will say that my favorite size table runner is about 15″ wide by 45″ long, and I love it on my rectangle table that seats 6 as well as my entryway tables, desk and chest. You will find instructions for creating a table runner specifically to this size, and then if you want to go a bit further, I’ll include more details and sizing options for other table sizes.
The best way to make a table runner that fits your table perfectly is to measure your table, then decide if you want it to hang off the ends.
The standard width for dining table runners is 1/3 the width (or diameter) of the table.
The average depth for entryway or console table runners is 14 – 18″.
The standard length for table runners regardless of the table or surface it will sit on is 12″ longer than the table (though I always make mine the same size or a little shorter than the full length as I don’t like to stretch my crocheted fabric).
What is the most common table size?
The most common table width is 36″. The length varies depending on how many people it will sit, and the shape of the table.
The average table sizes are as follows:
Entryway or Console Table:
- 14″ – 18″ Wide
- 36″, 48″ or 60″ in Length
Square Table:
To seat 4 people: 36″ diameter
Rectangle Table – Width by Length:
- To seat 4 to 6 people: 36″ by 48″
- To seat 6 to 8 people: 36″ by 60″
- To seat 8 to 10 people: 36″ by 78″
Oval Table – Width by Length:
- To seat 4 to 6 people: 36″ by 56″
- To seat 6 to 8 people: 36″ by 72″
- To seat 8 to 10 people: 36″ by 84″
Circle Table:
- To seat 4 people: 36″ diameter
- To seat 4 to 6 people: 54″ diameter
- To seat 6 to 8 people: 72″ diameter
Can I put a table runner on a round table?
You definitely can use a table runner on a round table, and in a couple ways! You can place it along the diameter of the table top, much like you would do on other tables, or you can layer two of them in an X shape setting up placemats for guests in the spaces in between the table runners.
Does a table runner have to hang off the ends of the table?
Whether or not a table runner hangs off the ends of the table is completely up to you and can vary on it’s placement. Perhaps you don’t like it to hang off the sides of a dining table, but you do like it to hang off the sides of an entryway table, and that’s perfectly fine!
My personal preference is no overhang, especially when working with crocheted fabric, just because hanging crocheted pieces is not recommended as it will stretch out the fabric, but if you did want to add an overhang, I might suggest using a lightweight yarn – not necessarily in weight, but the overall weight of the project. For example, if using worsted weight yarn, 100% acrylic is a lighter fiber than 100% cotton.
If you do want to add the overhang, the standard length regardless of the table or surface it will sit on is 12″ longer than the table.
Do you still use placemats with a table runner?
Table runners can lay along the center of the table as you’re probably more used to seeing, and add placemats, or you can use multiple table runners as placemats! When using multiple table runners as placemats you can get creative with placement. Imagine you have one table runner on your buffet table under all the food options, and two table runners lengthwise pushed more towards the sides of the table where a placemat would sit serving guests that sit next to each other, or two table runners positioned where a placemat would sit and running widthwise hanging off the sides versus top and bottom serving guests that sit across from each other, and then one running down the center lengthwise to house all the food options. These are just a couple ideas, but the sky is the limit!
Should table runners match napkins and placemats?
While you absolutely could match your table runner, napkins and placemats, I think choosing either your table runner or your accent pieces as the patterned or bolder color choice, and coordinating the others with a plain or less busy design or color is best.
Ad-Free, Printer Friendly PDF:

EyeLoveKnots newsletter subscribers get access to Exclusive Subscriber Content, like the free PDF of this pattern via the Free File Library – you’ll find the tab on the top menu. The library is password protected so sign up for my newsletter and you’ll receive a Welcome email containing this month’s password, or if you are already a blog subscriber, reference your latest newsletter for this month’s password. From the library, you’ll be able to access the PDFs via Google Drive – you do not need to have a Google Drive account to view and download the PDF.
For a limited time…
Through 02/20/24 at 11:59pm EST, you can grab a free copy of the PDF for the Delilah Table Runner on Ravelry using code FREECROCHET202406. I earn my income from the number of pageviews my blog sees, so please do not share the code, but instead share the link to this post so others can find it. Thank you!
After 02/20/24 or for non-subscribers, if you would like a PDF version of this post, you may get one through either my Etsy Shop, Ravelry Shop or LoveCrafts Shop for a small fee. This fee is to compensate for the views lost when you no longer need to return to the blog to for the information, as you will have your own copy.
In a hurry? Pin this for later when you have more time!


Save this to your Favorites on: AllFreeCrochet, FaveCrafts, Crochet Pattern Bonanza, Cheap Thrifty Living, DIYideaCenter, AllFreeHolidayCrafts
Materials:
- Worsted Weight Yarn – that’s 12 Yards per Flower, and 4 Yards per Full Leaf. In my original table runner, I did not add half leaves or a border. I used 560 Yards of Lily Sugar n Cream in total. That’s 235 Yards in (MC) Yellow for the flower centers, 205 Yards in (CB) Rose Pink, Mod Blue, White & Red for the petals, and 120 Yards in (CC) Hot Green for the Full Leaves. **Half leaves along edges and border will use additional yarn, and yardage required will vary for other sizes.
- H8/5mm Crochet Hook – I love my Koi Fish Ergonomic Clay one from SiennasBowtique on Etsy
- Tapestry Needle for Weaving in Ends
- Optional, Jewelry Pliers
Material Notes:
Yarn Alternatives to Lily Sugar n Cream: WeCrochet Dishie, Queensland Coastal Cotton
Cotton is a great durable, sturdy, absorbent fiber, but really, you can use any yarn to create this runner. The only thing I will stress is the purpose of your runner. As decoration, any yarn will work just fine. If you will be using this on a table that you will be eating and drinking on too, I recommend cotton or wool with no synthetic yarn (acrylic, polyamide, nylon…) within it. Why? Synthetic’s could melt if something hot were placed on top of, and don’t hold up as well to moisture.
Gauge is not essential for this project and with the flowers joined as you go, it’s so easy to measure as you go, and stop at the size that you like the best, which means you can easily change up the yarn weight to use whatever you have in your stash!
Jewelry pliers are an excellent tool to use to help weave in ends, as cotton yarn can be quite tough on the fingers when weaving in with just fingers and a tapestry needle.
Time Spent:
- Flowers: Just over 15 minutes each.
- Full Leaves: 5 minutes each.
- Entire Runner: Just over 14 hours.
Measurements:
Flower, taken from the position of one petal at the top center and measured from tip of top petal to tip of bottom petal:
- With Lily Sugar n Cream: 3 3/4″ wide by 4 1/4″
- With WeCrochet Dishie: 3 5/8″ wide by 4 1/8″
Original runner size that is almost 15″ by 45″:
- With Lily Sugar n Cream: 14″ wide by 46 1/4″
- With WeCrochet Dishie: 13 1/2″ wide by 44″
If you want to explore other sizing options, I will put that information down in the Written Pattern.
Gauge – Not Essential:
Diameter taken after Round 2.
- With Lily Sugar n Cream: 2 5/8″
- With WeCrochet Dishie: 2 1/2″
Abbreviations (US Terms)
- SC – Single Crochet (Photo Tutorial)
- DC – Double Crochet (Photo Tutorial)
- HDC – Half Double Crochet (Photo Tutorial)
- TR – Treble (or Triple) Crochet (yarn over 2x)
- DTR – Double Treble (or Quadruple) Crochet (yarn over 3x)
Pattern Notes:
Beginning chain does not count as a stitch, except for in the leaves.
Join to the first stitch of the round, not the beginning chain.
While you can also work in the more traditional ways of pulling new color through in the last yarn over of the previous stitch (I do have a photo and video tutorial for this technique – How to Change Yarn Colors in Crochet), I find that doing so in this manner distorts the fabric and disrupts the colors. For the most seamless color change, I recommend after joining the round as normal to yarn over and pull through with the new color, then pull the original color tight (it will disappear), or to fasten off the center color, and rejoin the new color in any stitch.
I work my increases a little different than most, and that is that the first stitch from the first set of increases is done in the first stitch of the round, which will appear just to left of the beginning chain, then the round will be worked as normal, and the final stitch of the round will be the second stitch of the first set of increases, and it will be worked into the same stitch as the first, and appear just to the right of the beginning chain. You can see a photo tutorial of this in my How to Keep a Straight Seam post.
Though there are only three rounds, and a straight seam isn’t really an issue, this is my preferred method – you can work in your preferred increase method for the center as long as you end up with 24 stitches.
I recommend weaving the ends in as you go – I weaved mine in at the end of each row. I know myself way too well to know that if I had left all those ends for the end, I may not have finished this project.
Delilah Table Runner Video Tutorial:
Outline:
The flowers are worked in rows across from left to right – the 1st flower is on the far left, and the last flower is on the far right. If you’re measuring as you go, additional flowers will add to the width, and additional rows will add to the length.
I worked the first two rows first, then went back and worked the leaves in between these rows, then I went on to add the next row of flowers, and then the leaves in between the previous two. Alternatively, you can do all the flowers first, and then go in, and add the leaves, or you can omit the leaves all together, but the runner will have less stability as it will have those gaps.
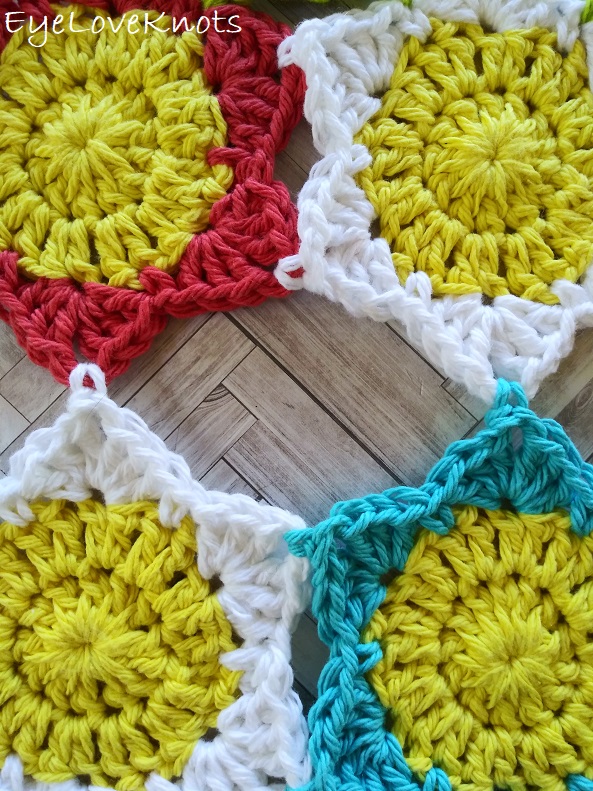
For my color pattern, I worked the first row of flowers as Blue, Pink, Red and White. For all the remaining rows, I took the first color, and moved it to the end, so my second row was Pink, Red, White and Blue. This creates diagonal lines of color. It would look great in all random colors, or all one color.
How Many Flowers to Work?
For the original table runner size, you will have rows of 4 flowers, and there will be a total of 11 rows of flowers with 10 rows of leaves in between. This will result in a table runner that is Lily Sugar n Cream: 14″ wide by 46 1/4″ or WeCrochet Dishie: 13 1/2″ wide by 44″.
If you are interested in working up a different size, see below. The best way to use the sizing information below is to measure your table, then find the measurements that are closest. For the best fit, you’ll want a width that is nearly the depth of your entryway table or 1/3 the diameter of a dining table, and either the same length as your table or with a 6″ overhang on both sides (12″ longer in total than the length of your table).
Entryway or Console Table
With Lily Sugar n Cream:
- 3 Flowers Wide by 9 Flowers Tall = 10 1/2″ x 37 7/8″
- 4 Flowers Wide by 11 Flowers Tall = 14″ x 46 1/4″
- 5 Flowers Wide by 13 Flowers Tall = 17 1/2″ x 58 7/8″
With WeCrochet Dishie:
- 3 Flowers Wide by 9 Flowers Tall = 10 1/8″ x 36″
- 4 Flowers Wide by 11 Flowers Tall = 13 1/2″ x 44″
- 5 Flowers Wide by 13 Flowers Tall = 17″ x 60″
Dining Table Widths:
With Lily Sugar n Cream:
- 3 Flowers = 10 1/2″
- 4 Flowers = 14″
- 5 Flowers = 17 1/2″
- 6 Flowers = 21″
- 7 Flowers = 24 1/2″
With WeCrochet Dishie:
- 3 Flowers = 10 1/8″
- 4 Flowers = 13 1/2″
- 5 Flowers = 17″
- 6 Flowers = 20 1/4″
- 7 Flowers = 23 5/8″
Dining Table Lengths
For length of table work the first number of flowers – or – for a 12″ overhang on the top and bottom work the number of flowers next to it.
With Lily Sugar n Cream:
- 11 Flowers = 46 1/4″ — 14 Flowers = 58 7/8″
- 13 Flowers = 54 5/8″ — 16 Flowers = 67 1/4″
- 14 Flowers = 58 7/8″ — 17 Flowers = 71 3/8″
- 17 Flowers = 71 3/8″ — 20 Flowers = 84″
- 19 Flowers = 79 7/8″ — 21 Flowers = 88 1/4″
- 20 Flowers = 84″ — 23 Flowers = 96 5/8″
With WeCrochet Dishie:
- 12 Flowers = 48″ — 15 Flowers = 60″
- 14 Flowers = 56″ — 17 Flowers = 68″
- 15 Flowers = 60″ — 18 Flowers = 72″
- 18 Flowers = 72″ — 21 Flowers = 84″
- 20 Flowers = 80″ — 23 Flowers = 92″
- 21 Flowers = 84″ — 24 Flowers = 96″
How much will the Border add?
The border will add about half an inch to the width and height. Additional rounds will add more.
1st Flower:
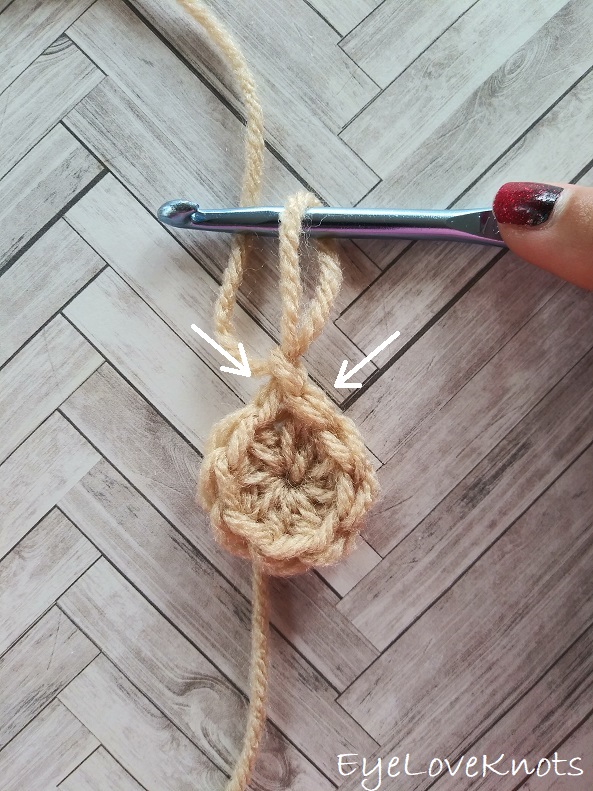
In Yellow, chain 5. Slip stitch to the first chain to form a ring. Chain 2. Work 12 DC into the ring. Join. (12 DC)
R2: Chain 2. DC into the 1st DC, 2 DC into each of the next 11 DC, DC into the same DC as the 1st. Join with CB, and fasten off Yellow. (24 DC)
R3: In CB, chain 1. SC into the 1st stitch, skip the next stitch, (3 DC, chain 2, 3 DC) into the next stitch, skip the next stitch, [SC into the next stitch, skip the next stitch, (3 DC, chain 2, 3 DC) into the next stitch, skip the next stitch] 5x. Join – I’ve done so to the same DC that the first SC is worked into to keep the shaping consistent with the rest of the petals, but you can experiment with joining here, to the first SC or even to the first DC. (6 Petals, 6 SC)
Fasten off, and weave in ends. If you’ve joined at the end to the same DC as the first stitch, you’ll sew the two layers together before weaving in your ends.
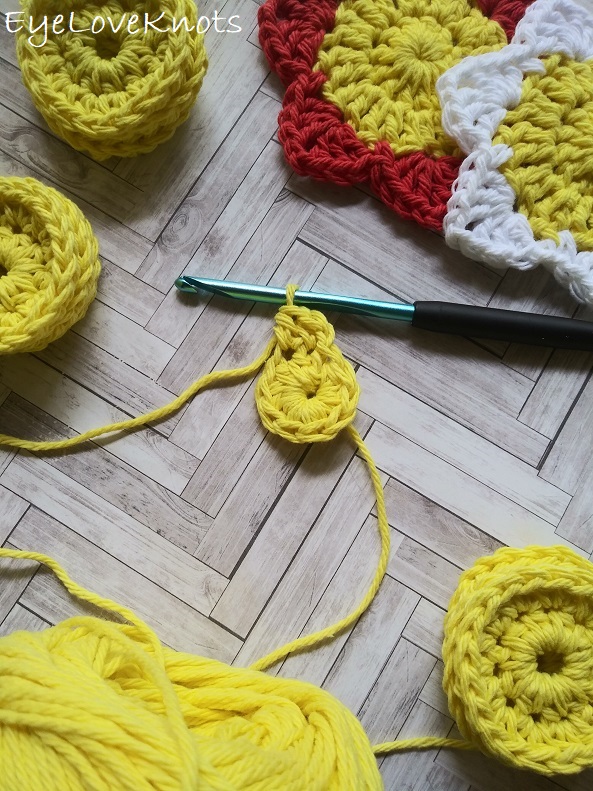
2nd – 4th Flowers:
R1 – 2: Same as 1st Flower.
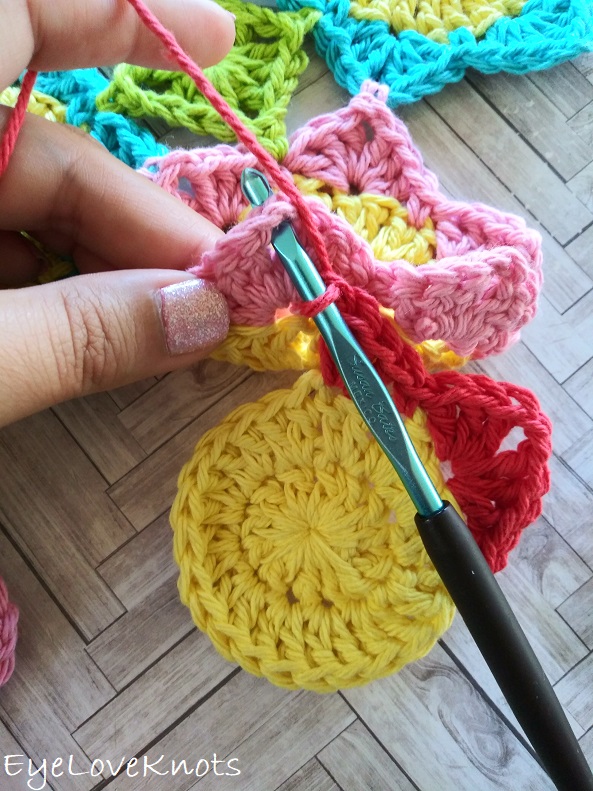
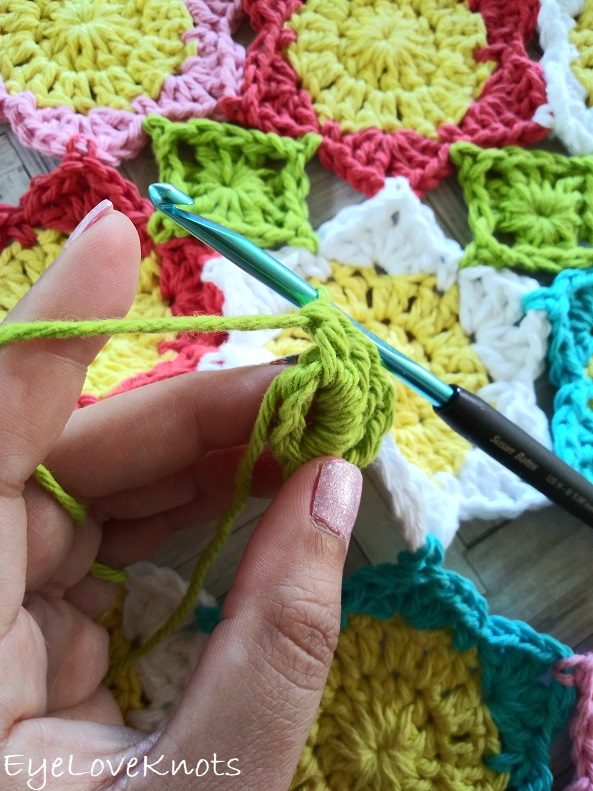
R3: Chain 1. SC into the 1st stitch, skip the next stitch, (3 DC, chain 2, 3 DC) into the next stitch, skip the next stitch, SC into the next stitch, skip the next stitch, (3 DC, chain 2, 3 DC) into the next stitch, skip the next stitch, SC into the next stitch, skip the next stitch, (3 DC into the next stitch, chain 1, from behind: SC into the corresponding chain space of the previous flower, in current flower: 3 DC into the same stitch, skip the next stitch, SC into the next stitch, skip the next stitch) 2x, (3 DC, chain 2, 3 DC) into the next stitch, skip the next stitch, SC into the next stitch, skip the next stitch, (3 DC, chain 2, 3 DC) into the next stitch, skip the next stitch. Join – I’ve done so to the same DC that the first SC is worked into to keep the shaping consistent with the rest of the petals, but you can experiment with joining here, to the first SC or even to the first DC. (6 Petals, 6 SC)
Fasten off, and weave in ends. If you’ve joined at the end to the same DC as the first stitch, you’ll sew the two layers together before weaving in your ends.
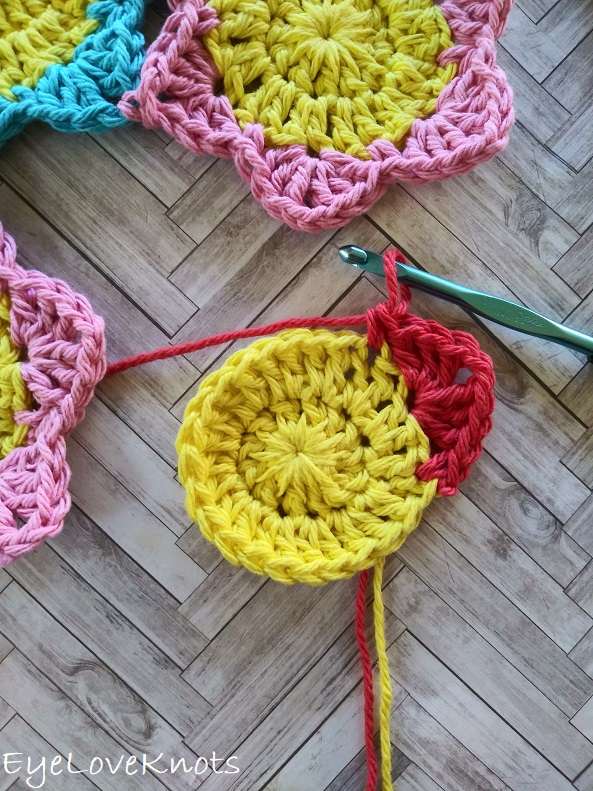
Next Row, 1st Flower:
R1 – 2: Same as 1st Flower.
R3: Chain 1. SC into the 1st stitch, skip the next stitch, (3 DC, chain 2, 3 DC) into the next stitch, skip the next stitch, (3 DC into the next stitch, chain 1, from behind: SC into the bottom center chain space of the previous row’s flower, in current flower: 3 DC into the same stitch, [skip the next stitch, SC into the next stitch, skip the next stitch, (3 DC, chain 2, 3 DC) into the next stitch] 4x. Join – I’ve done so to the same DC that the first SC is worked into to keep the shaping consistent with the rest of the petals, but you can experiment with joining here, to the first SC or even to the first DC. (6 Petals, 6 SC)
Fasten off, and weave in ends. If you’ve joined at the end to the same DC as the first stitch, you’ll sew the two layers together before weaving in your ends.
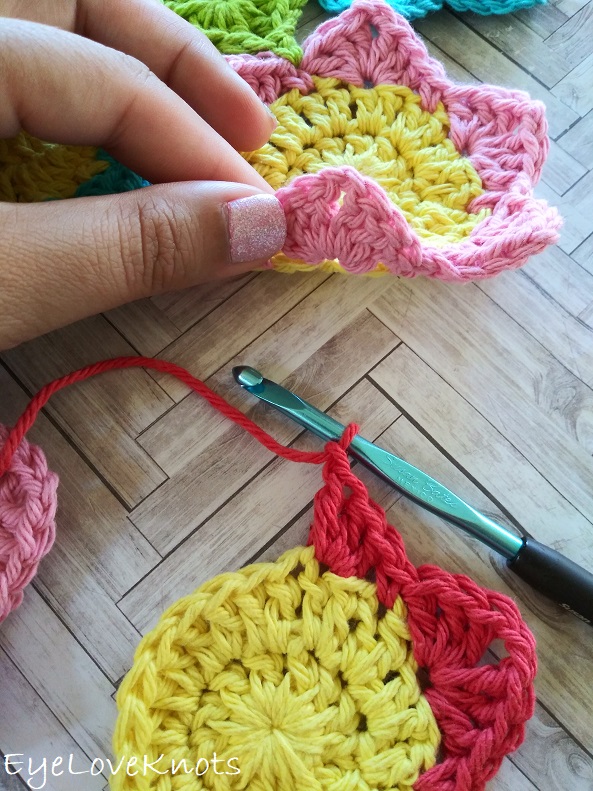
Next Row, 2nd – 4th Flowers:
R1 – 2: Same as 1st Flower.
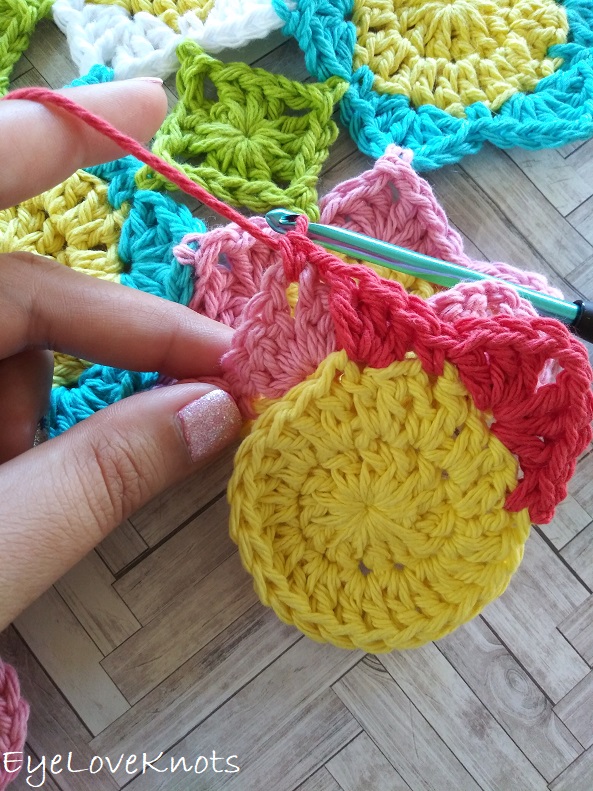
R3: Chain 1. SC into the 1st stitch, skip the next stitch, (3 DC, chain 2, 3 DC) into the next stitch, skip the next stitch, SC into the next stitch, skip the next stitch, 3 DC into the next stitch, chain 1, from behind: SC into the bottom center chain space of the previous row’s flower, in current flower: 3 DC into the same stitch, (skip the next stitch, SC into the next stitch, skip the next stitch, 3 DC into the next stitch, chain 1, from behind: SC into the corresponding chain space of the previous flower, in current flower: 3 DC into the same stitch) 2x, (skip the next stitch, SC into the next stitch, skip the next stitch, (3 DC, chain 2, 3 DC) into the next stitch, skip the next stitch. Join – I’ve done so to the same DC that the first SC is worked into to keep the shaping consistent with the rest of the petals, but you can experiment with joining here, to the first SC or even to the first DC. (6 Petals, 6 SC)
Fasten off, and weave in ends. If you’ve joined at the end to the same DC as the first stitch, you’ll sew the two layers together before weaving in your ends.
Photo Tutorial Showing 4th Flower:
Chain 1. SC into the 1st stitch, skip the next stitch, (3 DC, chain 2, 3 DC) into the next stitch, skip the next stitch, SC into the next stitch, skip the next stitch, 3 DC into the next stitch…
chain 1, from behind…
… insert hook into the bottom center chain space of the previous row’s flower…
… and complete SC.
… in current flower: 3 DC into the same stitch…
… (skip the next stitch, SC into the next stitch, skip the next stitch, 3 DC into the next stitch, chain 1…
…from behind: SC into the corresponding chain space of the previous flower, in current flower: 3 DC into the same stitch) 2x, (skip the next stitch, SC into the next stitch, skip the next stitch, (3 DC, chain 2, 3 DC) into the next stitch, skip the next stitch. Join – I’ve done so to the same DC that the first SC is worked into to keep the shaping consistent with the rest of the petals, but you can experiment with joining here, to the first SC or even to the first DC.
Fasten off, and weave in ends. If you’ve joined at the end to the same DC as the first stitch, you’ll sew the two layers together before weaving in your ends.
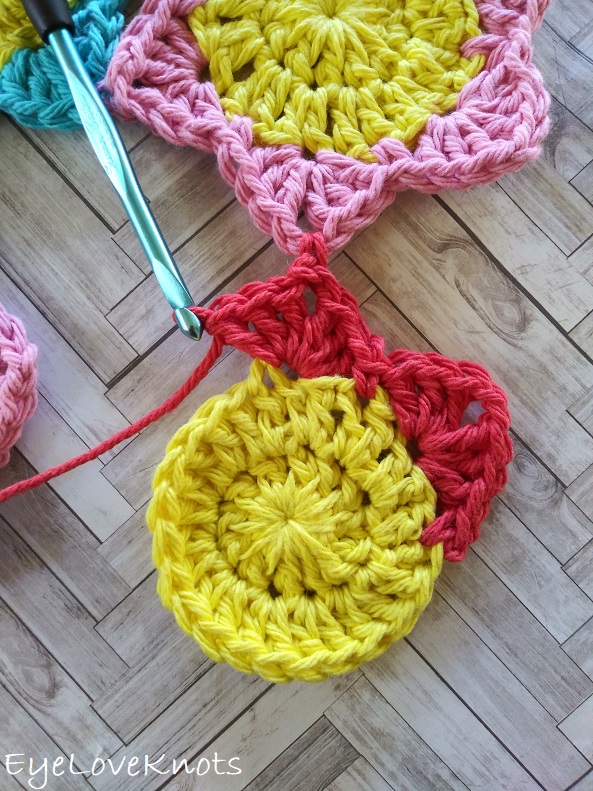
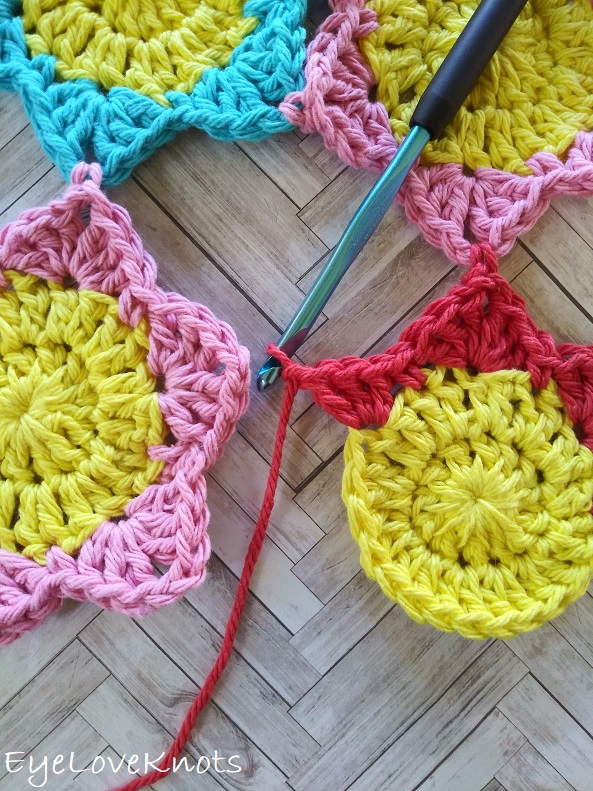
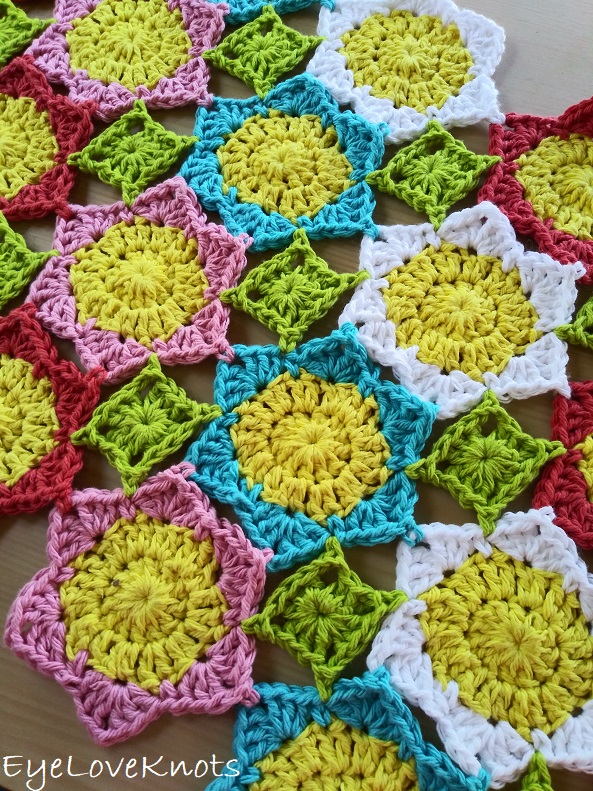
Full Leaves – Worked into the inside center 4 SC in between rows:
In Green, chain 5. Slip stitch join to the first chain to form a ring. Chain 2, 2 DC into the ring, (chain 1, from behind: SC into a SC that is in between petals, 3 DC into the ring) 3x, chain 1, from behind: SC into a SC that is in between petals. Join to the 1st DC, and fasten off.
Photo Tutorial of Leaves:
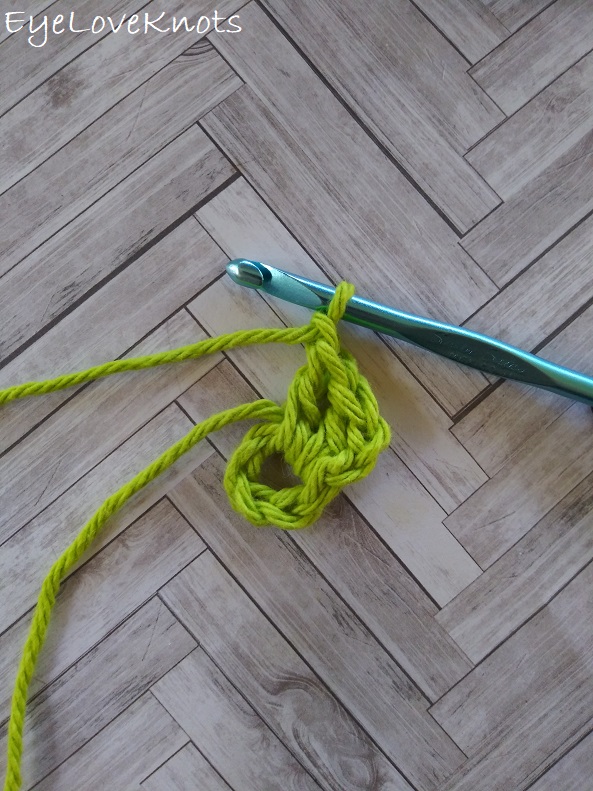
Chain 5. Slip stitch join to the first chain to form a ring. Chain 2, 2 DC into the ring…
… chain 1, from behind: insert hook into a SC that is in between petals…
… and complete the SC.
… 3 DC into the ring – making sure to always work over the beginning tail…
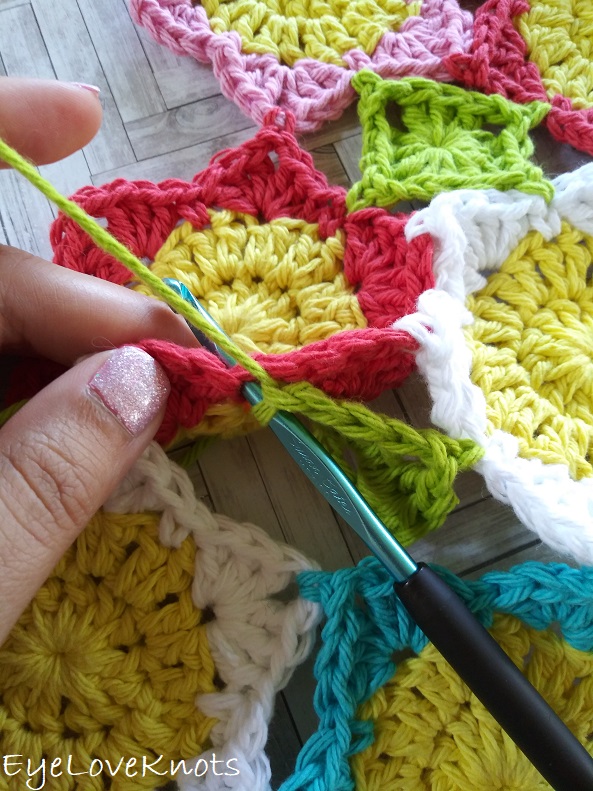
… chain 1, from behind: SC into the next SC that is in between petals…

… 3 DC into the ring…
… chain 1, from behind: SC into a SC that is in between petals, 3 DC into the ring, chain 1, from behind: SC into a SC that is in between petals. Join to the 1st DC, and fasten off.
Optional Half Leaves:
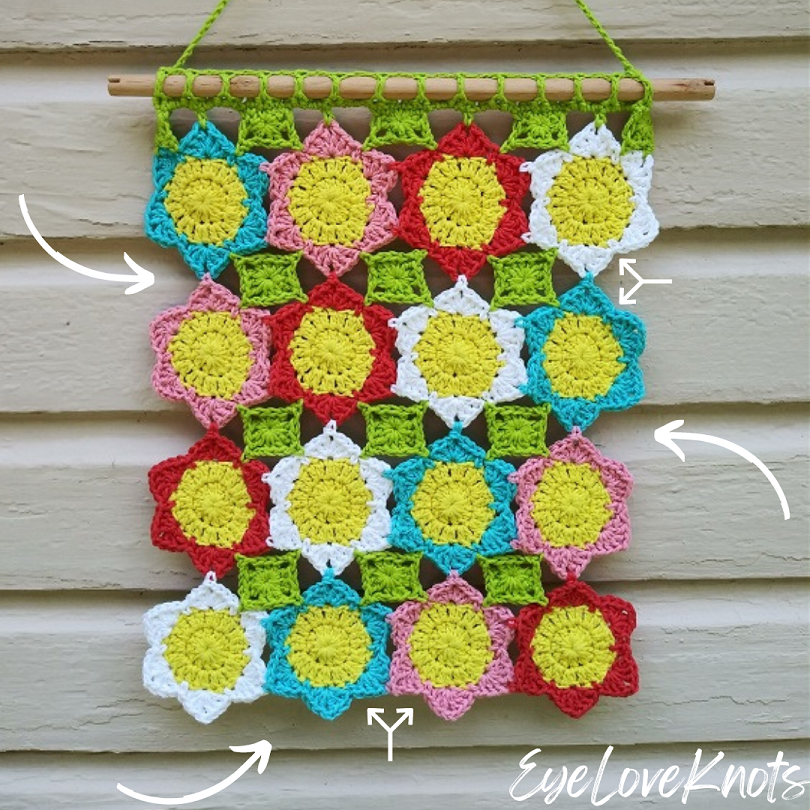
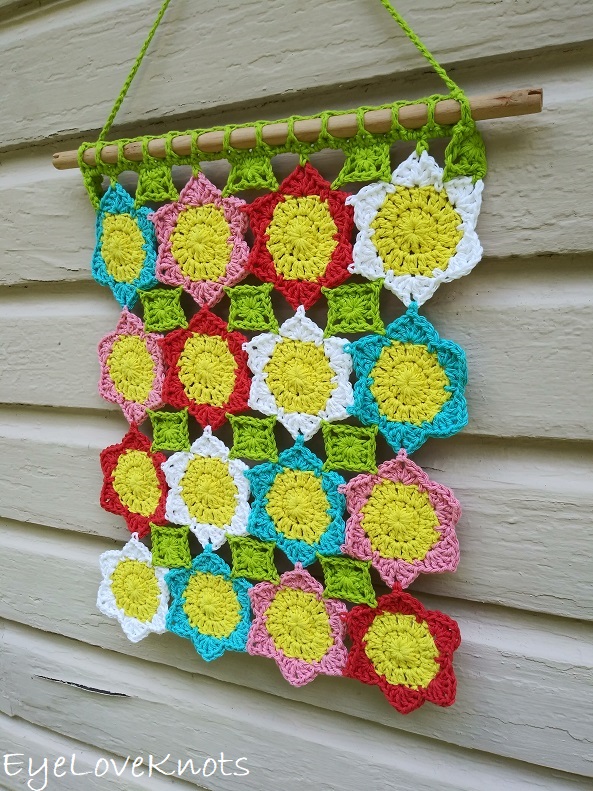
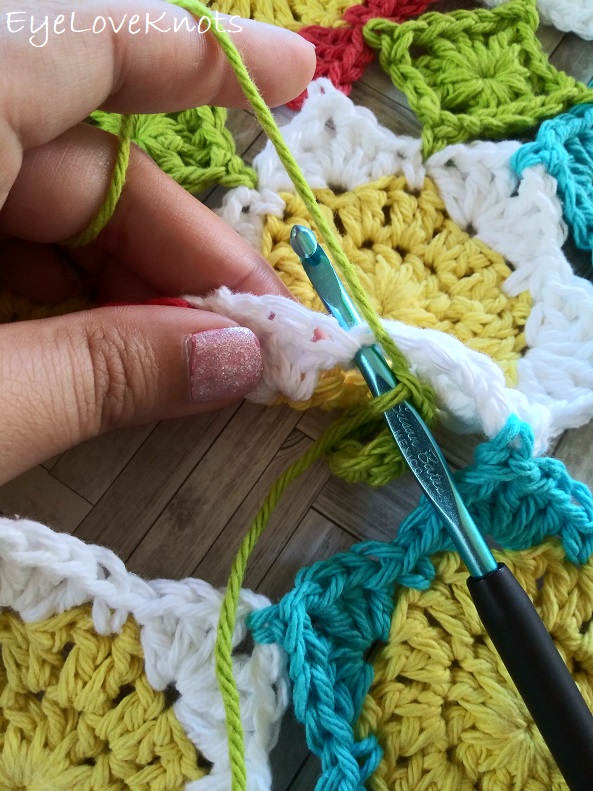
Half leaves are worked into the outside center 2 SC that are in between the rows on the sides, and in between flowers on the top and bottom. In the graphic above, you can see arrows indicating where half leaves get placed, including which two SC stitches, and you can see some half leaves worked along the top of the Delilah Wall Hanging. You will leave the corner most space on all four corners for the Border (currently shown at the top with a half leaf on each side). If you don’t want to add a Border, then skip the half leaves as they need the Border to connect everything together.
In Green, chain 5. Slip stitch join to the first chain to form a ring. Chain 2, 2 DC into the ring, chain 1, from behind: SC into a SC that is in between petals, 3 DC into the ring, chain 1, from behind: SC into a SC that is in between petals, 2 DC into the ring. Fasten off.
You can weave in your ends now, but I find it most helpful to do so after adding the Border so the fabric has more stability.
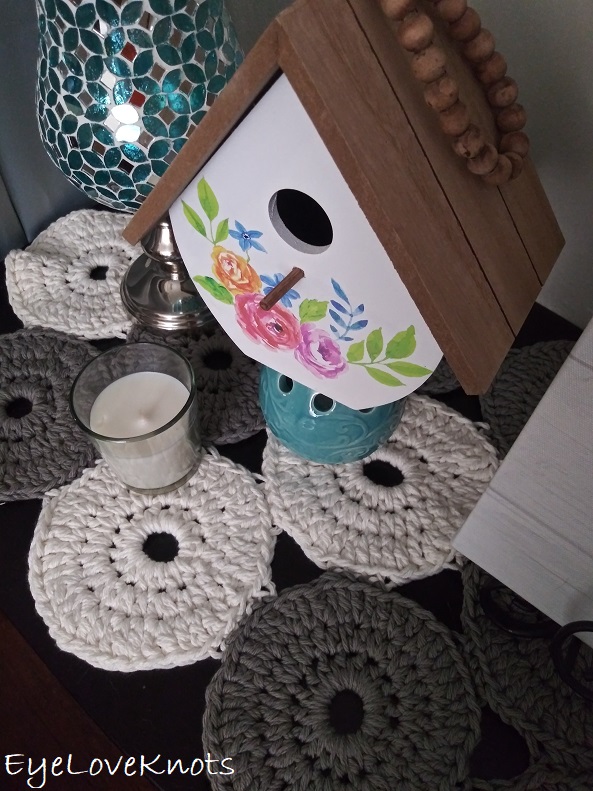
Border – Shown on the Delilah Mug Rug:

Join yarn on the flower on the right at the top center petal chain space. Chain 1. SC into this 1st stitch, [(chain 4, work 5 SC evenly along the side of the half petal with the third stitch into the center ring, chain 4, SC into the center of the next petal chain space) all the way across until you have reached the final flower of the row, (2 TR, chain 2, DTR, chain 2, 2 TR) into the next SC to form a corner, SC into the next petal chain space, chain 3, HDC into the next SC, chain 3, SC into the next petal chain space, (chain 2, work 5 SC evenly along the side of the half petal with the third stitch into the center ring, chain 2, SC into the next petal chain space, chain 3, HDC into the next SC, chain 3, SC into the next petal chain space) all the way across until you have reached the final flower, (2 TR, chain 2, DTR, chain 2, 2 TR) into the next SC to form a corner], SC into the next petal chain space, repeat [ … ] one time to get back to the beginning, then join to the 1st SC.
How do I add more rounds to the Border? Do I need to add more rounds to the Border?
You can either stop here, fasten off and weave in ends, or you can add additional rounds to the Border. Completely up to you! You can keep it simple with just a couple rounds of single crochet, finish by working into the back loop only or reverse single crochet, or use any stitch combination you like!
To add additional rounds to the Border, you’ll simply work one stitch into each stitch and per chain (that’s means if there is a chain 4 space, then you work 4 stitches into that chain 4 space) all the way around making sure to increase in the corner most stitch of the corners. If I were working in single crochet, I might increase into the DTR as (single crochet, chain 2, single crochet).
Why do my edges look uneven and wonky? How do I fix wonky edges?
It’s possibly your edges may look uneven and wonky. There are a couple different fixes:
- You can use your fingers to manipulate the fabric to give it shape.
- You can add additional rounds to the border.
- You can block the finished piece.
Fasten off, and Weave in all ends!
Please feel free to make and sell your own items made using this pattern, but keep in mind, this written pattern and my photos are protected by copyright. Please DO NOT claim this pattern as your own nor should you sell my pattern. DO NOT re-publish my photos as your own. DO NOT copy and paste my pattern anywhere, link to it instead so other’s can visit. Making videos providing instructions how to make my projects on any social media platform is also not permitted.
Join one of our awesome Facebook groups to share your creations, and see what others are up to!
– Yarn Crafts & Coffee Community
– DIY Home On Rockwood Lane
– Alexandra Lane Lifestyle
Linked Up To…
Craft Schooling Sunday – Creative Jewish Mom
Happiness is Homemade Link Party #324 – Design Morsels
Handmade Monday #177 – Sum of their Stories
Ginx Woolly Linx Party May – Ginx Craft
Craftastic Monday Link Up – Sew Can Do
The Really Crafty Link Party #219 – Keeping it Real
Linky Ladies Party #185 – The Purple Poncho
549th Inspire Me Tuesday – A Stroll Thru Life
Fabulous Party #321 – Lou Lou Girls
Your Whims Wednesday #461 – My Girlish Whims
{Wow Me} Wednesday #456 – Ginger Snap Crafts
To Grandma’s House We Go Link Party 194 – Chas’ Crazy Creations
All About Home #41 – Common Ground
Waste Not Wednesday 207 – Faeries and Fauna
Thursday Favorite Things #441 – An Artful Mom
Creatively Crafty Link Party #225 – Life Beyond the Kitchen
Creative Compulsions Linky Party #61 – My Bijou Life
Tuesday Turn About #50 – My Wee Abode
Scrappy Stitchers Link Party #63 – Stitches n Scraps
Hookin on Hump Day #215 – Moogly Blog
Traffic Jam Weekend Linky Party #235 – My Bijou Life
Pin Party #370 – The Pin Junkie
Home Matters Linky Party #284 – Modern on Monticello
Handmade & Otherwise Weekly Link Up 51 – Petals, Pies and Otherwise
Create, Bake, Grow & Gather Party #421 – Shabby Art Boutique
Link Your Stuff – Annemarie’s Haakblog
Snickerdoodle Create Bake Make Link Party 337 – EyeLoveKnots
Unlimited Monthly Link Party 13 – Grammy’s Grid
This turned out cute and I love how this space is decorated with it!! Have a beautiful Memorial Day weekend!
Carrie
curlycraftymom.com
Thanks, Carrie! I love it so much, I am so tempted to skip Summer, and keep it up. Hehe. But now, I will be all set for next Spring.
Beautiful! Pinning!
Michelle
https://mybijoulifeonline.com
Thanks, Michelle!
So pretty and colourful! I love it :).
So happy to hear! Thank you!
Gorgeous! I could see this as a large wall hanging, quilt style, right? thanks for sharing on craft schooling Sunday!
How did you know that I was working on a wall hanging version? Hehe! I’ll be sharing it at this week’s party 🙂
It’s stunning, I love all the projects you’ve done with these gorgeous flowers.
Thank you, Julie!! I have been having so much fun putting them together, and have so many more ideas.
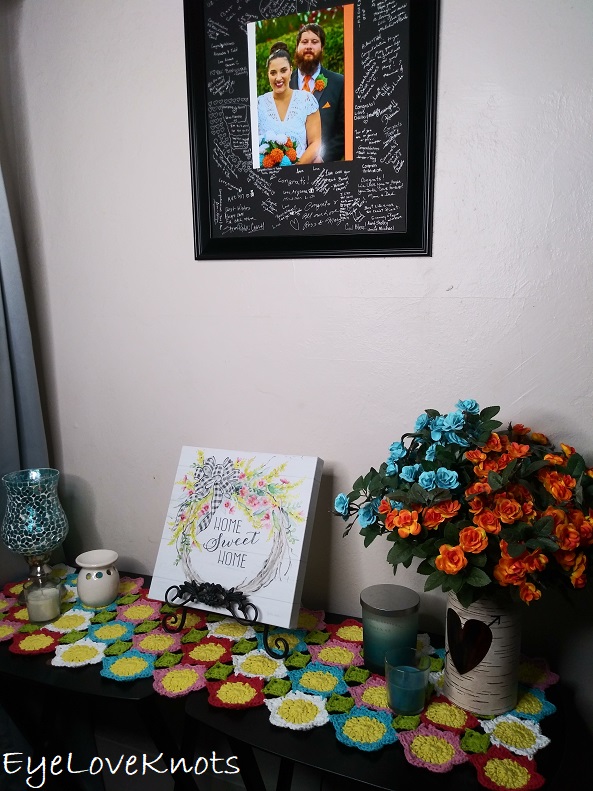
What a lovely idea. I really like the final picture with the runner in place.
Thanks, Ginny! It does bring the whole picture together when it’s shown in use. This is something I am trying better to do with my projects.
Beautiful and vibrant color scheme! The pattern looks great made into a runner.
Thanks so much, Allyson! I’m so happy with it.
I love how colorful this is. It would also look good as a blanket or throw. Thanks for sharing this week at #HomeMattersParty
I want to make it into a throw blanket! Looking for the perfect yarn. Thanks, Donna!
How lovely!
I don’t crochet with yarn myself, so I admire such pretty pieces even more.
https://catswire.com
Aww, thank you, Cat! In reverse, I envy your bead work – it’s incredible!